
Some people might be intimidated by the idea of pressure canning. It seems complicated and risky. But it’s not! It’s a straightforward process that is relatively safe if you follow the proper methods. If you’ve been curious about pressure canning or tried it before and had a bad experience, this Pressure Canning 101 comprehensive guide is for you.
I always follow the guidelines from the National Center for Home Food Preservation. They’ve extensively tested to determine when acidic foods must be processed to make them safe for storage. Mark and I took the classes to receive our Master Canner Preserver Certificates.
If you have a state extension service office in your city or county, the cost of training is minimal. As I remember, the classes took 12 weeks. It was so much fun. We met other canners, from beginners to experts, who needed to learn the updated techniques. Our food products have changed since grandma was canning, so most of us need to improve our skills.
Pressure Canning 101: The Most Comprehensive Guide
What is Pressure Canning?
Pressure canning is a method of food preservation that uses pressure to seal cans or jars. The pressure forces the air out of the container, which prevents bacteria from entering and spoiling the food.
Why Use Pressure Canning?
Pressure canning is the only safe way to preserve low-acid foods like vegetables, meats, and fish. Low-acid foods can cause botulism, a severe and potentially deadly foodborne illness. Pressure canning destroys the bacteria that cause botulism, so it’s the only safe way to preserve these foods.
Botulinum spores are tough to kill at boiling water temperatures. However, the higher canner temperatures can destroy them much more quickly.
When heated, acidic foods contain enough acid to prevent the growth of bacteria that cause botulism. However, low-acidic foods are not acidic enough to prevent the growth of these bacteria, so they need to be pressure-canned.
All low-acidic foods, such as vegetables, meats, and fish, should be sterilized at temperatures of 240℉ to 250℉, attainable with pressure canners operated at 10 to 15 PSIG.
At temperatures of 240℉ to 250℉, the time needed to destroy bacteria ranges from 20 minutes to 100 minutes, depending on the kind of food being canned.
Pressure Canning 101
Before you start with pressure canning, you must ensure you have everything you need. Here’s what you’ll need:
- Presto Pressure Canner or an All-American Pressure Canner
- Jar lifter, funnel, and rack
- Canning Jars (with lids and bands)
- Ladle
- Towels and pot holders
- Pots and bowls
- Spoons & Knives
- Food to can
- Other ingredients, depending on the recipe
- Ball Canning Guide
- USDA Canning Guide
Always use high-quality food for the best results. Follow the step-by-step directions below to pressure can your food like a pro!
Put Hot Water in the Pressure Canner
First, put 2 to 3 inches of water in the canner (some foods require more water; always follow the recipe directions).
Clean the Jars
Next, you’ll want to wash your jars to ensure they are clean. Once you’ve washed your jars, you’ll want to keep them warm until you’re ready to use them. There are three options for doing this:
- Please place them in a water canner. You can place the jars upside down in a water canner.
- Please leave them in the dishwasher. If you wash your jars in the dishwasher, you can leave them until you are ready to fill them. Keep the door closed, so keep the heat in.
- Use another pot. You can also place the jars upside down in another pot of water. Boil 2-3 inches of water, then turn the pot off.
Fill the Jars with Food
Depending on your recipe and what you are preserving, there are two methods to preserve food: pressure canning.
- Hot packing means your food is hot before you put it into the jar. Typically, you will simmer the food for a few minutes first. This method is a great way to remove excess air and is more suitable for meats and fruits.
- Raw packing means the food is not cooked before it is put in the jar. This method is more suitable for vegetables.
Whichever method you use, prepare and pack the food according to your Ball or USDA canning guide. Then, fill the jar, leaving the recommended headspace.
Remove the Air Bubbles
After the food is in the jar, remove any air bubbles. You can do this by running a non-metallic spatula around the inside of the jar. A small rubber spatula works well.
Clean the Rim
The rim needs to be cleaned for the lid to seal. Wipe the rim of the jar with a clean, damp tea towel or paper towel.
Add the Seals and Rings
Next, place the seals and rings on the jars. You don’t have to tighten the lids like a machine; finger-tight is fine.
Place Jars in the Pressure Canner
Set the jars upright on the rack in the pressure canner using a jar lifter. The rack keeps the jars off the bottom of the pot and prevents them from hitting each other while boiling.
Put The Lid On & Heat
Securely fasten the canner lid. Then, with the weight off the vent port. Heat the pressure canner at the highest setting until steam flows freely from the vent port. Let the steam flow continuously for 10 minutes.
Close the Vent
Next, place the weight on the vent to close it. The pressure canner will begin to pressurize, taking about 3 to 5 minutes.
Start the Timing Process
Start the recipe’s timer once the pressure reading dial reaches the recommended pressure (240℉ to 250℉).
Regulate the Heat
Keep an eye on the pressure canner, ensuring it maintains a steady pressure at or slightly above the correct gauge pressure. You must follow the canner manufacturer’s directions for how a weighted gauge should indicate that it maintains the desired pressure.
Important: If the pressure exceeds the recommended amount, return the canner to pressure and begin the timing again!
Turn off the Heat
When the timed process is complete, turn off the heat and let the canner depressurize. DO NOT force-cool the canner. Forced cooling can result in unsafe food. Depressurizing the canner will take about 30-45 minutes.
Remove the Weight
Once the canner has depressurized, remove the weight from the vent port. Wait about 10 minutes before unfastening the lid and removing it. Be sure to remove the lid away from you so the steam doesn’t burn your face.
Remove the Jars
Using your jar lifter, remove the jars from the canner and place them on a towel to cool. Leave a 1-inch space between each jar while they cool. The jars should sit at room temperature, undisturbed, for 24 hours.
Test the Jar Seals
After cooling the jars for 12-24 hours, test the seals. Remove the screw bands and test using one of these three methods:
- Press the middle of the lid: Use your finger or thumb to push the middle. If the lid springs up when you release your finger, the lid is NOT sealed.
- Tap the lid: Using the bottom of a teaspoon, tap the lid. If it makes a dull sound, the lid is not sealed. But if it is sealed correctly, it will make a ringing, high-pitched sound.
- Look across the lid: Hold the jar at eye level and look across the lid. The lid needs to be concave or curved down slightly in the middle.
Some Things to Keep in Mind:
Altitude Does Make a Difference
Most people who cook a lot realize that the altitude of the location where they do that cooking can affect cooking times. Recipes often call for the food product to be boiled. The time it takes for the water to boil varies considerably based on your altitude; the higher the altitude, the longer it takes to reach a boiling point.
The same logic applies to the canning process. The time it takes to bring the water in the canner to a boil must be considered when calculating processing times.
There isn’t room in this post to illustrate all the variations of altitudes and time to boil, but your Extension Service agent should be able to provide some tables or charts to help you out. Your canning books will have charts as well.
Acidity Levels Have to be Considered
As mentioned above, foods have a wide range of acid content. Many fruits naturally grow with a high level of acid in their makeup. As such, they can be canned in a hot water bath canner since the acids kill the botulism bacterium when brought to a boil. Remember that the processing time in a water bath canner will be longer since the temperatures have to be maintained for an extended period to achieve the desired results.
Low-acid foods require higher temperatures (240°F—250°F) for the bacterium to be killed, and that’s why a pressure canner is needed. It is the only way to reach and maintain the necessary temperatures for an extended period. Yes, a pressure canner is required to can most vegetables and meats since they have a low acidity. Due to the pressure achieved in these special canners, the temperatures are higher, so the processing time to kill the bacteria is shorter.
PH is the Rating Factor for Acidity
Many of us are used to testing the “PH Factor” of the water in our swimming pools as part of regular maintenance. We are testing to determine the level of acidity or alkalinity in the water. Once that’s determined, we have our marching orders of what chemicals must be added to make the water match our comfort levels.
The same issues apply to foods to be canned. If a food’s pH level is 4.6 or lower, it is considered a high-acid food. If it is above 4.6, it is considered low-acid and requires acid added, such as lemon juice, citric acid, or vinegar, to make it safe for processing. Again, low-acid foods should be pressure canned.
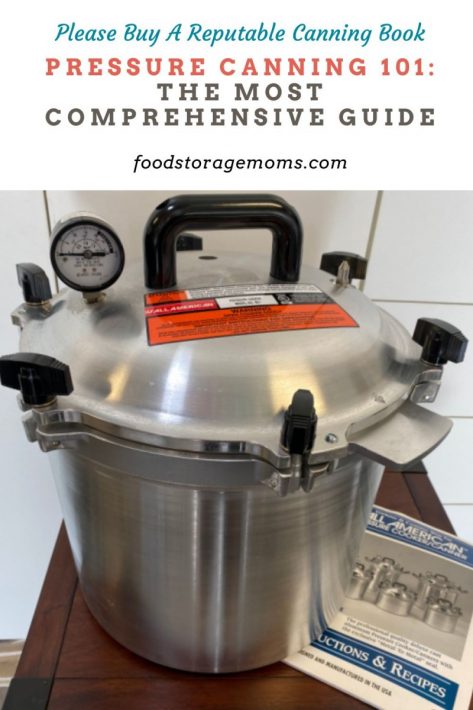
Pressure Canners Aren’t Created Equal
My posts explain my philosophy of always buying right the first time. Getting good-quality products that will perform as advertised and last a long time makes sense to me. Today, we are talking about Pressure Canners.
Yes, they may cost more, but in the long run, I think it’s worth the time and effort to budget so I can get the right one the first time. I bought and used the All-American model 921 heavy-cast aluminum pressure canner. I’ve had other models in the past, and they worked great and processed the food just the way I expected.
The Gauge Accuracy is Critical
The pressure gauge must accurately reflect the internal pressure for the pressure canner process to work as designed. Most gauges will show the PSIG (pressure per square inch gauge) up to 20 psi. Again, altitude affects the pressure needed to process the food since it reflects the internal temperature. The higher the pressure, the higher the temperature.
Gauges can get out of adjustment over time. It is suggested you have them tested at least once a year.
Final Word
I hope this guide has been helpful and that you feel confident about canning your food! Check out my Home Canning- Important Dos and Don’ts post to learn more. Always follow the guidelines directed by the National Center for Home Food Preservation. They have done extensive testing to determine the proper times for canning foods. If you have any questions, please leave a comment below. Happy canning! May God bless this world, Linda
The post Pressure Canning 101: The Most Comprehensive Guide appeared first on Food Storage Moms.
from Food Storage Moms
No comments:
Post a Comment