Most people think a deep freezer is the key to long-term food storage, but what happens when the power goes out? There’s a reason pioneers and survivalists alike have turned to freeze-drying. It locks in flavor, nutrients, and freshness for over a decade without needing constant electricity. And you don’t even need a $3,000 machine […]
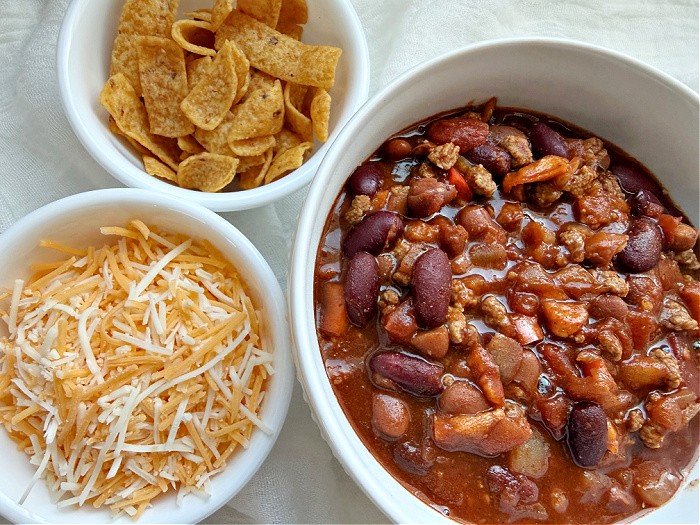
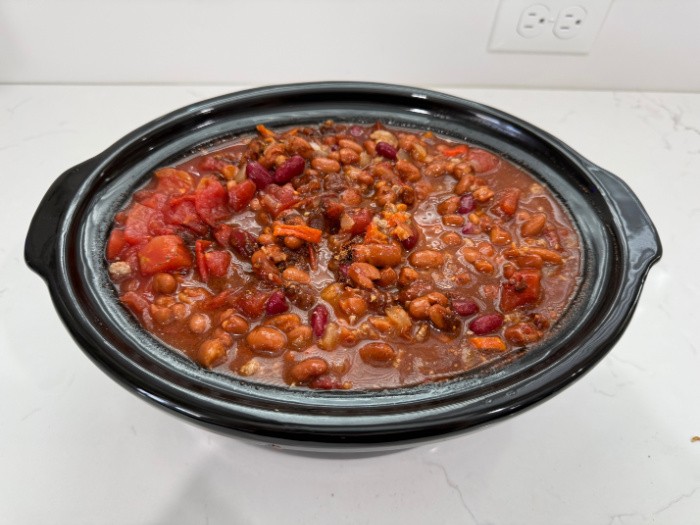
There’s something timeless and comforting about slow-cooker chili with beans simmering away. It’s the kind of meal that brings people together; perfect for family dinners, game days, potlucks, or chilly evenings when you want something hearty and satisfying. This all-time favorite chili is known for its rich aroma, bold flavor, and cozy, home-cooked appeal that never goes out of style.
Please note that I will show you how to use your freeze-dried meats, vegetables, and fruits in several of my recipes. Mark and I have decided we must use our freeze-dried food to save money on groceries. Additionally, at our age, we aren’t passing it down to our kids, who likely won’t want it. In other words, what are we saving all this food for? At this stage of our lives, we need to use it now.
I’d like to share a chili story with you that I learned many years ago from Harry, who is a member of our forum and whom we all love. In Texas, chili does not have BEANS. Well, on Christmas Eve, Mark and I were invited to a friend’s house, where family from Texas was coming to stay.
After a few appetizers, I had to ask this sweet Texas guy, who is my friend’s brother, how he makes his chili. I said, “Does your chili have beans?” I laughed. He told me that Texas chili has zero beans. If beans are added, it’s called soup. Not chili. He said he shreds meat and adds a variety of chilies and some spices; no beans and certainly no tomatoes. I got the giggles so bad because that is how I met Harry the first time through my blog while discussing what constitutes chilli.
Chili with beans has long been a staple in American kitchens because it’s filling, flavorful, and endlessly adaptable. Beans add heartiness and texture, soaking up all those warm spices while stretching the dish to feed a crowd. Combined with a savory base and slow-simmered seasonings, chili becomes one of those meals that tastes even better the next day.
Flavor Profile You’ll Love
This beloved chili strikes the perfect balance between savory, smoky, and mildly spicy. Each spoonful delivers depth and warmth without overpowering the palate. The flavors develop as the chili simmers, creating a rich, comforting dish that’s bold but familiar—just the way classic chili should be.
Perfect for Any Occasion
One of the best things about chili with beans is how versatile it is:
Ideal for weeknight dinners
A crowd-pleasing option for tailgates and game days
Easy to make ahead for parties and potlucks
A comforting choice during the fall and winter months
It’s also easy to customize for different tastes, whether you like it mild, smoky, or with a little extra heat.
Serving Ideas
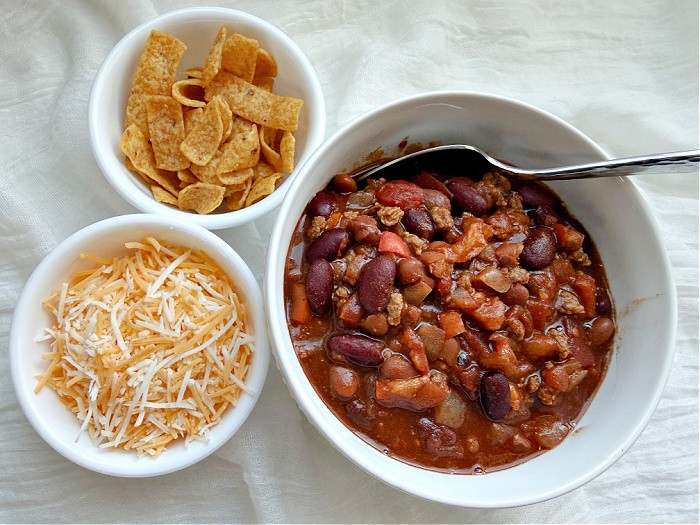
Slow Cooker Chili With Beans is hearty and satisfying on its own, but pairing it with the right sides makes it an even better meal. Here are some delicious serving ideas that work for family dinners, gatherings, or game day:
Classic Sides
Cornbread or Corn Muffins: A timeless pairing that soaks up every bit of chili.
Crackers or Saltines: Simple, crunchy, and perfect for dipping.
Dinner Rolls or Buttery Biscuits: Soft breads balance the bold chili flavors.
Toppings to Set Out
Shredded Cheddar or Colby-Jack Cheese
Sour Cream or Greek Yogurt
Chopped Green Onions or Red Onions
Sliced Jalapeños or Hot Sauce
Fresh Cilantro or Parsley
Fresh & Light Pairings
Green Salad with a light vinaigrette to balance the richness
Coleslaw for crunch and a touch of sweetness
Fruit Salad for a refreshing contrast
Fun & Filling Add-Ons
Tortilla Chips or Corn Chips
Baked Potatoes topped with chili and cheese
Hot Dogs or Chili Dogs
French Fries or Tater Tots topped with chili
For Entertaining or Game Day
Nachos with chili, cheese, and toppings
Quesadillas or Grilled Cheese Sandwiches
Slider Buns for mini chili sandwiches
A Comfort Food That Never Fails
There’s a reason this dish is called a classic chili. It’s reliable, comforting, and always welcome at the table. Whether you’re feeding a hungry family or serving guests, chili with beans delivers big flavor with minimal fuss—making it a go-to recipe again and again.
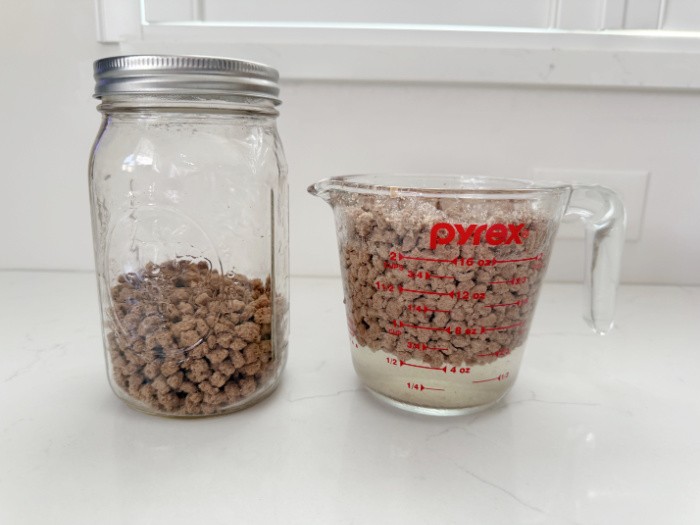
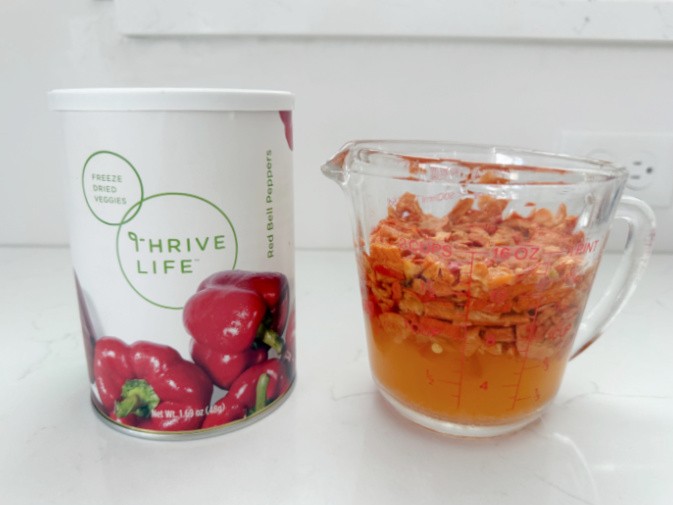
Step Two: Fry the Meat or Rehydrate Freeze-Dried Meat and Bell Peppers
Red Bell Peppers Rehydrating
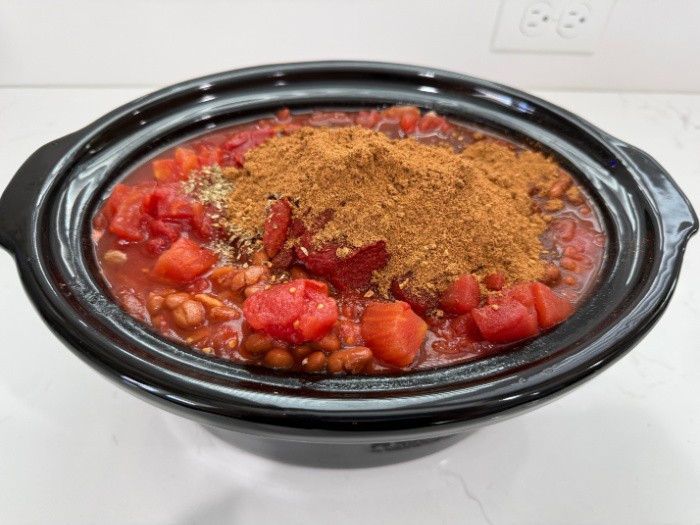
Step Three: Combine All Ingredients
Add Tomato Paste
Step Four: Turn on the Slow Cooker
I used a 3-1/2 quart slow cooker, and yes, it did boil over a bit. I kept checking it because I had given away my larger slow cooker. Luckily, Mark and I were able to clean up the overflowing liquids. Just giving you a heads up, this slow cooker was a bit too small. Live and learn, but life is still good!
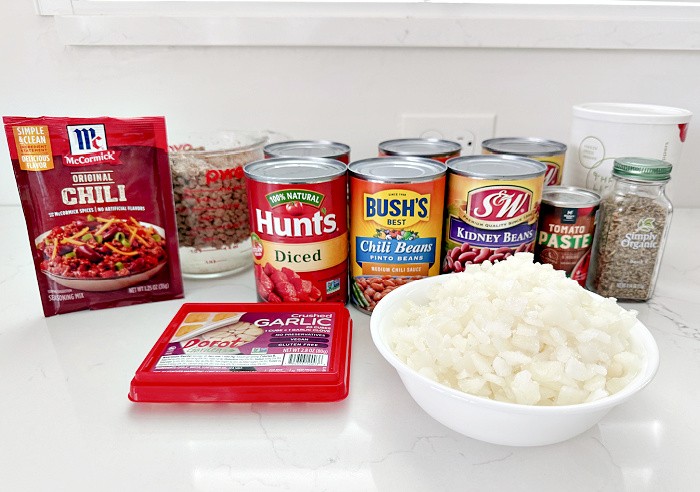
2poundsGround beef or freeze-dried reyhydrate as directed on can.
2Onions finely chopped
2Red or green bell peppers (chop into bit size pieces). Or freeze-dried peppers rehydrated as directed on can.
2Cloves of garlic (chopped)
2-15.5ounceCans of kidney beans, undrained
2-16ounceCans of chili beans (undrained)
2-14.5ounceCans of diced tomatoes
1teaspoonSweet basil
1-8ounceCan tomato paste
2-1.25 oz.Packages of chili seasoning or your favorite chili spices
Instructions
Grab a frying pan and brown the hamburger, drain the fat and add the onions, bell peppers, and garlic. Cook until tender.
OR: Rehydrate your freeze-dried ground beef or peppers as directed on the cans. Drain excess water.
Add all the ingredients into your slow cooker and set it on low for 6 hours or until heated through.
Ingredient Breakdown: What Makes This Chili a Classic
The heart of a classic chili with beans lies in its simple, well-balanced ingredients. Each one plays an essential role in building rich flavor, satisfying texture, and that slow-simmered taste everyone loves.
Ground Beef
Ground beef forms the savory foundation of this chili. It brings richness and depth, creating a hearty base that makes each bowl filling and comforting. As it cooks, it absorbs the flavors of the spices and tomatoes, ensuring every bite is packed with classic chili goodness.
Onions
Onions add natural sweetness and aroma, helping to balance the chili’s bold spices. When cooked, they soften and blend seamlessly into the sauce, creating a flavorful backbone that enhances the dish’s overall depth.
Bell Peppers
Bell peppers contribute a subtle sweetness and gentle crunch that brightens the chili. Their mild flavor complements the beef and beans without overpowering the dish, adding color and texture to every spoonful.
Garlic
Garlic delivers a warm, savory note that enhances the chili’s complexity. It deepens the flavor profile and ties together the beef, vegetables, and spices, making the chili taste slow-cooked and robust.
Could you skip the Beans?
Kidney Beans
Kidney beans are a classic chili staple. Their firm texture holds up well during simmering, while their mild, earthy flavor absorbs the surrounding spices and tomato base. They add heartiness and make the chili more satisfying.
Chili Beans
Chili beans bring an extra layer of flavor, often already seasoned to complement chili dishes. They enhance the richness of the sauce and reinforce the bold, traditional chili taste that many people love.
Diced Tomatoes
Diced tomatoes provide brightness and balance. Their slight acidity cuts through the richness of the beef and beans, keeping the chili from feeling heavy while contributing a chunky, comforting texture.
Tomato Paste
Tomato paste adds concentrated tomato flavor and thickens the chili. It deepens the color and creates a more decadent and robust sauce that clings perfectly to the beef and beans.
Sweet Basil
Sweet basil adds a subtle herbal note that softens the bold chili spices. It brings a gentle freshness that rounds out the flavor and gives this chili a unique, well-balanced finish.
Chili Seasoning
Chili seasoning is what brings everything together. This blend of spices adds warmth, depth, and that unmistakable chili flavor. It allows the dish to be bold without being overwhelming, making it appealing to a wide range of tastes.
How to Store Chili in the Refrigerator
Let the chili cool slightly before storing (don’t leave it out more than 2 hours).
Transfer it to an airtight container.
Store in the refrigerator for 3–4 days.
Reheat gently on the stovetop, in the microwave, or back in the slow cooker until heated through.
How to Freeze Slow Cooker Chili With Beans
Chili freezes beautifully, making it perfect for meal prep.
Allow the chili to cool completely.
Portion it into freezer-safe containers or heavy-duty freezer bags.
If using bags, lay them flat to save freezer space.
Leave about 1/2 inch of headspace to allow for expansion.
Label with the content name and date.
Freeze for up to 3 months for best quality (it’s often safe longer, but flavor is best within this time).
Thawing Frozen Chili
Overnight in the refrigerator is the safest method.
For faster thawing, place the sealed container in cold water.
You can also reheat directly from frozen on the stovetop or in a slow cooker; stir occasionally.
Reheating Tips
Reheat until the chili reaches a safe internal temperature and is steaming hot.
Add a splash of water or broth if it has thickened too much.
Stir occasionally to keep the texture smooth and even.
Final Word
Slow cooker chili with beans is incredibly versatile. Whether you keep it simple with cornbread or turn it into a fun chili bar with toppings, these sides help create a comforting, crowd-pleasing meal every time.
Together, these ingredients create a chili that’s hearty, flavorful, and timeless. Warm, hearty, and full of classic flavor, this dish is proof that simple comfort food never goes out of style. When you need something cozy, filling, and universally loved, a bowl of chili with beans is always the right choice. May God bless this world, Linda
There’s something incredibly comforting about a classic breakfast casserole; the kind that brings everyone to the kitchen before the coffee is even finished brewing. Classic Breakfast Casserole by Stacie is one of those dishes that feels familiar, cozy, and perfect for sharing, whether it’s a holiday morning, a weekend brunch, or a simple family breakfast.
This type of casserole has stood the test of time because it checks every box: hearty, satisfying, easy to prepare ahead of time, and loved by both kids and adults. It’s the kind of breakfast that feels special without being fussy.
Classic Breakfast Casserole by Stacie: A Timeless Morning Favorite
My daughter, Stacie, has made this recipe for years for her family. They cook it in a Dutch oven placed in their conventional oven. Now that her family has grown, she makes two Dutch ovens. Her daughter and her husband blessed us with our first great-granddaughter.
Why Classic Breakfast Casseroles Never Go Out of Style
Breakfast casseroles became popular because they were practical and filling, especially for busy households and large gatherings, and combining beloved breakfast staples into one baked dish made mornings easier while still delivering big flavor.
What makes a classic breakfast casserole so appealing is its balance:
Hearty and filling without being heavy
Comforting flavors everyone recognizes
Flexible and forgiving, perfect for customization
Make-ahead friendly, ideal for stress-free mornings
Stacie’s version captures everything people love about traditional breakfast casseroles while keeping things simple and dependable.
Perfect for Any Occasion
A dish like this isn’t just for breakfast; it’s a go-to solution for many occasions:
Holiday mornings like Christmas or Easter
Weekend brunch with family and friends
Potlucks, baby showers, or church gatherings
Meal prep for busy weekday mornings
Because it reheats beautifully, it’s also great for leftovers, making it just as practical as it is delicious.
A Crowd-Pleasing Comfort Dish
Classic breakfast casseroles are known for their rich aroma as they bake, filling the house with that unmistakable “breakfast is ready” feeling. They’re warm, satisfying, and inviting, exactly what you want first thing in the morning.
This type of dish encourages people to slow down, sit together, and enjoy a shared meal. That’s part of why it’s remained a favorite across generations.
Why You’ll Love a Classic Breakfast Casserole by Stacie
Uses familiar, everyday breakfast flavors
Easy to prepare and serve
Feeds a crowd without extra effort
Perfect balance of savory and comforting
A reliable, no-fail breakfast option
It’s not trendy or complicated, and that’s precisely the point. Sometimes the best recipes are the ones that feel like home.
Instructions
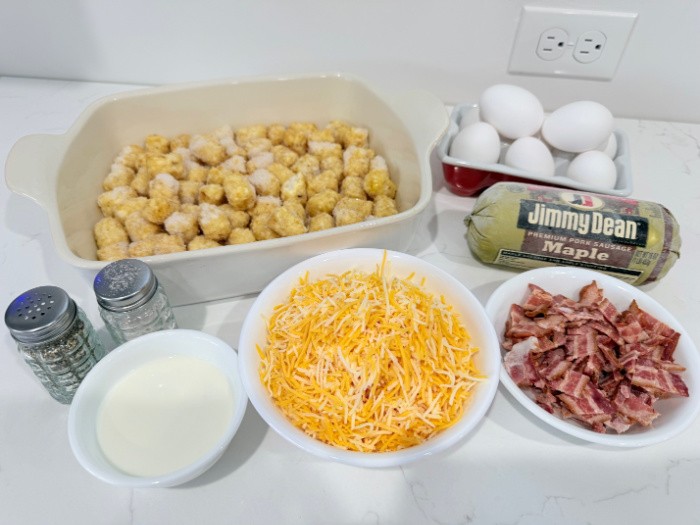
Step One: Gather The Ingredients
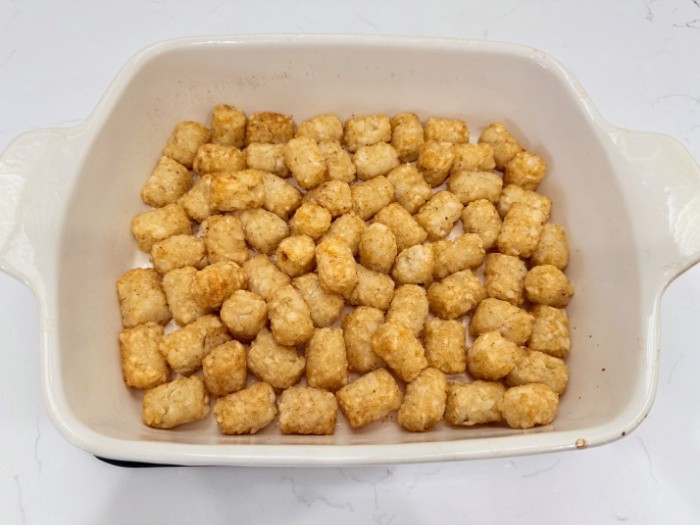
I found these Tator Tots in the freezer. Yes, they have freezer burn, but I used them anyway. I love gathering all the ingredients before I get started.
Step Two: Preheat Oven/Grease Pan
Preheat your oven to 425°F (218°C). Grease a 9-by-13-inch pan, then place the hash browns or Tator Tots into the pan. Sprinkle one tablespoon of oil over the hash browns or Tator Tots. Bake for 25 minutes.
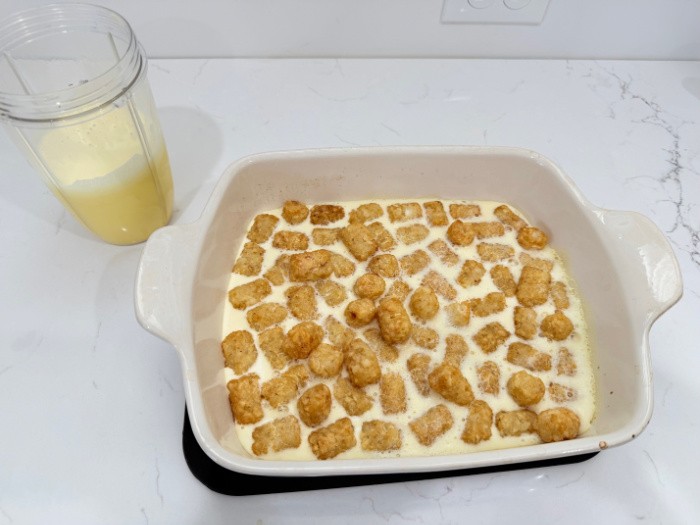
Step Three: Remove From Oven – Mix the Eggs, Milk, and Spices
Beat the eggs with the milk. Add salt and pepper. Remove from the oven, and pour half of the egg mixture over the hash browns.
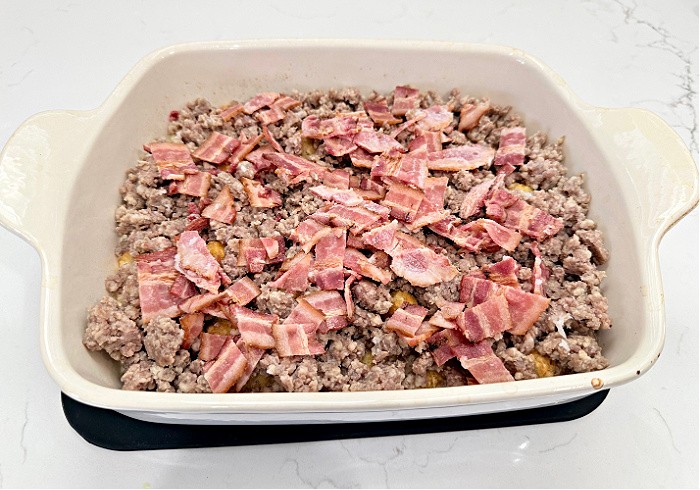
Step Four: Layer Meat of Choice
Put the meat of your choice on top of this layer. I used both cooked sausage and cooked bacon on mine.
I cooked the sausage ahead of time.
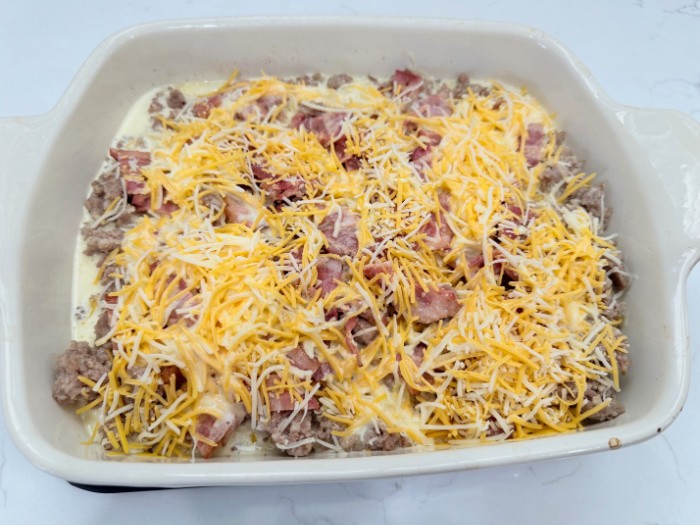
Step Five: Sprinkle Half of the Cheese
Sprinkle half of the cheese on top of the meat layer. Pour the remaining egg mixture over the meat layer.
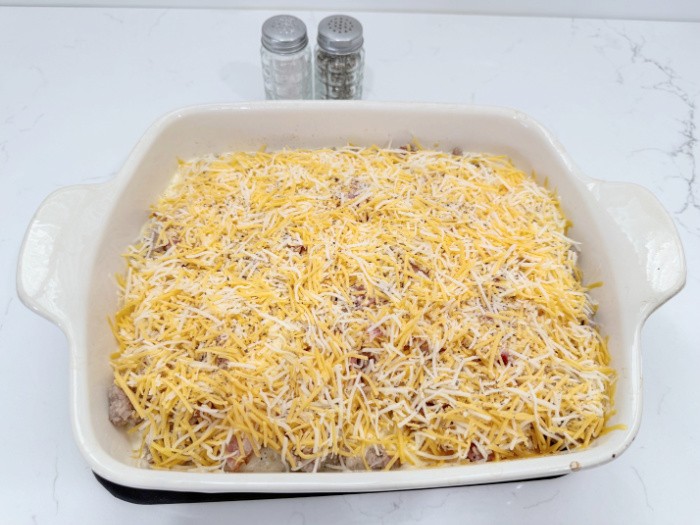
Step Six: Sprinkle the rest of the cheese on top
Sprinkle the remaining cheese on top of the final layer. Lower the oven temperature to 350°F (176°C). Bake for 40-50 minutes uncovered, or until the eggs set.
4cupsHash browns (1-inch deep in your pan), I used Tator Tots.
1Package sausage (cooked, drained and crumbled or 1-1/2 cups cooked ham or 1-1/2 cups cooked bacon, crumbled)
8-10Eggs (beat until smooth)
1/2cupMilk
2cupsgrated cheese (set aside 1 cup for one of the layers)
Salt and pepper
Instructions
Preheat your oven to (425°F (218°C).
Grease a 9-by-13-inch pan, then place the hash browns or Tator Tots into the pan.
Sprinkle one tablespoon of oil over the hash browns or Tator Tots.
Bake at 425°F (218°C) for 25 minutes.
Beat the eggs with the milk. Add salt and pepper.
Remove from oven, and pour 1/2 of the egg mixture over the hash browns.
Put the meat of your choice on top of this layer. I used both cooked sausage and cooked bacon on mine.
Sprinkle half of the cheese on top of the meat layer.
Pour the remaining egg mixture on top of the meat layer.
Sprinkle remaining cheese on top of the final layer.
Lower the oven temperature to 350°F (176°C)
Bake at 350°F = 176°C for 40-50 minutes uncovered, or until the eggs set.
Ingredient Spotlight: What Makes This Breakfast Casserole a Classic
The beauty of a classic breakfast casserole lies in its simple, familiar ingredients. Each one plays a vital role in creating the comforting texture, savory flavor, and hearty appeal that make this dish a longtime favorite.
Hashbrowns
Hashbrowns form the foundation of this casserole, giving it structure and heartiness. Their mild potato flavor absorbs surrounding seasonings and savory drippings as the casserole bakes, creating tender bites on the inside with lightly crisp edges. Hashbrowns also make the dish especially filling, turning classic breakfast flavors into a satisfying, all-in-one meal.
Sausage
Breakfast sausage brings bold, savory depth to the casserole. Seasoned with spices like sage, pepper, and fennel, sausage adds richness and warmth that balances the mildness of the potatoes and eggs. As it bakes, its flavors infuse the entire dish, making every bite hearty and comforting.
Bacon
Bacon adds a smoky, salty contrast that instantly elevates the casserole. Its crisp texture pairs beautifully with the softness of the eggs and hashbrowns, while its unmistakable flavor enhances the overall richness. Bacon brings that classic breakfast aroma that makes this dish so inviting the moment it comes out of the oven.
Eggs
Eggs are the binding element that brings everything together. They create a soft, custard-like texture that holds the ingredients in place while keeping the casserole light and fluffy. Eggs also add natural richness and protein, making this dish both satisfying and nourishing.
Milk
Milk helps create a smooth, creamy egg mixture that bakes evenly throughout the casserole. It softens the texture of the eggs and prevents the dish from becoming dense, resulting in a tender, comforting consistency that melts in your mouth.
Grated Cheese
Grated cheese adds creaminess, flavor, and that irresistible golden top. As it melts, it ties all the ingredients together, adding richness and a slight stretch that makes each serving extra comforting. The cheese also contributes a savory depth that enhances the eggs, meats, and potatoes.
Salt
Salt is essential for bringing out the natural flavors of every ingredient. It enhances the richness of the eggs, sharpens the cheese, and balances the savory meats, ensuring the casserole tastes well-seasoned and complete.
Pepper
Pepper adds a gentle warmth and subtle bite that keeps the casserole from tasting flat. It complements the richness of the eggs and cheese while enhancing the savory notes of the sausage and bacon without overpowering them.
What to Serve With a Classic Breakfast Casserole
A hearty breakfast casserole is satisfying on its own, but pairing it with the right sides can turn it into a complete and memorable meal. Whether you’re hosting brunch, serving holiday breakfast, or planning a relaxed weekend spread, these accompaniments balance the richness of the casserole and add variety to the table.
Fresh Fruit Options
Fresh fruit is the perfect contrast to a savory breakfast casserole. Bright, juicy flavors help lighten the meal and add natural sweetness.
Fresh fruit salad
Sliced melon or berries
Citrus segments like oranges or grapefruit
Breads and Baked Goods
Soft or slightly sweet breads complement the savory flavors of the casserole without overpowering them.
Toast or buttered rolls
Biscuits or croissants
Muffins, banana bread, or coffee cake
Breakfast Potatoes or Hashes
If you’re serving a crowd or want extra heartiness, additional potatoes make the meal even more filling.
Breakfast potatoes or home fries
Sweet potato hash
Roasted breakfast vegetables
Light Breakfast Sides
Lighter sides help balance the richness of eggs, cheese, sausage, and bacon.
Yogurt with honey or granola
Cottage cheese with fruit
Simple green salad with a light vinaigrette (great for brunch)
Sauces and Condiments
Offering a few toppings lets guests customize their plates.
Salsa or pico de gallo
Hot sauce
Ketchup
Sour cream or plain Greek yogurt
For Holiday or Brunch Tables
If you’re hosting a special occasion, consider adding:
Deviled eggs
Cinnamon rolls
Pancakes or waffles for a mixed breakfast spread
Final Word
A classic breakfast casserole pairs beautifully with fresh, light sides and simple breads that complement its savory richness. Whether you keep it minimal or create a full brunch buffet, the right sides will elevate the meal and make it feel warm, welcoming, and complete.
Classic Breakfast Casserole by Stacie is more than just a breakfast dish; it’s a tradition-worthy favorite that brings people together around the table. Warm, hearty, and timeless, it’s the kind of meal that turns ordinary mornings into memorable ones. May God bless this world, Linda
If you knew there were delicious gummy bears that could help support your immune system, would you eat them? Of course you would! But what if you could make them right in your own kitchen?
During cold and flu season, many of us look for ways to naturally support our health and boost our immune defenses. Elderberry syrup is a popular choice thanks to its antiviral and antioxidant properties, and now you can turn that powerhouse syrup into something your whole family will enjoy: delicious, immune-boosting gummy bears.
This recipe is simple enough for beginners and fun enough to make with kids. It's also easily adaptable, so you can switch out the base liquid for other juices like orange, grape, or strawberry if you want to try different flavors.
I found this particular recipe on the Youtube channel, Our Oily House. You can watch it and read the instructions below.
You’ll also want gummy bear molds and a dropper (many molds come with one), or use a 9×13 pan and cut them into squares after setting.
Step-by-Step Instructions
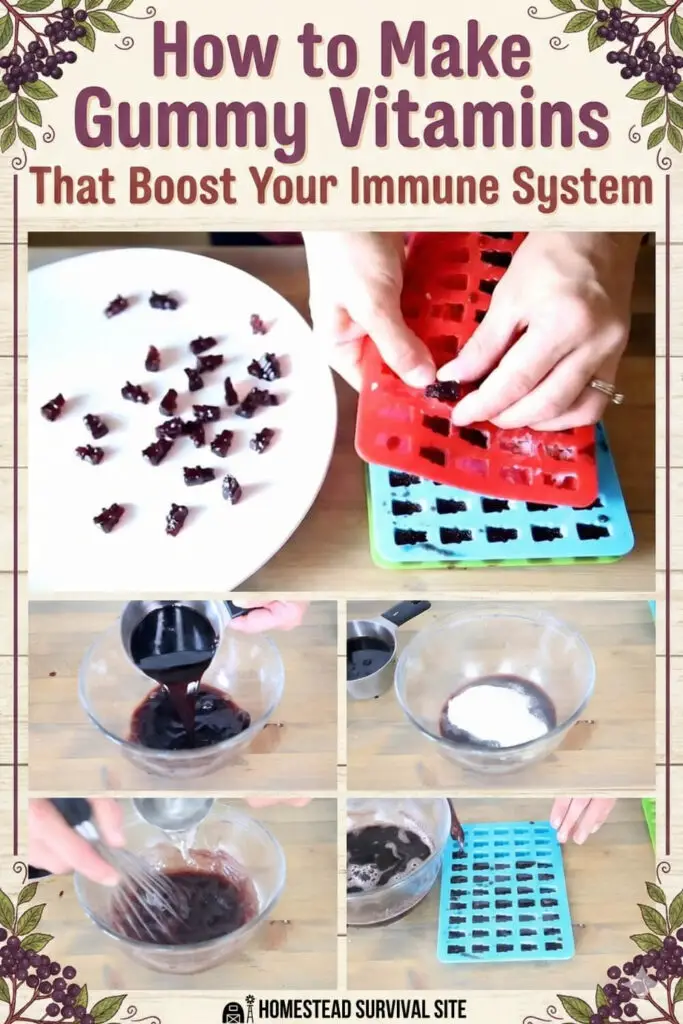
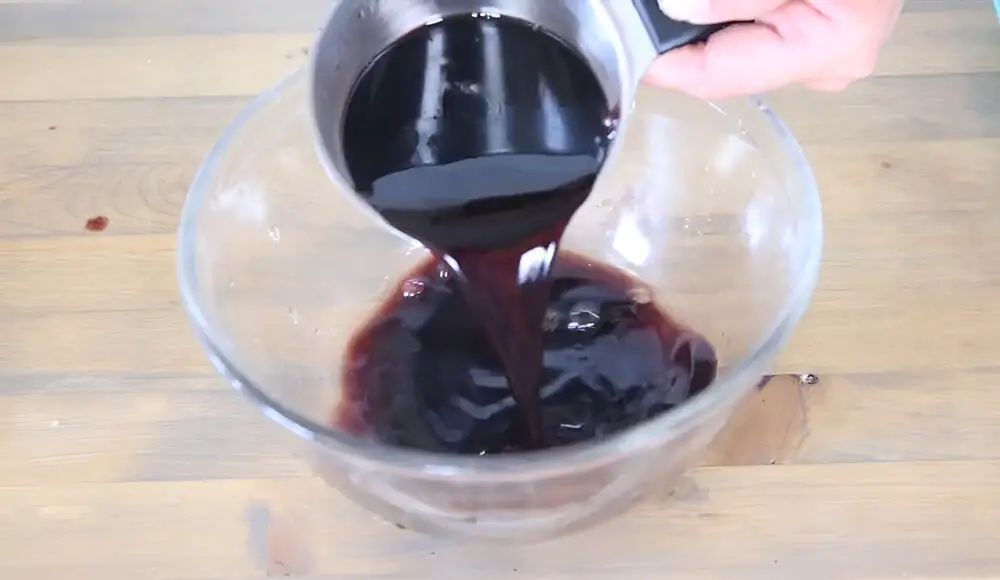
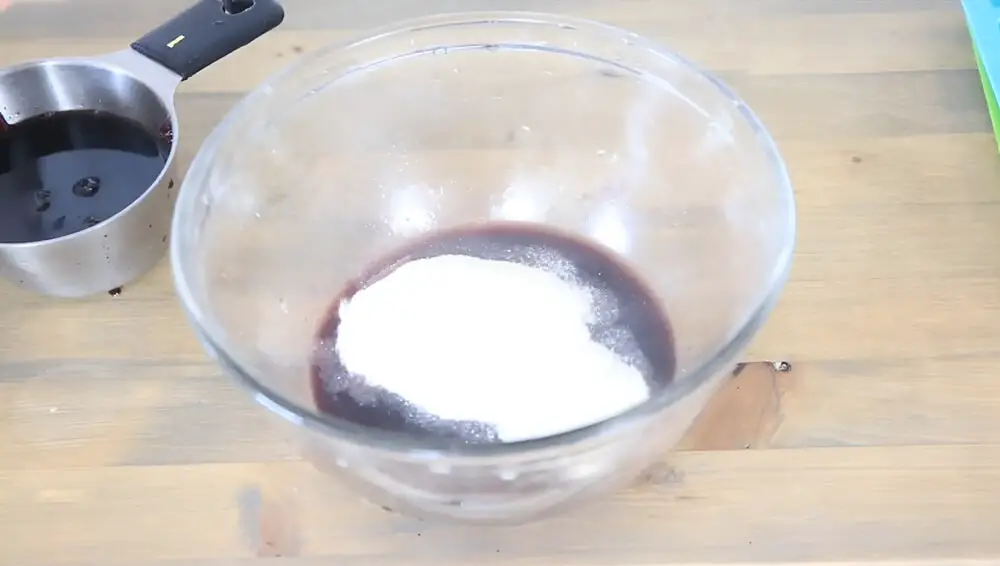
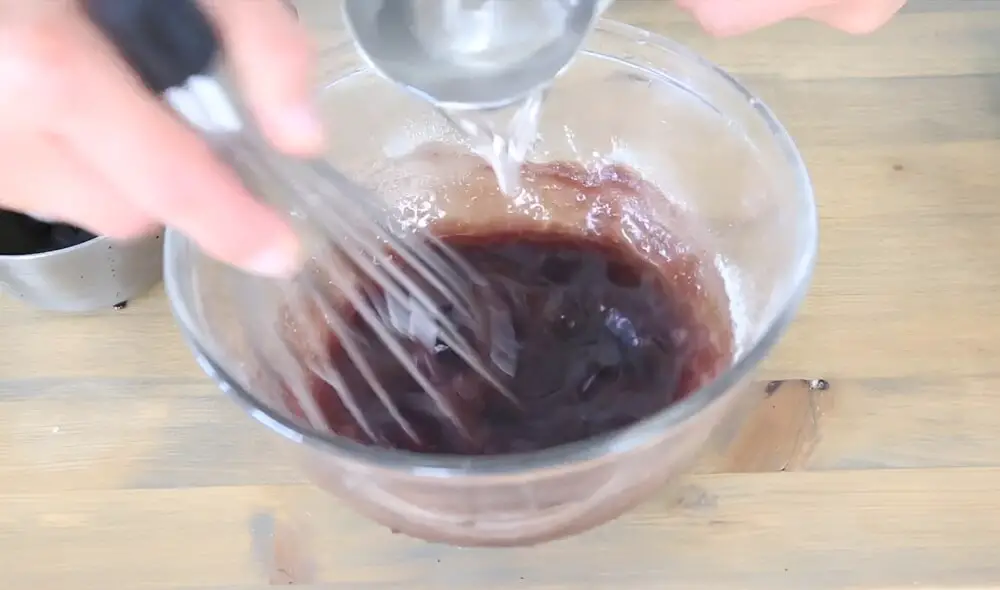
1. Add Elderberry Syrup & Gelatin
Pour ½ cup of elderberry syrup into a mixing bowl and whisk in ¼ cup of unflavored gelatin. Work quickly, though. Gelatin begins to set fast.
2. Add Hot Water
Slowly pour in ½ cup of hot (not boiling) water while continuing to whisk. This step dissolves the gelatin and helps everything incorporate smoothly.
3. Add More Elderberry Syrup
Once the mixture is smooth, whisk in the remaining ½ cup of elderberry syrup. Stir until fully combined.
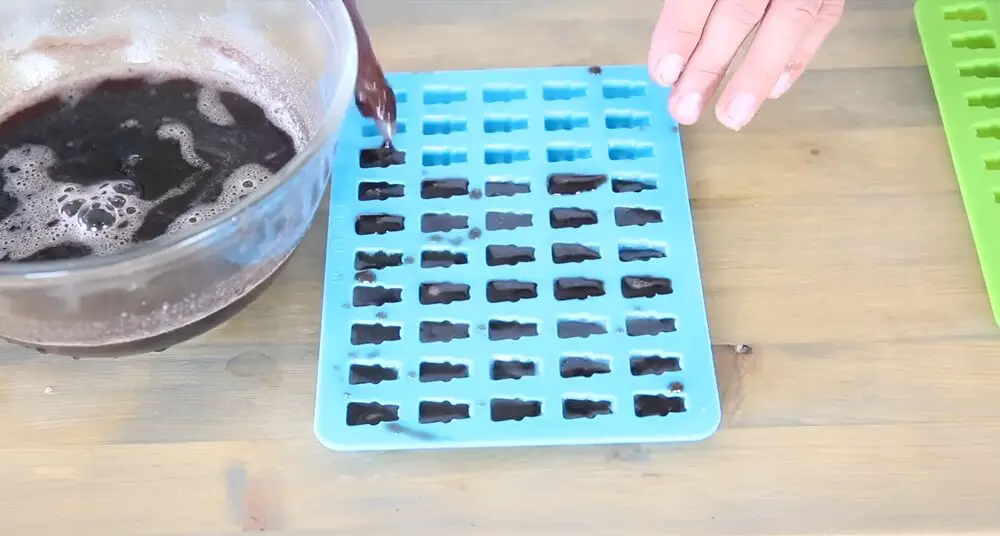
4. Grease & Fill the Molds
Lightly grease your gummy bear molds with coconut oil to prevent sticking. Just rub a bit into each cavity using your finger or a brush.
Use a dropper to fill each mold cavity with the mixture. If you don’t have a dropper, you can pour the mixture carefully, but expect it to get a little messy.
No molds? Pour the mixture into a greased 9×13 pan and refrigerate. Once set, cut into small squares.
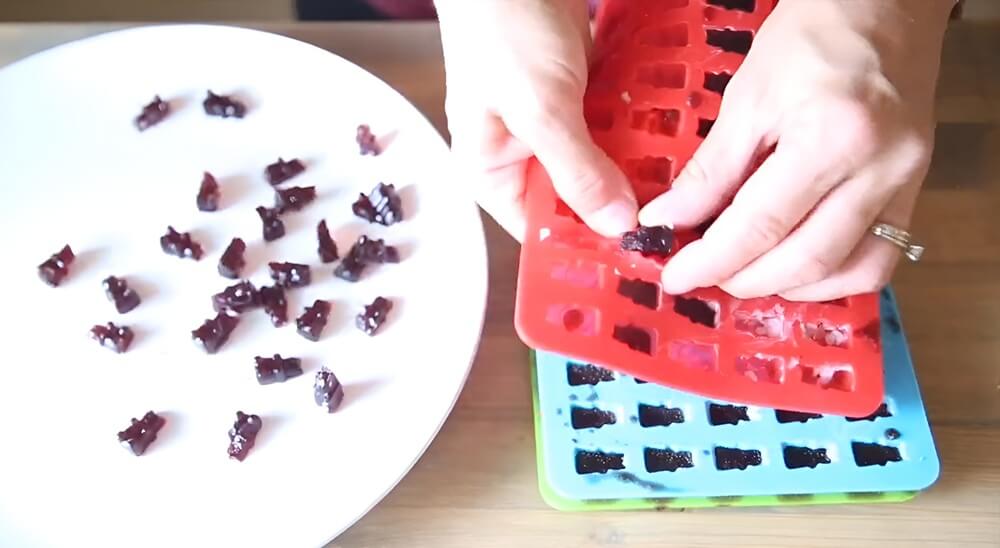
5. Refrigerate to Set
Place your filled molds in the refrigerator. For small gummy bears, they’ll set in about 20–30 minutes. If using a larger pan, allow 4 to 8 hours.
6. Store & Enjoy
Once firm, pop the gummies out of the molds. Store them in an airtight container in the refrigerator for up to 2 weeks.
How to Use Them
Laura recommends giving these gummies to her kids five days on, two days off to avoid building up a resistance. These gummies are naturally packed with vitamins A, B, and C, plus the immune-supporting power of elderberries and the gut health benefits of gelatin.
Customize the Flavors
This recipe is very versatile! Try substituting the elderberry syrup with:
Orange juice
Grape juice
Strawberry juice
Lemonade or herbal tea
Each variation offers new flavors, colors, and added health benefits.
Winter is when food mistakes stop being uncomfortable and start becoming dangerous. Cold weather doesn’t just make you hungry. It burns calories faster, drains energy, and slows thinking. Your body works harder just to stay warm, even when you’re sitting still. Add physical work, stress, or poor sleep and that calorie burn quietly spikes. That’s ... Read more...
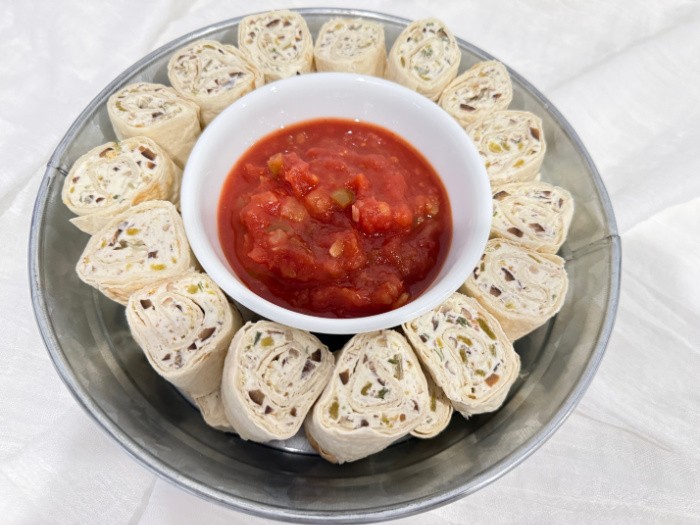
If you’re looking for a simple, crowd-pleasing appetizer that comes together in minutes, Easy-To-Make Cream Cheese Roll-Ups are a must-have in your recipe box. These bite-sized favorites are creamy, flavorful, and endlessly customizable; perfect for parties, potlucks, game days, or even an easy snack at home. Best of all, they look impressive with minimal effort, making them ideal for busy hosts who still want to serve something special.
Why Cream Cheese Roll-Ups Are Always a Hit
Cream cheese roll-ups have stood the test of time because they strike the perfect balance between rich, smooth texture and bold, savory flavors. Soft tortillas or wraps provide a neutral base, while seasoned cream cheese brings everything together. Add-ins like vegetables, meats, herbs, or spices can be adjusted to suit any taste, from classic and comforting to fresh and modern.
Another reason these roll-ups are so popular is their make-ahead convenience. They can be prepared hours in advance, chilled, and sliced just before serving, saving valuable time when entertaining. That’s what I did with my roll-ups in anticipation of our family gathering together over the weekend.
Perfect for Any Occasion
These easy cream cheese roll-ups fit effortlessly into almost any menu. Serve them as:
A quick appetizer for casual gatherings
A light snack for afternoon cravings
A party platter addition for holidays and celebrations
A no-fuss option for picnics and potlucks
Because they’re served cold or at room temperature, they travel well and hold their shape beautifully on serving trays.
Endless Flavor Possibilities
One of the best things about cream cheese roll-ups is their versatility. They can be mild and kid-friendly or bold and savory for adult palates. Whether you prefer classic flavors, a touch of spice, or a fresh, herby finish, these roll-ups adapt easily to suit your taste. This flexibility makes them a go-to appetizer when you need something dependable yet customizable.
Presentation Made Simple
Cream cheese roll-ups are as visually appealing as they are tasty. When sliced into pinwheels, they showcase colorful layers that instantly elevate any appetizer spread. Arrange them on a platter with fresh herbs or crisp vegetables for a polished, inviting look.
Instructions
One: Gather Ingredients
This recipe has only seven ingredients, and most of them are likely already in your pantry or refrigerator.
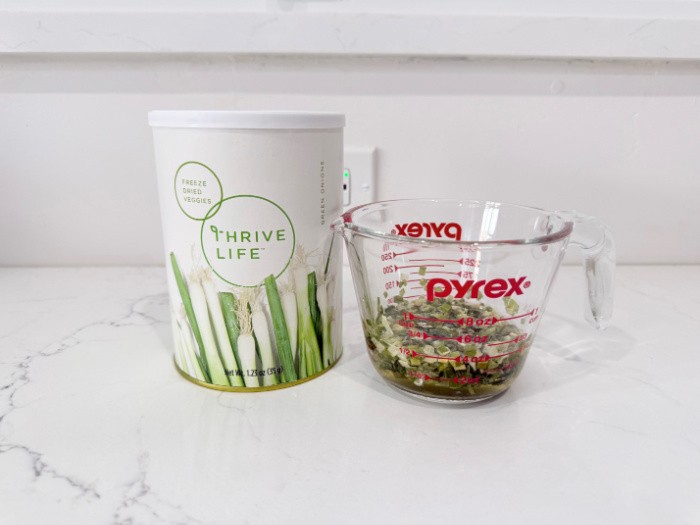
Two: Freeze-Dried Green Onions
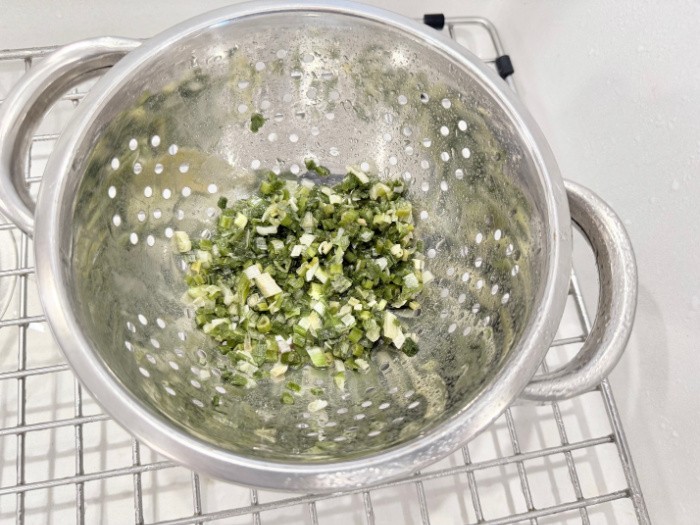
I didn’t have fresh green onions, so I used my freeze-dried ones and rehydrated them.
Drain the Freeze-Dried green onions after mixing them with water.
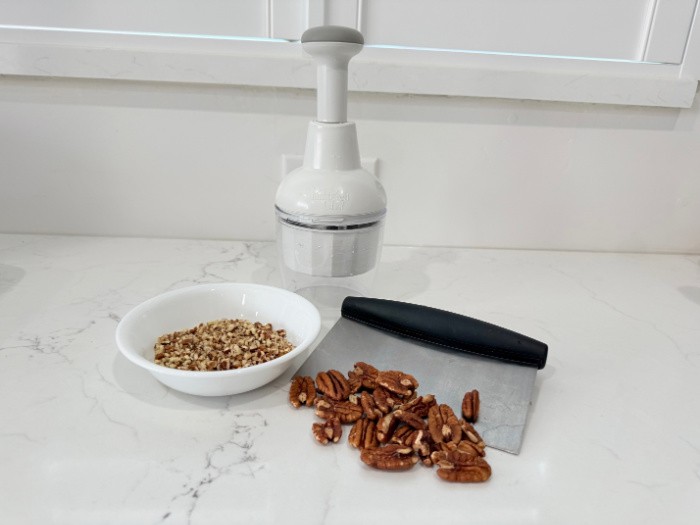
Three: Chopping Pecans
I used a vegetable chopper to chop the pecans as finely as possible.
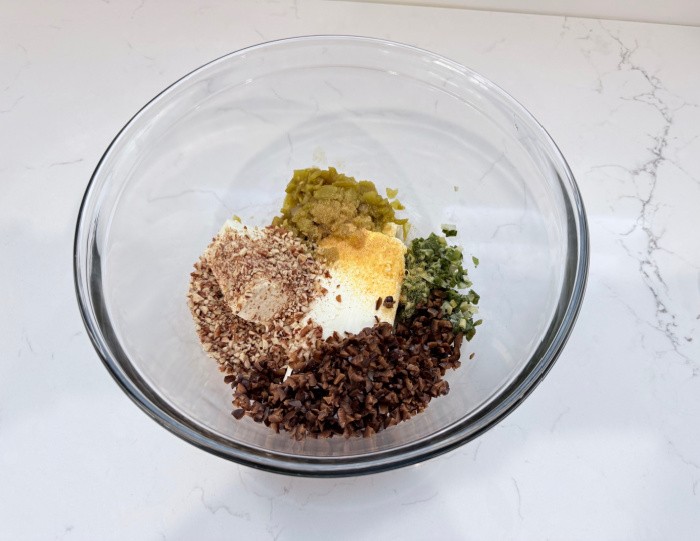
Four: Combine Cream Cheese, Green Onions, Garlic, Olives, & Pecans
Combine the cream cheese, green onions, chilies, garlic or garlic powder, olives, and pecans.
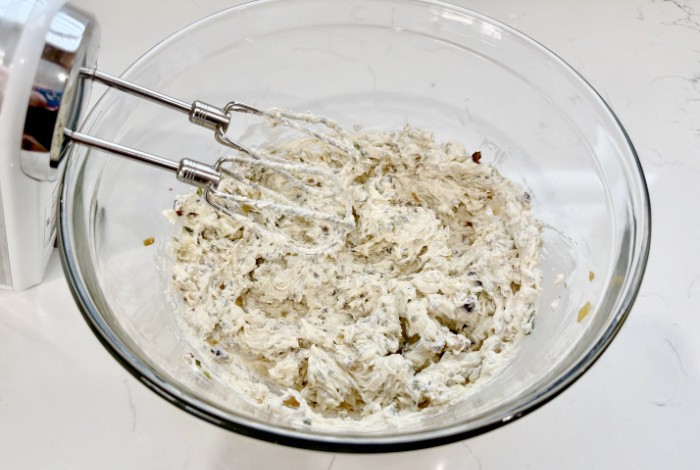
Five: Use Mixer To Combine Ingredients
I used a hand mixer to mix the ingredients thoroughly.
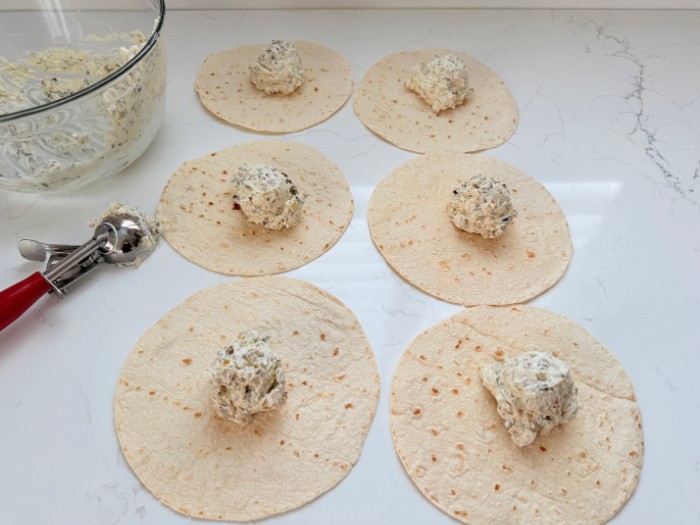
Six: Scoop the Mixture Onto Tortillas
I used a muffin scoop to put the mixture onto each tortilla.
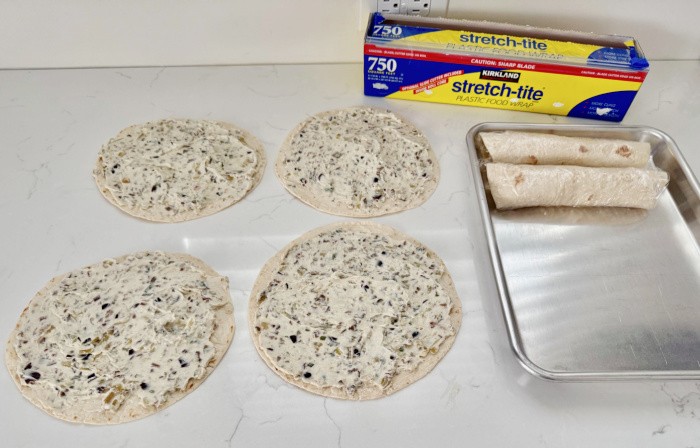
Seven: Spread the Mixture and Tightly Roll Up the Tortillas
Spread the mixture over the entire flour tortilla, and roll up tightly in plastic wrap.
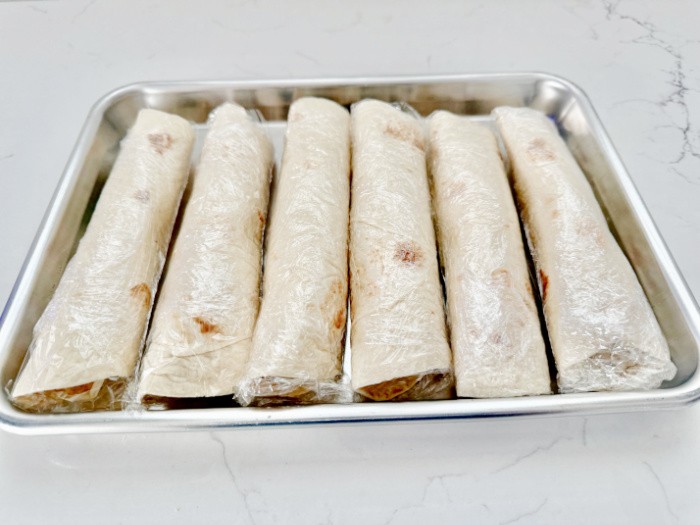
Eight: Tightly Roll & Place in Plastic Wrap
Grab some plastic wrap, roll the tortillas tightly, and place them in the refrigerator for at least 4-6 hours or overnight.
When ready to serve the roll-ups, remove the plastic wrap, slice them into the desired bite size, and place them on your serving tray.
Combine the cream cheese, green onions, chilies, garlic or garlic powder, olives, and pecans.
I used a hand mixer to mix the ingredients until completely smooth.
I used a muffin scoop to put the mixture onto each tortilla.
Spread the mixture over the entire flour tortilla, and roll up tightly in plastic wrap.
Grab some plastic wrap, roll the tortillas tightly, and place them in the refrigerator for at least 4-6 hours or overnight.
Slice the tortillas about 1-1/4 inch thick. Serve with Ranch Dressing or Salsa.
Keep any uneaten roll-ups in the refrigerator. They will keep for about 3-4 days in the refrigerator.
Cream Cheese Roll-Ups Ingredients
Flour Tortillas
Flour tortillas form the foundation of cream cheese roll-ups, providing structure while remaining soft and flexible. Their mild flavor allows the filling to shine without overpowering it. When rolled, flour tortillas hold their shape well and slice cleanly, creating neat pinwheels for presentation. Larger, burrito-size tortillas are especially useful because they offer more surface area for spreading and rolling, resulting in uniform, attractive pieces.
Cream Cheese
Cream cheese is the heart of this appetizer, delivering a smooth, rich, and slightly tangy base that binds all the ingredients together. When softened, it spreads easily and creates a creamy consistency that complements both savory and crunchy add-ins. Its neutral flavor acts as a canvas, absorbing seasonings and enhancing the taste of vegetables, nuts, and spices without competing with them.
Green Chilies
Green chilies add a gentle heat and subtle smoky flavor that brings depth to the filling without overwhelming it. Often mild and slightly tangy, they balance the richness of the cream cheese and add moisture to the mixture. Their soft texture blends seamlessly, ensuring even distribution of flavor throughout every bite.
Pecans
Pecans introduce a pleasant crunch and buttery, nutty flavor that contrasts beautifully with the creamy filling. Their natural richness adds complexity and a hint of sweetness, elevating the overall taste profile. Finely chopped pecans work best, ensuring an even texture and making each slice cohesive and easy to bite into.
Black Olives
Black olives provide a briny, savory note that enhances the overall flavor balance. Their mild saltiness pairs well with cream cheese and helps cut through its richness. When sliced or chopped, black olives add visual contrast and subtle depth, making the roll-ups more flavorful and visually appealing. My husband used a butcher knife to chop the black olives into small pieces that still allowed me to roll up each tortilla easily.
Green Onions
Green onions bring a fresh, crisp element to the roll-ups, offering a mild onion flavor without harshness. Their slight bite adds brightness and balances the richness of the cream cheese and nuts. Both the white and green parts can be used, contributing flavor and pops of color throughout the filling.
Garlic Powder or Fresh Garlic
Garlic powder adds a warm, savory undertone that enhances all the other ingredients without overpowering them. Unlike fresh garlic, garlic powder blends smoothly into the cream cheese, ensuring consistent flavor in every bite. It deepens the overall taste and gives the roll-ups a well-rounded, savory finish.
Pecans
Pecans introduce a pleasant crunch and buttery, nutty flavor that contrasts beautifully with the creamy filling. Their natural richness adds complexity and a hint of sweetness, elevating the overall taste profile. Finely chopped pecans work best, ensuring an even texture and making each slice cohesive and easy to bite into.
Ingredient Insight
Together, these ingredients create a harmonious balance of creamy, crunchy, savory, and mildly spicy flavors. Each component plays a distinct role, resulting in cream cheese roll-ups that are satisfying, flavorful, and perfect for any gathering.
Final Word
Easy-To-Make Cream Cheese Roll-Ups prove that simple ingredients and minimal prep can still deliver big flavor. They’re reliable, adaptable, and always well-received—everything you want in an easy appetizer. Whether you’re hosting a holiday gathering or need a last-minute dish, these creamy roll-ups deserve a regular spot on your entertaining menu. May God Bless this World, Linda