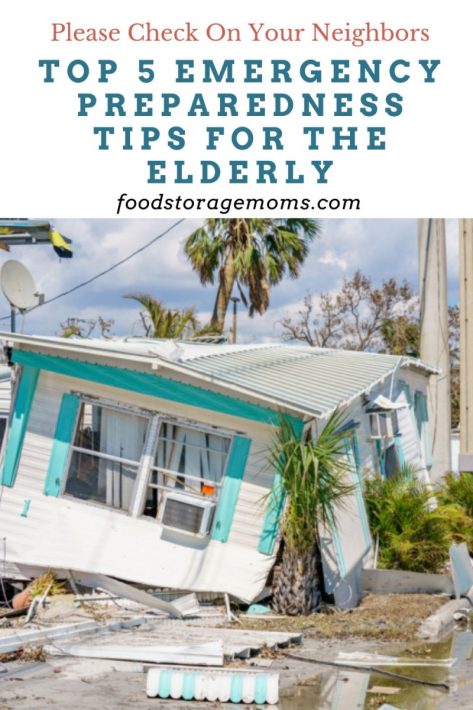
It doesn’t matter whether you’re young or old, natural disasters put everyone at risk. But it makes sense that senior citizens are far more likely to die or be seriously injured from them than young people are. Whether it’s due to problems such as limited mobility or isolation, the elderly have a much more difficult time evacuating during a disaster such as a hurricane or a wildfire. Here are the top 5 emergency preparedness tips for the elderly. In case you missed this post, here are The Best Ways To Help The Elderly.
Top Emergency Preparedness Tips for the Elderly
Did you know that over half of the deaths from Hurricane Katrina were adults over the age of 75? Or do you remember the Chicago heat wave in 1995? Two-thirds of the 700 lives that were lost were men and women over the age of 65. When a wildfire takes place, senior citizens over 85 years of age are 4 times more likely to die from it than any other age group. Studies have alarmingly shown us that less than 1/4 of all senior citizens living in the United States are prepared for a natural disaster.
These numbers are not only astonishing and sad, but they show us that we need to do a better job preparing and helping take care of the elderly should a natural disaster ever occur. It’s also essential for those caring for the elderly to know how to respond in those situations. These are the top 5 emergency preparedness tips for the elderly.
#1. Have a Network of Friends and Family
Having a network of friends and family looking out for you is one way of avoiding being left alone in your home during an emergency. If you need help, don’t hesitate to pick up the phone and call one of them; that’s what they hope you’ll do.
That way, someone can pick you up and see you get to safety. Whether you plan on staying in your home or evacuating to a specific location, make sure that you let them know of your plans.
If you don’t have any friends or family who live close to you, get yourself set up with a medical alert system that can respond to your situation. Having all your contact information printed and kept in a safe place is also helpful. If you have a smartphone, have the names listed in your contacts so you can access them easily.
#2. Plan Ahead
Should you ever have to deal with a hurricane or an out-of-control wildfire, don’t wait until the last minute to decide your escape and the best route. It may already be too late. Plan well for your evacuation, especially if you’ve been warned enough.
Also, be sure to keep up with the emergency broadcasts so that you know what’s going on around you. Should you have to leave your home, you’ll need to know where you’ll stay, whether it’s a shelter, hotel, or with family or friends living outside the affected area.
#3. Gather the Basics
No matter what age you are, it’s a good idea to gather up an emergency kit capable of holding you over for a minimum of 3 days. Some preppers store an extra emergency kit in the trunk of their vehicle in case they have to evacuate in a hurry.
That way, you don’t have to worry about making several trips to your car. Here are a few of the basics and other essentials that you should consider putting in one or more designated areas:
Food (non-perishable food items)
Water (four gallons of water a day per person)
Prescription medication (see if your doctor will provide you with 90 days worth)
Legal and essential documents (keep them in a waterproof container)
#4. Find the Safest Place In Your Home
You need to know what the safest place in your home is. If a disaster arrives, you’ll know where to go for shelter. When dealing with a tornado, the best place to go is usually your basement or the bathroom.
Get as far away from windows and exterior doors as possible. Other options include hiding underneath staircases or in the closet.
For those living in a mobile home, be aware that no room in your house is safe during a tornado. You need to head to the nearest permanent structure and have a prearranged method of getting there.
When you’re dealing with a hurricane and have decided to bunker down in your home, head to the innermost room on the first floor and avoid windows and exterior doorways.
#5. Avoid the Heat
It’s not uncommon for extreme heat to follow behind a hurricane or a tornado that has ripped through an area. Hot temperatures can be deadlier than the natural disaster itself.
To make matters even worse, chances are high that your power will not work afterward. This type of scenario has claimed far too many lives, especially among our senior citizens.
If this were ever to happen and the temperature in your home reached a dangerously high range, you would need to consider going somewhere else with air conditioning.
In the meantime, whether it’s your local community center, a restaurant, a hotel, or staying with a loved one. Don’t become a statistic as you try and hang in there until the power returns.
For Everyone Else…
Maybe you’re not an elderly person who needs care. Please take a minute to consider your situation. Do you live beside or down the street from an elderly person living alone?
Or maybe your parents or grandparents live further away from you? Please don’t wait until there’s a disaster at their location to see whether they’ll be okay.
Get with them now and find out what their arrangements are if a natural disaster were to strike. Offer them any suggestions for preparation and let them know that yours is a number they can call if they need help.
Final Word
There’s no denying that the elderly are more vulnerable during a natural disaster, but that doesn’t mean they can’t weather the storm. With a bit of extra preparation, planning, and help from friends and family, senior citizens shouldn’t face the dangers and obstacles alone. What are some top emergency preparedness tips for the elderly that you’d like to share? May God bless this world, Linda
Copyright Images: Forest Fires Deposit photos_48123941_s-2019, Flooding in Front Of House Depositphotos_1072481_S By Konstantin32, Mobile Home Damage by Hurricane Depositphotos_612249496_S by felixtm
Having a pantry or cellar full of stockpiled food and supplies gives a person a feeling of security. It is comforting knowing that no matter what comes to pass in the world outside, your family will be well fed. The fact that you grew and preserved these nutritious foods yourself provides an even bigger sense of accomplishment.
One of the keys to a successful harvest and storage is choosing the right seeds or stock to plant in the beginning. Choose varieties that are known for their long-term storage properties. Many times these will be heirloom or open-pollinated plants.
Experiment to find out what grows best in your area, provides a high yield, and ultimately, how it does in storage. You will also want to grow more than you think you'll need in order to account for any crop failure or spoilage once in storage.
The other thing to remember is that how you harvest, prepare, and store the produce will also affect how long it will remain usable. While there are many methods of food preservation, this article will focus on produce and root crops that lend themselves well to being stored as they are or dried.
The best apples and pears to choose – with preservation and storage in mind, are those with firmer, thicker skins. Pick the fruit when ripe and then store in boxes or crates that are well-ventilated.
Air circulation is important as these fruits give off a gas called ethylene that builds up and can ruin your produce. Place sheets of paper or even shredded paper between the layers of fruit to keep them from touching and bruising each other.
The best temperature range for long-term fruit storage is 32-40 degrees Fahrenheit with 80-90% humidity. The ethylene gas the fruit produces as it ripens is detrimental to many vegetables, causing them to rot.
Because of this, it is best to store these fruits away from other produce. Expect the fruit to remain usable for up to 6 months, depending upon the variety. Regularly sort through and remove damaged or deteriorating fruit.
Dried beans, grain corn, and various nut varieties are easy crops to grow and preserve for future use. Plan on storing each of these items in dark, dry areas in airtight containers. Be sure that your bean varieties are completely dried before storing them as just a small bit of moisture can breed mold and ruin the beans.
Grain corn can be completely dried on the cob and then stored as-is (on the cob) in open bins. It can also be shelled with the dried kernels stored in sealed jars. Grain corn can be used as popcorn or ground into cornmeal to be used for baking.
Nut varieties have different shelf lives according to the amount of oils in them. Two of the longer lasting types of nuts are almonds and cashews. You can expect them to last up to a year or so when properly stored.
Other nuts such as walnuts, macadamias, hazelnuts, and pecans tend to go rancid a little sooner. 6-8 months is usually their limit before they go bad. All of the varieties should all be kept in sealed containers in cool, dark, dry locations. A freezer will make any of them last even longer.
Most root crops enjoy cold and humid storage methods to ensure the longest freshness. They tend to do their best in temperatures ranging from 32-45 degrees Fahrenheit.
Packing the root in boxes with layers of moist sand, sawdust, straw, or shredded paper is a popular way to keep them. You may have to occasionally mist them to keep them moist through the winter.
You can also try the “mound” or “clamp” method with some of the tubers. This is where you alternate layers of straw and root vegetables on the ground in a mound and then cover it, leaving a space for ventilation on top.
This method allows the snow to cover the mound and create a refrigeration effect without the ground, and your produce freezing.
Root crops that benefit from either of these storage methods include:
Pumpkins and winter squash should be allowed to dry and cure for 1-2 weeks before storing. This drying off can be done in a warm, well-ventilated room or area.
Once dry, both types of gourds can be stored in a cool environment with moderate humidity. Bushel baskets, shallow containers or trays, and small, open crates are often used. The produce can also be placed directly on shelves when needed.
Even if you only decide to add just one or two of these crops to your garden this year, you will be ahead of the game. You are well on your way to providing healthy, nutritious food for your family that you can say you grew and preserved yourself.
Cabbage and Garlic: More Long-Storing Crops to Grow
Adding just a couple more storage-friendly crops to your garden can make a big difference when it comes to self-sufficiency. Both cabbage and garlic store well with minimal effort and provide essential nutrients for your pantry.
Cabbage
Cabbage is a cold-hardy vegetable that not only produces a high yield but also has an impressive shelf life when properly stored. The best varieties for long-term storage are late-season or winter cabbages, which have tighter, denser heads.
To store fresh cabbage, keep it in a root cellar, basement, or refrigerator at 32-40°F with high humidity. Whole heads can last 3 to 4 months when stored correctly. Avoid washing cabbage before storage, as excess moisture can lead to mold.
Another great way to preserve cabbage is by fermenting it into sauerkraut, which extends its shelf life even further and adds beneficial probiotics to your diet.
Garlic is a must-have for any survival pantry. It’s easy to grow, simple to store, and has powerful medicinal properties. Softneck varieties tend to store longer than hardneck varieties, sometimes lasting up to 9-12 months.
To store garlic long-term, cure the bulbs by hanging them in a warm, dry place for 2-4 weeks until the outer layers become papery. Once cured, store garlic in a cool, dry place with good airflow. Avoid sealed containers, as they can trap moisture and cause the garlic to rot.
If you want an even longer-lasting option, garlic can be dehydrated and ground into a powder or preserved in oil and frozen.
About the Author: Julie Dees is a freelance writer who also happens to be a real, lifelong cowgirl. She enjoys writing about her animals, gardening, homesteading, and just about anything related to the outdoor life.
In an era marked by climate change, geopolitical instability, and increasing energy demands, the concept of energy independence has never been more relevant. The ability to generate and store your own power is not only a matter of convenience but a critical component of survival and self-sufficiency. Whether you’re preparing for natural disasters, grid failures, ... Read more...
When a crisis strikes, being stocked up on OTC medications and prescriptions gives you a little sense of security. Yet these are finite supplies that will dwindle during a prolonged crisis. Also, taking expired medications is dangerous! Adding medicinal herbs to your preparedness strategy gives you a sustainable source that can help stretch your other […]
Today, it’s all about how to garden with 5-gallon buckets. Here’s the deal: We can’t all have 1-20 acres of land. Some of us have a postage stamp-sized lot like me, some have a porch, and others have a balcony. But I’ll bet we all love picking those fresh, sweet tomatoes in the summer. If you have ever had a garden, big or small, that first red tomato is gold, my friends. Maybe not worth as much as gold, but I can smell the bacon cooking right now to go with those tomatoes to make the very best BLT!
In my neighborhood, very few people have a garden. In my humble opinion, I’m not sure they love to garden as much as I do. I love getting my hands in the earth’s soil and experimenting with what I can grow in the desert. The good thing about living in Southern Utah is that I can have two gardens if I plan. I start seedlings inside while my garden is coming to an end outside. Now, I must also cover the tomatoes with garden shade cloth to help modify the temperatures. This is the product I have used: Garden Shade Cloth. I think it’s essential to grow your food whether inside, in a yard, in a bucket, or a raised garden bed.
Updating Post Today
I’m updating this post today because, as you know, I have moved to Northern Utah, where it’s cooler. We’re getting closer to gardening, which may be put on hold again. This is frustrating because I love to garden and harvest fresh food daily. It’s been rough waiting, and food prices continue to rise. When I go to the grocery store, I’m shocked each time I see the prices of eggs (if you can get them), milk, and meat.
I’ll visit the Farmer’s Markets this year to get homegrown veggies and fruits. Life is so good!
Why Plant Fruit and Vegetables in 5-Gallon Buckets?
You may be thinking, what in the world, why would I use a 5-gallon bucket to garden? Besides not having the space for an outdoor garden, there are various benefits to using 5-gallon buckets. Here are just a few:
You don’t need a huge backyard. You can grow food whether you have a backyard or not. You can even set these buckets right on your front porch or deck.
It saves space. You still get plenty of food, but the buckets save space in your yard or another growing spot.
Plants don’t get trampled. I don’t know about you, but when I had little ones running around, someone always seemed to trample something.
They prevent rabbits and other small animals from eating your food. Although they could probably figure out how to get up in your plants, having them higher than ground level deters a lot of nibbling.
No poor soil. When you put plants in a bucket, you know the potting soil is suitable for growing. And you don’t have to deal with nasty weeds.
The buckets are portable. If you notice your tomato plants aren’t getting enough sun, you can pick the bucket up and move it to a better location.
5-Gallon Bucket Gardening Cons
As stated above, there are a lot of benefits to gardening using a 5-gallon bucket. However, it is essential to note that there are also a few cons. Because the plants are in buckets, you may have to pay more attention to them than you would if planted in the ground. Here are a few cons that I found to bucket gardening:
You have to water more often. Make sure you water your plants regularly. If they are thirsty and need more moisture, the roots can’t dig into the ground to find more water. You do have to be careful not to overwater them. Having some drainage holes at the bottom of the bucket can help.
The soil has to be replenished and amended. The soil in the bucket can’t replenish its nutrients as it would be able to in the ground. You must replenish and amend the soil with nutrients each time you plant new plants. Be careful when fertilizing to ensure you don’t apply too much fertilizer and burn the plants. Using a compost pile and applying the compost material is a more gentle approach that eliminates the use of many chemicals.
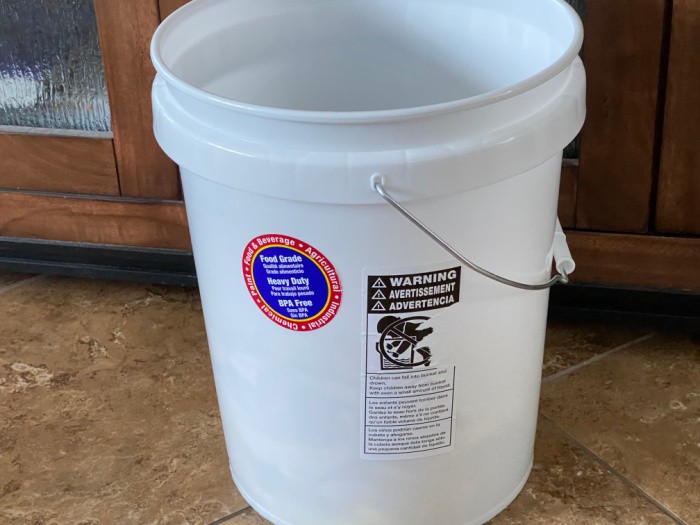
There’s a cost to materials. You may need to buy seeds to grow a garden anywhere, but buckets cost a bit more than just planting in your yard due to the cost of the buckets and the purchased potting soil. I suggest using safer food-grade buckets that could cost a little more.
How to Garden With 5-Gallon Buckets
Not everyone has a plot of land they can use to plant a garden. That said, you can still grow your food in plenty of ways! Instead of digging up your yard, you can use 5-gallon buckets to plant various plants, and you may find plenty of room to place a bucket planter where it gets the needed sun.
Vermiculate (Regulates soil PH value and temperature of the soil)
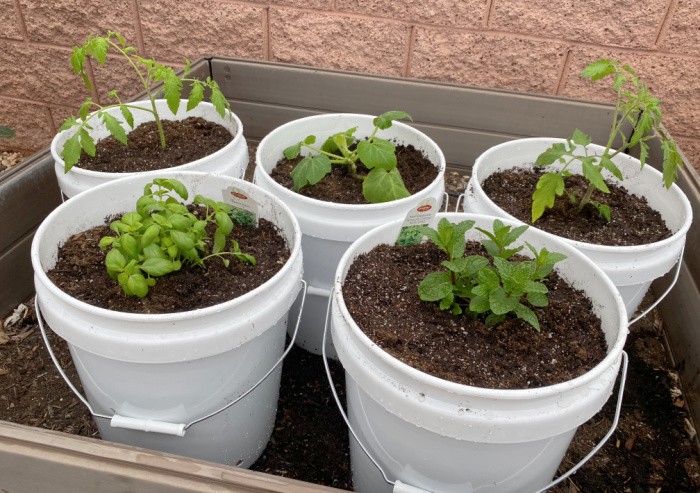
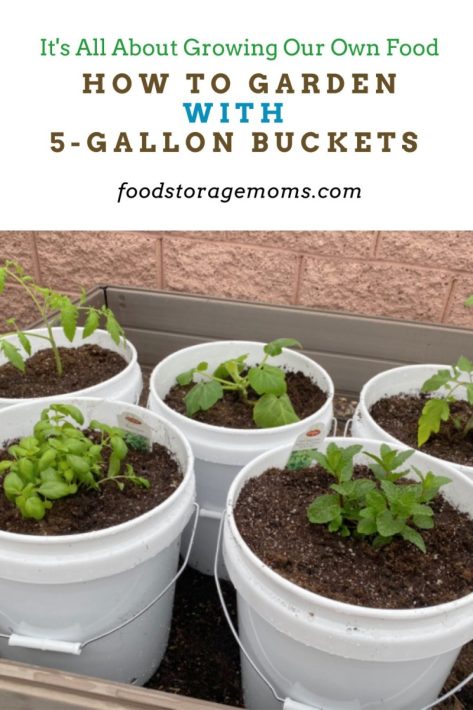
Step One: Purchase Your 5-Gallon Buckets – BPA Free
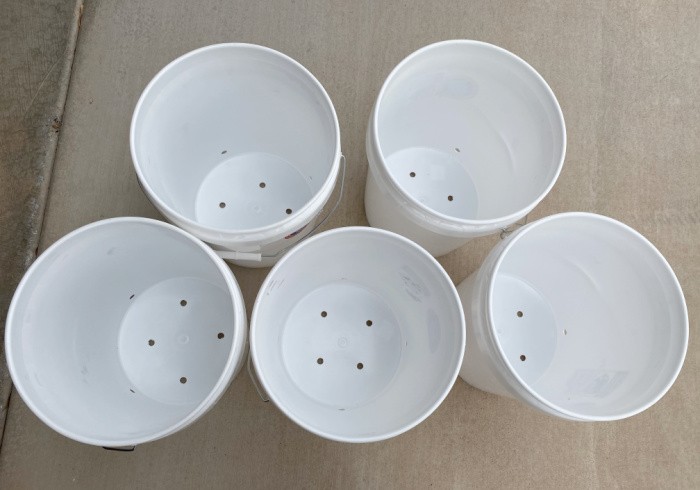
Mark and I picked up five 5-gallon buckets at a local grocery store. They were in the paint department and priced at $2.99 each. I made sure they were BPA-Free and food-grade. I didn’t need the lids, which saved me a dollar.
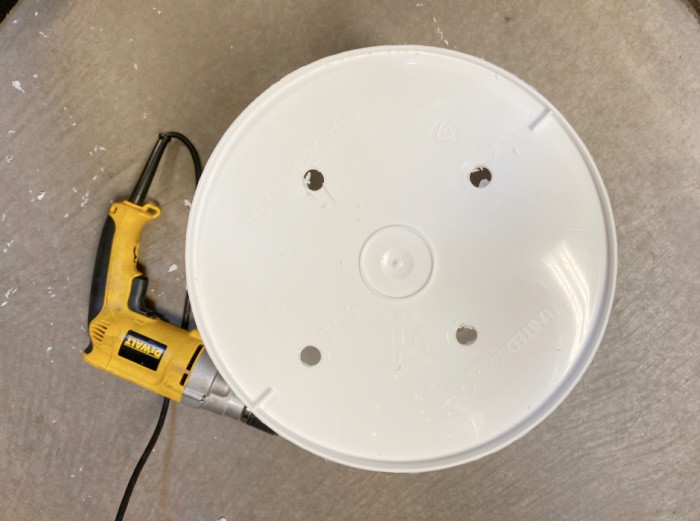
Step Two: Drill Four Holes in the Bottom for Drainage
We used a 1/2-inch drill bit to make four holes in the bottom of each bucket so the plants could drain after being watered. We just randomly drilled them with no specific spacing.
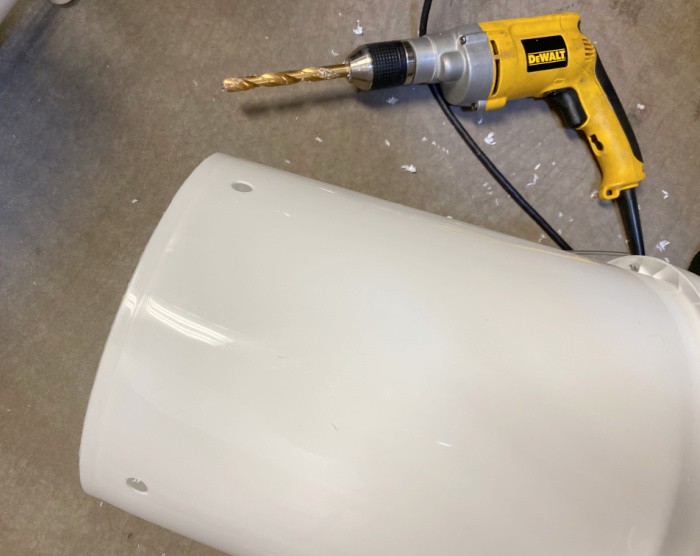
Step Three: Drill Additional Holes Around the Sides
Mark drilled four holes around the sides of the buckets (about 1-2 inches) from the bottom of each one to help circulate air to the roots within each container. After drilling them, we had to use pliers to break off some of the plastic residues.
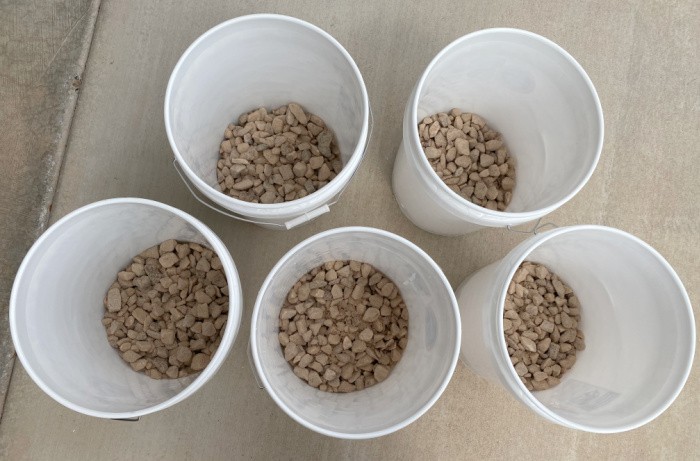
Step Four: Put Gravel or Small Rocks in the Buckets
When I went to find gravel, I couldn’t find any in a small quantity, so I opted for small rocks called marble chips. You need to fill each bucket with 2-3 inches of gravel or, in my case, small stones. I didn’t want small gravel because I was afraid it would fall out of my 1/2-inch-drilled holes.
Step Five: Level Out the Gravel/Small Rocks
Before we added the soil, we put about 3 inches of rock (small rocks) in each 5-gallon bucket for proper drainage.
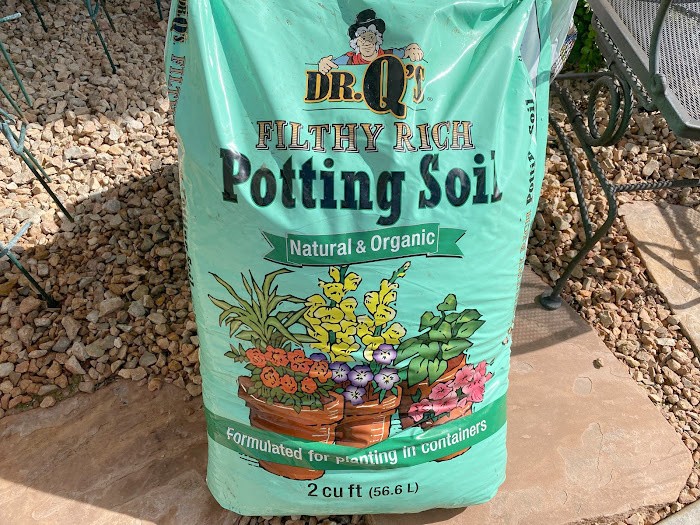
Step Six: Use Quality Potting Soil
I purchased this soil because it’s made by Dr. Q, a company I’ve had good experience with. It’s organic and formulated for planting in containers of all kinds.
Step Seven: Fill Buckets with the Potting Soil
After filling the buckets with the rocks we purchased, we filled the 5-gallon buckets with the soil shown above.
Step 8: Plant Your Seeds, Seedlings, or More Mature Plants
After you have set up your 5-gallon bucket, you can plant your seeds, seedlings, or plants into the bucket.
Why Do You Drill Holes in The 5-Gallon Bucket?
Don’t skip over drilling holes in your bucket. If you don’t drill holes, you may have dead plants. The holes help to protect your plants from water pooling up into the roots, especially during hard rains or excessive watering. If there is too much water for the roots, they can rot. Additionally, the plant won’t get enough oxygen and nutrients from the soil.
What Food Grows Well in 5-Gallon Buckets?
Unfortunately, not everything you may want to plant will grow well in a 5-gallon bucket. Below, I give you a list of what foods you can grow in your buckets and how many of each you should plant per bucket based on its diameter:
Tomatoes. You can plant cherry or bush tomatoes, as they work best. Remember, you only want one tomato plant per bucket to prevent overcrowding. Update: I must say, tomatoes are the hardest ones to grow in buckets or pots. You will need more vermiculate water and water each day. I lived in the desert where the summer temperatures would reach 115 degrees mid-summer. I used shades to lower the temperature slightly, but they need a lot of water because the soil in the buckets can dry out quickly.
Cucumbers. Cucumbers are great to grow because you can eat them in salads, pickle them, or just enjoy them with some ranch dressing. Plant only one plant per bucket. Space the buckets so that the plants have room to grow as they mature.
Melons. I love a good watermelon. These get rather big, so you only want one plant per bucket. Again, you’ll want to spread them out since watermelon plants can grow long vines.
Squash. You can do all kinds of things with fresh squash. It grows well in a bucket, but you can only plant 1 plant per bucket.
Eggplant. This is another one in that you can only put one plant per bucket.
Peppers. Whether it’s hot or bell peppers, only plant two plants per bucket.
Beans. Bush beans are the best kind of beans to plant in a bucket. You can plant three plants per bucket.
Onions. Not only are onions a good source of nutrition, but they can also be expensive to buy. You can plant four of them per bucket.
Lettuce. We all need those leafy greens. You can plant 4 per bucket.
Carrots. Great for your eyes and perfect as snacks, you can plant 10 carrots per bucket.
Radishes. I love radishes in a salad—plant radishes 10 per bucket.
Herbs. You can plant many different kinds of herbs in your bucket. One herb plant will spread and fill the entire bucket.
Potatoes. I’ve had mixed results with potatoes. Since they are root plants, they need room under the ground to grow. Give them a try and see how it works in your area.
This is where I buy all of my garden seeds: SeedsNow.
5-Gallon Bucket Gardening Tips and Tricks
This gardening method is pretty straightforward, but you always learn a few tips and tricks along the way. Here are a few to keep in mind when using 5-gallon buckets for gardening:
Companion plants. Companion plants are beneficial and help keep nasty bugs away while attracting good ones.
Givethe buckets a quarter-twist every week. This helps the plants not grow lopsided, as they love to seek the sun.
Insecticides. To make insecticide, combine four to five tablespoons of concentrated dish soap with one gallon of water. Mix it well and apply it with a spray bottle.
You can reuse your potting mix. Once per year, amend and replace it with fresh ingredients, remove dead plants, and shake loose soil from the roots. Fill it back up, and use it again.
Seeds or Live Plants?
What is best to plant in your buckets, seeds, or live plants? I have used seeds, but many said live plants thrive best in buckets. I suggest buying live plants if you don’t have a green thumb. Today, I planted plants from the nursery. My seedlings are not big enough for a “picture” yet, Lol! I needed to get this post up for all to see. So many people don’t have access to land, so here they are still provided an option to have a successful gardening experience! I’ll cover the plants tonight with domes to protect them from rain or frost.
Other Posts to Read
There are so many vegetables you can grow outdoors, depending on where you live. Check out my posts on what to plant each month of the year!
I hope you enjoyed my post today on gardening with 5-gallon buckets. I love growing most of my food, and I bet you would like to! Life is good if we work through food issues by increasing fruits and vegetables. You are so lucky to have a farmer’s market near you! Let’s grow as much food as we can and support local farmers, too, and we can do it! May God bless this world, Linda
In today’s fast-paced world, it’s easy to feel overwhelmed by the rapid changes in technology and modern culture. Yet, amidst all this change, the timeless lessons of our past remain invaluable, including when talking about paramount life skills for kids. Many of us look back on our school days with a sense of nostalgia—remembering lessons […]
When our forefathers were conquering the great wilderness of the new world, they ate some foods that would be pretty weird by our modern standards. Sure, we’ve all heard the tales of how Thomas Jefferson introduced the US to macaroni and cheese, French fries, and ice cream. Yet historically our forefathers, the pioneers and homesteaders […]
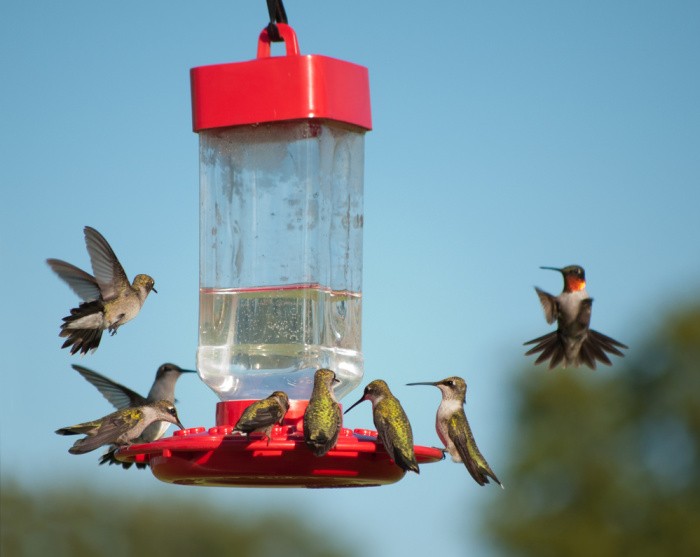
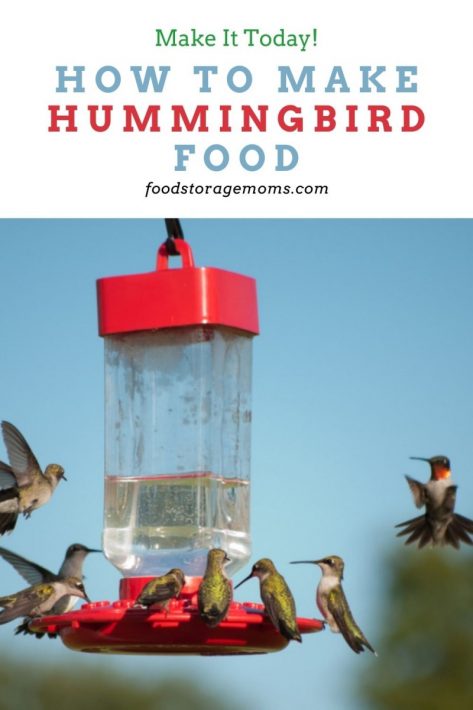
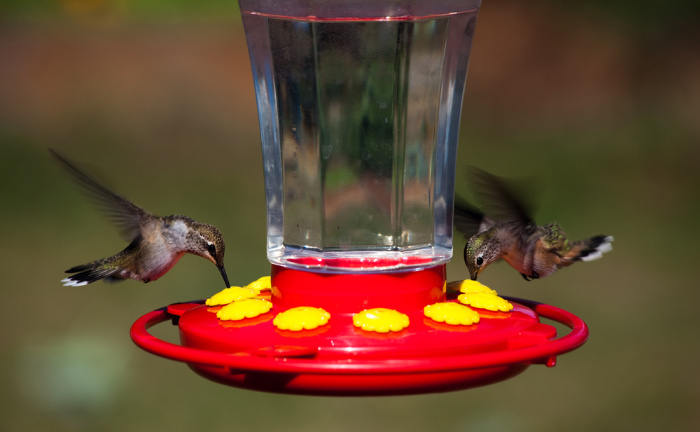
Today, it’s all about how to make Hummingbird Food! In a few easy steps, you can bring those nectar-loving birds directly to your feeders. There is something so exciting to me when I see the first hummingbirds of the season start dropping by my house. A few readers have asked me if I make my own hummingbird food, so with spring coming, I thought I better update this post.
Oh, the joy they bring to my soul! They are so tiny, yet they fly so fast! I strategically placed my two feeders so I could work on my computer and look out the front window right at them.
Do you know how they swoop in and out while guarding their hummingbird food against other birds? In case you missed this post, What You Can Do to Attract Hummingbirds
Hummingbird Nest
A few years ago, my next-door neighbor mentioned she had a Hummingbird nest in a tree in her yard and wondered if I had ever seen one.
I said, “No, I haven’t!” I quickly ran over there to see it. We had to look closely because it was super tiny. If you didn’t know it was there, you would never have guessed there was a nest in those little branches.
We didn’t touch it because we knew the mother bird might not return. It was awesome!
Two Hummingbirds Feeding
I love seeing these little birds feeding on my feeders. It brings me so much joy; I bet you know exactly what I’m talking about.
How To Make Hummingbird Food
I made the hummingbird food recipe in printable form because every year, I have to look it up and see the water-to-sugar ratio. Please don’t use distilled water. It’s suggested you use water right out of your tap unless you’re concerned or have your water tested to confirm a high chemical content. Usually, tap water is fine, but if you have filtered water, that would provide an extra level of safety to the birds.
Tap water is okay, but I don’t trust the water system where I live. Even though Mark feels okay about it, I don’t cook or drink tap water in my home. Springwater or reverse osmosis water has been my choice for sugar water. This is typically called nectar. I’m just giving you the heads up here.
4cupswater (tap water, unless it has too many chemicals)
Instructions
1. Combine the ingredients in a saucepan or bowl.2. If you want to speed up the sugar dissolving time, heat the water in the saucepan, otherwise, just stir well in the bowl.3. Make sure the sugar is completely dissolved.4. You don't need to boil the sugar water unless you feel it has been exposed to bacteria or mold that may be present.5. If heated, let it cool and fill your clean feeder.6. Refrigerate any leftover sugar water.
How Often Do I Need To Change The Nectar?
This is where it gets tricky where I live. During the summer months, temperatures are above 90 degrees every day.
From what I’m reading, I should change the feeders each day at that temperature. If you have cooler temperatures, you can go 3-4 days if the temperature is in the 60s, but at least once a week. If it’s really cool, you could possibly stretch it to two weeks.
No matter how often you change the nectar, be sure to clean out the feeder and rinse it with clean water before filling it again. Remember, birds’ beaks can carry microscopic germs and diseases that can infiltrate the feeder and the nectar, so if you’ve seen hummingbirds feed on yours, it just reinforces the idea of cleaning it often.
How Big Are Hummingbirds?
I quote Wikipedia: “Hummingbirds are birds native to the Americas and constitute the biological family Trochilidae. They are among the smallest birds, most species measuring 7.5–13 cm (3–5 in) in length.
The smallest extant bird species is the hummingbird, the 5 cm (2.0 in) bee hummingbird, which weighs less than 2.0 g (0.07 oz).
There is also a species called the giant hummingbird. Although much bigger than the bee species, it’s still tiny compared to other birds you may see in your yard.
Can I Add Red Food Coloring?
It is still up for debate whether red food coloring is safe. I prefer not to add red food coloring to the solution. In years past, some food coloring brands weren’t properly prepared to prevent contamination, so birds would often become sick. Now, the manufacturers do a better job.
Some folks think the red color is needed to attract birds when, in fact, the birds are attracted to the red base or parts in the feeder and don’t need red water. If you are concerned about attracting more birds, place the feeder near very colorful flowering plants or plant them close to the feeder, whichever you prefer to do.
How Do I Know When Hummingbirds Will Return?
Some people aren’t aware that hummingbirds are migratory. That means they spend their winters in the tropics and summers as far north as Alaska. That means you’ll want to use your hummingbird feeder when they tend to be in your area.
Where I live, I put my feeders out about March 1st each year. I want them ready when they return. It will depend on your latitude, altitude, and annual temperatures when they migrate through your area. Following are some guidelines:
Gulf Coast and southern states = the typical migratory period is February through November.
Mid-latitudes / central states = The typical migratory period is April through October.
High-latitudes / northern states and Canada = typical migratory period is May through September.
They are heading north after spending the winter in Central America or Mexico. Once the days get longer and warmer, they will head north.
Will Hummingbirds Return To Our House?
Yes, they will; they have a fantastic memory. But, if the feeders are not out, they will leave and look for another place and may never return. They are loyal but can’t survive without nectar from your feeder or flowing.
Most hummingbirds fly during the day and sleep at night, but it depends; some fly at night.
How Do They Survive The Winter?
When the temperatures get colder, they enter the torpor stage. This helps them preserve their energy for lower temperatures and change their diet to eat more insects when nectar flowers are unavailable.
Some put on heavy coats, and some hibernate (torpor).
Hummingbird Predators
Please hang the feeders at least five feet off the ground so a cat can’t attack them. Praying mantids like to sit on plants and devour the little birds. Who would have guessed this? Not me.
Watch out for frogs, they like to eat them too. Larger birds like Blue Jays and Hawks are a threat as well.
How Long Do Hummingbirds Live?
Their lifespan is usually 3-5 years.
How Do I Clean My Feeder?
This will depend on the type of container you have. I use minimal dishwashing soap and rinse with warm to hot water. I’m always afraid that hot water will break my containers.
Some feeders can be put in the dishwasher. I would read the directions on the one you decide to buy.
How Long Can I Store The Leftover Sugar Water?
To be safe, the limit is two weeks in the refrigerator. I would date the bottle you store it in so you can remember when you made it. Before using the stored nectar, check the container for any discoloring, which may be a sign of mold. If you have any questions about the safety and quality of the nectar, throw it out.
Why Don’t The Hummingbirds Come To My Home?
Stay clear of pesticides and insecticides; they can poison the birds. For one thing, they eliminate insects, one of the food sources the birds need to thrive. Please make sure the sugar water is fresh. As mentioned above, be sure to have some bright-colored flowering plants nearby, too. Some good plants that help attract hummingbirds are bee balm, salvias, weigelas, cardinal, trumpet, and honeysuckle.
They tend to be shy birds, so place the feeder away from areas with a lot of foot traffic or kids playing. Also, they prefer shadier areas, and the shady areas will allow the nectar to last a little longer.
I’ve found my feeders do better if a few trees are around. The hummingbirds like to perch in the trees to rest, and it also provides a location to keep an eye on the feeder. We don’t think of them as predatory birds, but they are territorial birds and will fight to protect “their” feeder.
How do I Keep Pests Away from My Feeder?
If you live in an area that is prone to having a lot of insects, here are a few ideas to help keep them from your feeder and the precious nectar inside:
Some feeders are better at protecting the nectar, like saucer feeders that keep the nectar away from the feeder “port.”
Please don’t use a feeder with any yellow color, as it tends to attract bees and wasps.
Keep feeders clear of tree branches and rain gutters. Consider hanging the feeder with a fish line rather than hooking it directly to the pole. It’s harder for pests to climb the line.
Most pests like sunlight, so again, put the feeder in a shady area.
Keep the feeder away from garbage cans and other containers that might attract insects.
You can try using insect traps, like ant traps, to catch the pests before they can reach the feeder.
Do They Reuse Their Nests?
No, they don’t reuse their nests. Most will barely make it through a single breeding season. They may recycle the sticks and cobwebs from the original nest.
They may even steal another nest and recycle it for their use.
The Best Hummingbird Feeder
I like this one because it’s easier to clean and fill. My neighbor has this style, and when mine no longer works, I will purchase them. I always bring in both feeders, clean them, and refill them simultaneously. Hummingbird Feeder 16 ounces
How To Make Hummingbird Food
Final Word
I hope you print off the Hummingbird Food Recipe to use on another day. Let me know if you have birds visiting your neighborhood. If you have hummingbirds visiting your yard, it’s a good sign that it is full of beautiful flowers that help attract them. Note that if you have large glass windows near your feeder, consider covering them with mesh a few inches from the glass to help protect the birds from flying into the glass and possibly killing them.
Thanks for being prepared for the unexpected. Keep on prepping; you’ll be glad you did. May God bless this world. Linda
Copyright Images: Hummingbirds Hovering On Red Dish Depositphotos_6869090_S By Tamifreed, Hummingbird Eggs In Nest Depositphotos_2160692_S By Tobkatrina, Hummingbirds At Feeder Eating Nectar Depositphotos_71276817_S By Okiepony
When it comes to baking, understanding your leavening agents is essential for achieving the perfect rise and texture. Two of the most common leavening agents are baking soda and baking powder, and while they might seem similar at first glance, they’re chemically quite different. People looking for baking soda substitutes often first think about baking […]
In the first part of this article, we covered the essential steps for handling bullet wounds in emergency situations, focusing on immediate response, basic first aid principles, and techniques for managing specific types of injuries. These initial actions are critical for stabilizing the victim and preventing further harm until professional medical help arrives. However, the ... Read more...
There’s always a lot to do in your garden: plants to tend, pests to get rid of, and soil to improve. Even a small garden can turn into quite a job! Most of us who garden by choice want to get a great return and enjoy the fruits of our labors. That’s why companion planting ... Read more
There’s a bit of a tendency to focus on firearms here in the prepping and survival community. That makes sense, when you think of it from the viewpoint of self-defense […]
A fake electronic outlet. The bottom of a fake plant. A false bottom drawer. All these might sound nice to the unexperienced eye, but there’s no way your whole stockpile will ever fit into those small places. I think you’re just as tired as I am of unrealistic prepping ”hacks” that AI-authored articles call ”game-changing”. […]
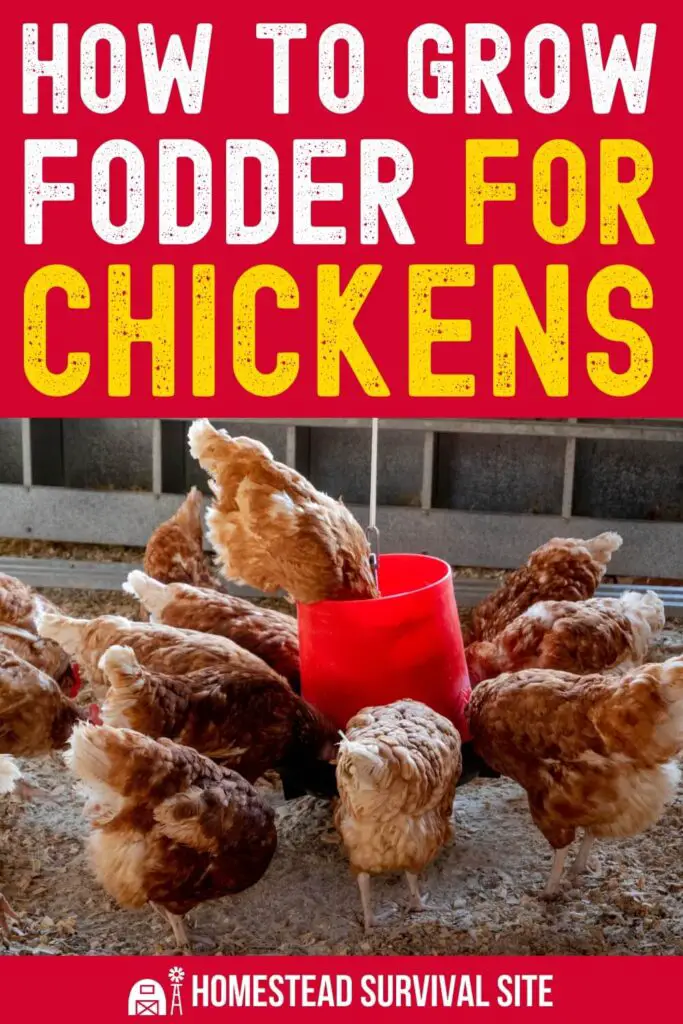
With frequent egg shortages and soaring egg prices at the grocery store, more and more people are raising their own chickens.
However, although those fresh eggs are wonderful, those chicken feed expenses can start adding up. One way to cut down on those costs is by supplementing your flock’s diet with fodder. This article discusses what fodder is and how you can grow it for your backyard flock.
What is Fodder?
Fodder is a mat of sprouted seeds that can serve as a nutritious and cost-effective feed for chickens and other small animals. Depending on the time of year, you can grow fodder indoors or outdoors.
You can grow fodder to supplement your flock’s diet at any time, but having it as a food source can be particularly helpful in winter months when access to fresh grass and other greens is limited.
Fodder is full of vitamins, minerals, and proteins chickens need, and it is highly digestible. Another advantage is that eating fodder can help relieve your chickens’ boredom when the weather is inclement.
Steps for Growing Fodder at Home
If you’ve grown your own microgreens at home, you already have a leg up in knowing how to grow fodder. Plus, you know how easy the process is.
Seeds
Your first step is to choose the type of fodder you want to grow to supplement your flock’s dietary needs. For example, seeds with high protein content include clover, alfalfa, and peas. Or, you may prefer to try oat, wheat, or barley seeds, which germinate quickly.
Many fodder growers mix different types of seed to achieve a balance of nutrients. Popular seed choices include the following.
Alfalfa
Barley
Buckwheat
Field Peas
Millet
Oats
Ryegrass
Soybeans
Sunflowers
Wheat
White Clover
Winter Rye
Trays. You can grow your seeds indoors in trays without soil. You can find suitable trays in the garden supply section or online retailers. Or, if you prefer, you can use baking trays you have at home or recycle clean plastic or foam shallow containers for seed growing. You’ll just need to add several drainage holes if the trays don’t already have them.
Location
When growing fodder indoors during the winter months, choose a warm location. They don’t need to be in or near a windowsill. In fact, a cold window can hinder growth in the winter and may contribute to mold growth. Supplemental light typically is not required.
Most seeds will not germinate in temperatures below 50℉. However, when nighttime lows exceed 50℉, you can place the trays outside in partial shade where they won’t get too dried out by excessive heat.
Seed Preparation
Some types of seeds (and those sold in bulk for use as livestock feed) are prone to mold. To prevent the potential of moldy fodder, you may want to disinfect your seed supply before you place them in your trays.
An easy way to disinfect the seeds is with household white vinegar. Here are the steps:
Rinse the seeds in cold running water.
Place them in a clean bucket.
Cover seeds with vinegar at a level one inch above their level.
Soak seeds in the vinegar for about 15 minutes, stirring occasionally.
Rinse seeds again with cold running water.
Place the rinsed seeds in a clean bucket and cover them with about two inches of fresh water. Let them soak overnight. The next day, drain out the seeds and transfer them to your trays. Spread out the seeds evenly in the bottom of the tray.
Watering
The seeds need to stay moist in order to germinate. Plan to give them some water once in the morning and again at night. A sprayer water bottle can work well since you want them moist but not sitting in standing water. If they are drying out between those two watering times, you may need to add a clear lid to reduce evaporation.
Growth
You should notice roots developing within the first two or three days. Then, you will see sprouting as the germination process continues. After about seven to 10 days, you should have a solid mat of fodder that is about three to four inches tall that you can remove from the tray in one piece. Keep in mind that the rate of germination can vary according to the type of seed.
Feeding
You can set the fodder mat on the ground directly in the pen. If you have a sturdy tray, you can leave it in the tray for your flock to enjoy.
Chicken Fodder FAQS
How much fodder should I feed my chickens?
The answer depends on whether the fodder is a supplemental feed or a main feed. It’s important to keep in mind that chickens eat 2 to 3 percent of their body weight each day. Also, if fodder is their main diet, consider giving them a supplement to provide them with needed calcium and other minerals.
Are sprouts and fodder the same thing?
Both sprouts and fodder are hydroponically grown feed made from grasses, grains, and legumes. The main difference is that sprouts typically are harvested before they reach four inches in height, and fodder is harvested at taller than four inches.
How much light do the seeds need to grow as fodder?
In order to germinate, the seeds require only warmth (around 70℉ is optimal) and moisture. Too much warmth can lead to mold growth. We found one study that revealed that barley sprouts grown in a greenhouse where they were exposed to bright sunlight had more root development.
On the other hand, barley sprouts grown without sunlight exposure grew longer shoots. Since your chicken will be enjoying nibbling on the shoots, it goes to follow that sunlight is not necessary.
For more information on growing fodder for your backyard chickens, check out these resources.
Lately, more and more politicians are raising the specter of World War III. The events in Ukraine, the war in the middle-east, and the local conflicts affecting so many other parts of the world all seem to indicate a growing powder keg ready to explode.
Fueling the fear is the continuing spread of terrorism both state-sponsored or driven by crime syndicates as cartels continue to bring countries and societies to their knees. A look at the wars of the past century provides an unfortunate set of indications.
World Wars don’t start overnight. It sometimes seems that way as events like Pearl Harbor and the assassination of Archduke Franz Ferdinand seemed to be the triggers for World War, but in actual fact, a series of events allowed World Wars to explode. This series of events is sometimes referred to as the “long fuse.”
The events and conflicts that define that fuse appear throughout the last century and are still smoldering to this day.
Is Personal Preparation for World War III Possible?
It should be. What’s the alternative? The big question gets down to the nature of any war. Preparing for a conventional war requires a whole different set of preparations than preparing for the devastation of a nuclear, biological or all out cyber war.
In this article, we’ll cover some of the basics and provide links to expanded information and details through articles, videos, and books.
The Dynamics of World War
A world war is typically defined as a war between multiple nations, usually in an alliance that pits one against the other. In some way, shape, or form, a member of that alliance feels threatened or attacked by a nation from a different alliance and what could have been a local conflict between two countries becomes a war between alliances.
History tells that story all too well, so it's worth taking a brief look at the events that led to war over the last hundred years.
The Long Fuse of World War I
There’s actually conflicting opinions about the cause of World War I, but the event that led to much of the conflict was the annexation of Bosnia by the Austro-Hungarian empire. Serbia, a neighboring country of Bosnia, was hoping that the two countries could merge given the common background of their people.
After the annexation, any thoughts of a combined Bosnia/Serbia were now impossible. A terrorist society in Serbia known as the Black Hand emerged, and it was a member of the Black Hand who ultimately assassinated the Archduke of Austro-Hungary.
Austro-Hungary mobilized their troops for a planned invasion of Serbia after the Serbian government was dismissive of the assassination. Germany was allied with Austro-Hungary but still saw it as a local conflict.
It was an alliance between France and Russia that fueled the flames, and both felt any incursion into Serbia would be a threat to their territories, especially Russia. The events that followed can best be described as a combination of paranoia, fear, confusion, miscommunication, poor leadership, and misunderstandings.
World War I began with an invasion of Belgium by Germany, and Britain joined the alliance. The U.S. entered the war in 1917, and the war ended with the Treaty of Versailles in 1918.
The Long Fuse of World War II
The Treaty of Versailles resulted in a demand for war reparations from Germany. Most of those reparations went to France. The amount was $5 billion dollars, a staggering sum in 1918. The left Germany crippled as a nation. The global depression of 1929 exacerbated the devastation in Germany that ultimately fueled the rise of Adolf Hitler and the Nazi Party.
Hitler soon annexed Austria and Czechoslovakia and was unopposed by other European nations. This emboldened Hitler, and in 1939, Germany invaded Poland. That finally led to a response, and an alliance led by France and Britain declared war. World War II had begun.
In the meantime, the military grew to dominate the country of Japan. As an island nation, they were devoid of many resources, and the military junta invaded Manchuria and territories in China in 1931 mostly for their natural resources.
There was little response from the rest of the world, although the U.S. did enforce a strict embargo on goods and products to Japan, including oil. Japan wanted to end the embargo and determined that it could force the U.S. to end its embargo by crippling its naval fleet at Pearl Harbor.
The U.S. instead declared war on Japan. For reasons still debated, Hitler declared war against the U.S. days later. World War II was now, literally a world war.
Ultimately, World War II ended with the death of Hitler and the dropping of the Atomic bombs on Japan. Germany and Japan were actually rebuilt by the U.S. Marshall plan to avoid the devastation of reparations caused by the treaty of Versailles, but Russia emerged as a new threat as the newly formed Soviet Union held on to new territories in Eastern Europe.
Today’s Long Fuse
The end of World War II led to the rise of communism in the Soviet Union and China. Both countries spread their influence and doctrine to other countries, and the result was both the Korean war and the war in Vietnam. Both ended without results, and the tensions continued.
The Soviet Union dissolved in the early 1990’s and many eastern European countries regained their sovereignty. Unfortunately, Vladimir Putin has declared his intention to regain what he perceives as lost territories, leading to the current conflict in Ukraine.
The creation of the state of Israel following World war II in 1948 has continued to be a flashpoint for many middle-eastern countries and ethnic groups. The surprise attack of Hamas has made tensions higher than they've been in years, maybe decades.
Israel continues to destroy Gaza, and Iran-backed Houthi rebels continue spontaneous attacks through the region. Meanwhile, China rattling sabers about annexing Taiwan. Not to mention North Korea, which continues to fire missiles into the Sea of Japan and boast of their nuclear capability.
The big question is when and what will emerge as the trigger for a multi-national war. Maybe the bigger question is what can any of us do about it.
Preparing for World War III
The thought of preparing for World War III is a staggering proposition. It’s one thing to prepare for a natural disaster like a hurricane, an economic downturn, or even something as domestic as civil unrest. World War as a concept leaves a lot of people wondering where to start. Maybe the best way is to consider the potential nature of the conflict.
Conventional War
A conventional war is defined as a war that engages various armed services in a conflict defined by conventional weapons. Most people will not be in the war zone, but the effects of war on a global scale will affect everything in our lives. This includes the availability of goods and services and many of the other fundamental necessities that define our lives and lifestyle.
The actual list is similar to preparations for other “conventional” disasters that don’t bring the catastrophic effects of things like nuclear radiation, biological pathogens, or the destruction of the Internet and all e-commerce.
Here are categories to consider for conventional war preparations:
Water
You can put water in storage, but if water is in short supply, you’ll need to find water from natural sources. Rain water is a possible option but requires filtering and purification. The same is true for water from other natural sources. Storage will always be a good idea, but the ability to replenish stored water could be a constant challenge.
Be prepared to sew and repair clothing. You’ll also need to think about how to launder clothing without electricity. Stockpiling fabric and sewing supplies will give you some options for making your own clothes. Think about repairs to shoes and boots as well. And while you’re at it, stockpile some clothes.
Communication
A lot can affect communication during times of war from grid failure to cyber attacks to an electro-magnetic pulse. Learn about all of the ways you can continue to communicate with family and access local news.
Fuel may be scarce and roads closed, barricaded, or simply inaccessible. Consider alternative transportation methods including bicycles with pull-behind buggies or carts, rechargeable electric powered bikes, and get used to walking.
Fuels
Gasoline, kerosene, propane and most other fuels the require refining will most likely be very expensive and in short supply. Rationing is a always a possibility. Learn to conserve fuels, and consider alternatives to some fuels whether it’s understanding all of the oils you can burn in a lamp or salvaging from abandoned vehicles.
Self-Defense
Home defense is a critical first step as local law enforcement becomes overwhelmed by growing challenges. Firearms are a good option in addition to stockpiled ammunition and basic firearm maintenance and repair skills. Personal self-defense and situational awareness are also critical in desperate times.
Children’s Education
Schools may be closed and even e-learning may be limited depending on the power grid and the integrity of the Internet. Think about home schooling and the necessary books and materials to continue a child’s education until things hopefully return to normal, at least to some degree.
War decimates global economies. Learn about how to protect your investments. Think about having cash on hand and consider traditional emergency reserves like gold and silver coins. Crypto currency is probably not a good idea, but a better source would be barter.
Nuclear war continues to be the hot-button of conversation as global conflicts escalate. Preparations include the conventional preparations with some specific additions related to nuclear events. If there’s one place to start, it’s with an excellent book that details all of the possibilities related to a nuclear detonation. Specifics covered in the book include:
Assess your new location carefully. Some of the most remote parts of the country are home to inter-continental ballistic missiles and will most likely be targeted in a nuclear exchange. Other countries are another possibility. Australia and New Zealand often show up as recommended safe havens.
Construction a Faraday Cage
A nuclear detonation happens in stages starting with a flash followed by a burst or radiation and finally the shockwave. Hidden in those stages is an electro-magnetic pulse or EMP. An EMP can reach far beyond the other stages of a nuclear detonation. An EMP literally fries all electronics, particularly circuit boards. A Faraday cage protects electronics in the event of an EMP. They’re easy to make.
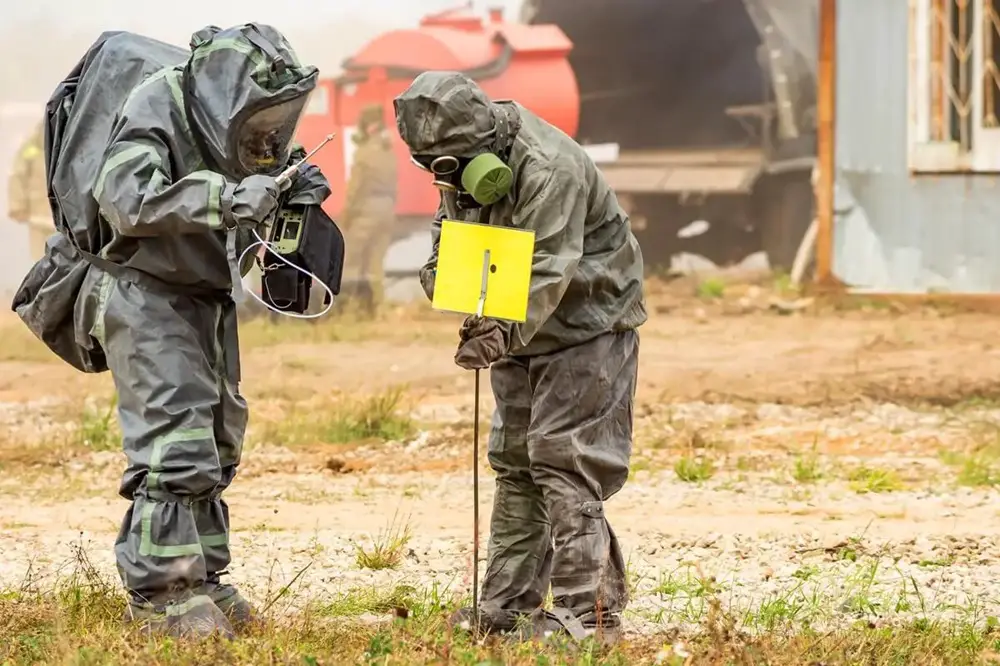
Biological War
We all had a brief lesson on the impact of a biological threat during the COVID pandemic. Unfortunately, there may be some rogue nations that took special note of that effect and may be motivated to consider it in the future as a way to engage in a last desperate act of war.
That leads to the possibility that World War III could in fact be worse than the fading effects of radiation following a nuclear war. It could literally plague us with an ever mutating and genetically engineered virus.
Specific details covered for preparations include:
Hazmat Suits and PPE Gear
Hazmat suits are similar to radiation suits and are self contained, airtight suits with specialized filters for breathing.
A Range of Sanitation Supplies
Bleach, white vinegar, hand sanitizer, rubbing alcohol and other chemicals should be stored and understood for any sanitizing or sterilizing. And remember that direct sunlight and artificial UV light is also an effective way to sterilize.
Equipment for a Germ Free Environment
Think duct tape, plastic sheeting, and anything else that can prevent germs from entering a living space. Drafts around electric outlets and any other outside outlet like dryer vents should also be sealed if outside air can enter a home.
Equipment for Food and Water Sterilization
Water from natural sources can be contaminated so effective filtering, purification and boiling is always recommended for any water for drinking or cooking. And don’t assume a basic cooking process will sterilize water. The minimum is 3 minutes at a full boil for effective water purification.
Medical Equipment and Supplies
It’s unlikely that you can stockpile a cure for a genetically engineered disease but you can treat the symptoms. Think about remedies for coughing, congestion, infections, blistering, pain, inhalers to aid breathing, eye drops, and any other OTC meds for symptomatic relief.
Cyber War
Cyber war is happening all the time. Ransomware has become a new form of terrorism and hackers regularly steal millions form people on a regular basis. It could no doubt be that World War III is a global cyber war as even the poorest nations find a small group of coders and programmers to destroy the global infrastructure defined by the Internet.
AI may be given the authority to implement strategy and tactics in a time of war. The decisions will most likely be highly logical and emotionally ruthless depending on the country implementing that kind of system.
In the event of a 3rd world war ruled by AI, the next possibility is the most likely.
All of the Above
The history of emerging technologies is directly tied to the history of war. Everyone tends to focus on nuclear war as the ultimate Armageddon. In actual fact, it may be a war with a blend of every savage technology we can imagine.
Nuclear powers may eventually turn to their nuclear arsenal, while less developed nation states may turn to biological warfare with the assumption that they have nothing to lose.
Even the most failed state could assemble a small team of hackers to wreak havoc on the Internet and add cyber war to the mix. When countries go to war, they seldom show restraint, and as each new weapon system enters the conflict, others respond in kind.
It gets back to one of our opening questions: Is preparing for World War III even possible? For most of us, all we can do is our best.
Perhaps there’s a more troubling observation related to the on-going and emerging events affecting many parts of the world. It may be that it’s not a question of whether or not World War III is imminent. The bigger question given the constantly evolving conflicts and their genesis in 1914 is whether World War I ever truly ended.