Today it’s all about containers for food storage you need. Sometimes we don’t know what works when it comes to our food storage options. I’ll try and help you today. Stocking up on an abundance of food and then tucking it away for your family to use during an emergency is certainly a great place to start.
But when it comes to food storage and emergencies, it is important to understand how best to store the food so it will hold up for longer periods. To prevent your food from being tampered with, or the quality from being compromised, you need to have a more longer-term solution. These are several different container options that you can use for food storage.
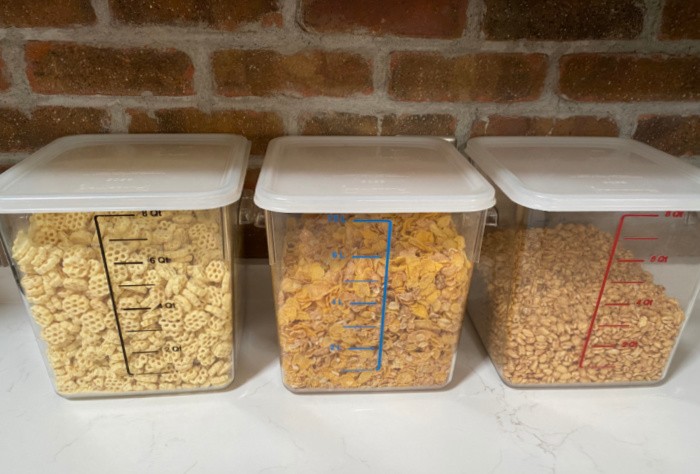
I always say, buy right the first time. I have had the cereal containers you see below for about 15 years. They will last a lifetime in our house. They are sturdy and easy to carry from the pantry to the kitchen counter.
Containers for Food Storage You Need
What am I Protecting My Food From?
To help you determine which container for food storage is best for you, it’s important that you first understand what exactly you are protecting your food from. There are 5 different elements that come into play when it comes to destroying food.
They are heat, humidity, light, oxygen, and pests. Unfortunately, I don’t know of any food storage container to date that can protect against the element of heat, but these container options will work well against the other 4 elements. The location you have your food stored can certainly influence temperature. That’s why I miss my basement storage area. It stayed at pretty much the same temperature throughout the year, and it was generally fairly cool.
Containers for Food Storage You Need
Down below I’ll share with you 6 different containers for food storage, along with the pros and cons of each of them so that you can make your own judgement on which method is best for you.
1. Original Packaging
Your first option would be to simply keep your food in its original packaging. This is obviously the easiest and cheapest solution that will work for preppers that are first starting out, but here’s a little more regarding why it’s not a great long-term solution.
I do not recommend original packaging, use OXO Containers instead. Yes, they are a little expensive, but they will protect your food from mice and cockroaches. They are tight, but not airtight, please don’t use them for long-term storage. I use them on my pantry shelves, they work great.
For starters, original packaging was never meant to survive in a natural disaster like an earthquake or hurricane. These packages can be easily broken or smashed following any one of these disasters, leaving your food exposed to the elements.
There are also rodents, insects, and other critters that can easily gnaw their way into your food supply. Yuck! Oxo Containers
2. Option – Plastic Containers
Repurposing your plastic bottles (pop bottles) for food storage is another cheap and easy way to store your food. They will do a decent job protecting against rodents and insects, as well as flooding. Just remember to add plastic over the mouth of the container and then secure it with the bottle cap.
The downside to using plastic bottles is that the plastic may eventually start to leach into your food. It’s also difficult to fully protect your food from oxygen and humidity. I don’t recommend using them, but if it fits your budget, then use them.
I highly recommend these Rubbermaid 8-quart containers, they are awesome. We store so many things in these containers. The cheapest place to buy these is at WebstaurantStore. Rubbermaid 8-Quart Containers and Rubbermaid Lids.
3. Glass Jars
Glass jars are a great solution for pickling and storing bulky foods such as grain or rice, and have a few other benefits that are worth addressing. They’re not only cheap and easy to use, but you can also see the food, which will help you have a better rotation system. You also don’t have to worry about rodents getting into your food supply.
However, this container storing option does come with its flaws. The most obvious one is that glass jars can break easily when debris and heavy objects start to come crashing down. It’s also difficult to get an air-tight seal on them so it becomes more difficult to keep food fresh once the container has been opened. If you have a FoodSaver it will remove the air from the jars which makes them better for longer-term storage.
This is an okay option if you don’t live in an area where earthquakes, hurricanes, or flooding are known to occur. You can keep your glass jars from breaking by reinforcing your shelving with a 1”x 4” board in front of them and making sure that your cabinet doors are secure.
Some people suggest that you add oxygen absorbers inside your jars before you seal them. I don’t, it’s a personal preference. Mason jars are awesome, and if you can get them, please stock up on them. It was crazy last year, no one could get them. I prefer wide-mouth or regular mouth, they are easier to fill than the smallmouth version.
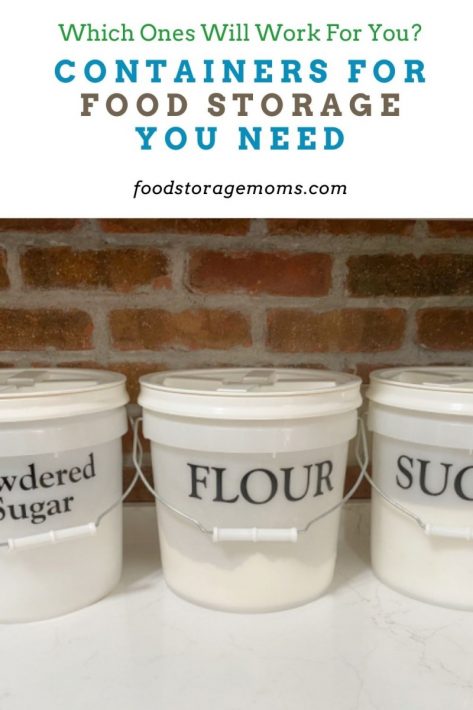
4. 2 Gallon, 3.5 Gallon, 5 Gallon, and 6 Gallon Buckets
Buckets are a great way to store your dry bulk foods for short-term and longer periods of time. They do a good job keeping rodents out, along with protecting your food from air, light, and humidity. They’re also built sturdier by design, meaning that they shouldn’t break during a natural disaster.
The ones shown above are 2-gallon buckets. I also have 5-gallon buckets with flour and sugar and refill these as needed. I use six-gallon buckets for food storage as well. This is where I get all of my buckets. Pleasant Hill Grain is my go-to place for all of my bucket needs. The words on the buckets are vinyl lettering my daughter made for me.
- 2-Gallon Buckets and 2 Gallon Gamma Lids
- 3.5-Gallon Buckets and 3.5 Gallon Gamma Lids
- 5-Gallon Buckets and 5 Gallon Gamma Lids
- 6-Gallon Buckets and 6 Gallon Gamma Lids
If you are thinking that this storage option is right for you, make sure that you get lids with air-tight seals on them, along with plastic containers that are considered food safe. But don’t just dump your flour into a bucket and call it quits. You may want to freeze the flour beforehand so that you make sure that it kills any insect eggs that may be present.
I can’t do this because I buy 25-50 pound bags of flour at a time. I’ve been lucky, I haven’t seen weevils in my flour. I only buy my bread flour from Costco, in case you are wondering.
Sugar and salt must be kept dry or they will become bricks. Salt and Sugar will also become bricks if someone uses oxygen absorbers in the buckets, please don’t do it. Just FYI.
5. Mylar Pouches along with Oxygen Absorbers
Mylar pouches are made from a metallic material that will keep all light and gases out. And if you add an oxygen absorber to them, your dry foods are capable of lasting for many years, maybe even decades. You also have the benefit of storing a fair amount of food in them, yet they’re easier to rotate through than the 5 gallon bucket option.
But there are a few drawbacks that need to be addressed. Their seals can be easily broken and the package itself can be damaged if not handled correctly. It also won’t protect against rodents and other animals that can easily chew through the packaging.
Please note, I don’t use Mylar bags or oxygen absorbers, it’s a personal preference.
6. Mylar Pouches Inside a Bucket
A good solution for this problem is to consider putting your mylar pouches inside of food storage buckets. People will tell you that this is among the best ways to keep your food stored for a much longer period of time.
It protects against the elements, rodents, and insects, as well as rough handling if placed inside buckets.
If done properly, along with being left sealed up, your food can last up to 25 years if you use oxygen absorbers!
This method does require the right equipment and the knowledge to make sure that your food is sealed up correctly. It’s a long-term food storage solution for your food, so you won’t want to open the packages, unless you are dealing with an actual emergency.
Final Word
I hope my post today helps with the pros and cons of 6 different containers for food storage. Which of these do you plan on using for your emergency food storage? I’d love it if you left a comment down below. May God Bless this world, Linda.
No comments:
Post a Comment