Americans produce almost 40 million tons of food waste each year – that means we’re putting about a pound of food into the trash each day, when this is totally unnecessary. Composting is a great way to reduce your household’s food waste and to make fertile, nutrient-rich planting matter that you can use in your garden.
There are several ways you can start composting. Whether you’d rather compost with worms (a method called vermicomposting) or use a compost tumbler, the fact of the matter remains that these methods can be cumbersome and challenging to manage.

After all, when you compost, you are constantly adding new ingredients to a compost bin, meaning it’s difficult to tell what compost is done, and which ingredients still need more time to be broken down.
You will be constantly creating new, heavy, wet material each day, and you won’t be able to harvest fresh compost when it’s done (since you’ll be continuously adding in new material).
Benefits of The 3-Bin Compost System
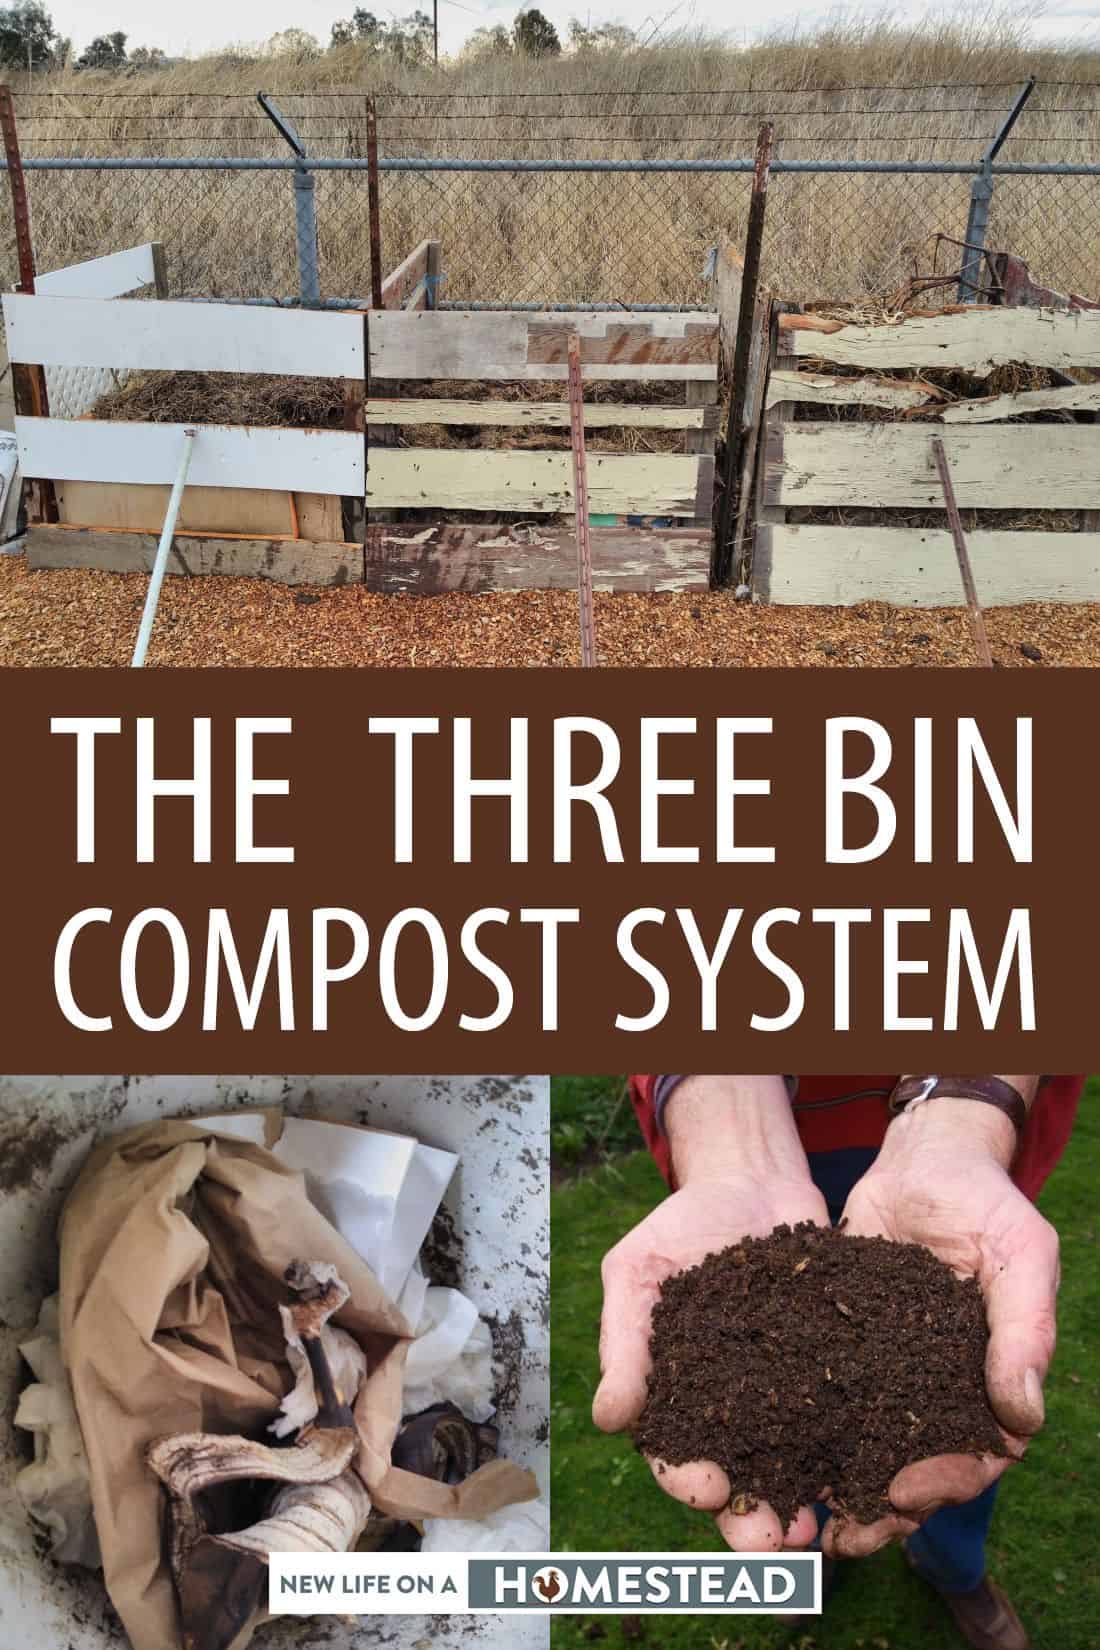
The 3-bin compost system may be the simplest setup for those who have backyard space, and want to create high-quality hot (or cold) compost to use around their homestead.
The bins don’t take up a lot of space and, with the right mixture of ingredients and treatment, they can create compost in a couple of months, if not weeks!
By using a 3 bin composting system, you’ll reduce the amount of weight in your overall compost pile. You don’t have to spend a ton of time (or use a lot of energy) turning the pile every day because your piles will be smaller and much easier to manage.
You can mix in various ingredients from both the garden and kitchen, and make compost throughout the year. Since you don’t have to wait for a huge pile to finish composting, you can harvest it whenever it is needed.
With regular composting, the process of decomposition is prolonged. You’ll always be mixing new material with developing compost. You will instead have a cycle that will be easier to manage and allow you to harvest compost whenever you are ready.
In the first bin, you’ll put your fresh scraps. Right now, this is where the composting action gets started.
However, if you continue to add new waste on top of the developing compost, it will take you longer to get quality compost. With the 3 bin system, fresh waste is confined to just one section. As it starts to form, you can transfer it to the second bin, and then the third when it’s finally finished.
The 3-bin composting system is an easy method that will encourage you to compost, while also allowing you to use that compost. You can turn food waste, yard waste, and even weeds into a valuable soil amendment.
A three-bin system is more attractive than composting in a hap and it can be enclosed, too, helping to keep out pests and curious animals. A 3-bin system is often a more manageable size, too, meaning it will be much easier for you to stir and maintain the pile as needed.
The 3 Composting Stages
The idea of a three-bin compost is to follow the traditional phases of compost development. These phases of course happen in every compost pile, but in a three-bin system, they’re a bit easier to delineate.
In the first stage of composting (in what will be your first bin), both bacteria and fungi are being built up from the soil. The temperature of your compost pile will slowly start to increase.
All you need to do is add a bit of material, turn it regularly, and keep an eye on the moisture level and temperature.
It can take a few weeks for this stage to complete, but you usually won’t have to wait more than a month to get through the first process of decomposition.
During the second stage of composting, things will start to “cook.” Bacteria and fungi will be working hard to turn the organic matter in your bin into compost.
Try not to disturb the pile too much – unless you notice a foul smell. Everything should be breaking down and turning into one compact mass within the second bin of your compost system.
In the final stage of composting, you should not be able to recognize any of the material in your compost bin. The temperature in the center will begin to drop, and you’ll begin to be able to harvest the soil to be used in your garden.
3-Bin Design
There are only a few factors that go into designing your 3 bin system. It doesn’t require a lot of building experience, and it can be finished in an afternoon. It’s also relatively cheap, or even free if you have materials on hand!
Size
The size of each bin should be at least a cubic yard. That means it should measure 3 feet long, 3 feet wide, and 3 feet deep. This is the amount of bulk material needed to create enough heat to kill off weed seeds and potential pathogens in the compost.
You don’t have to settle for this size, however. You can also build each bin larger. A novel idea is to build your first bin larger since it will be the largest pile.
When compost starts degrading, the piles will shrink, so the first bin will always contain the most biomass. The 2nd and 3rd bins will always be less full than they were in the previous bin due to the decomposition taking place.
I choose to build my bins 3 feet (90 centimeters) long and wide, but at a height of 3.5 feet (1.06 meters). This allows me to pile a little more material on top of each bin since I am in no shortage of composting materials.
One design consideration to make as you are building your bins is that you may want to include removable slats in the front of each bin to give you easy access to the compost. It’s far easier to get the compost out if you can remove the front (and this can also make it easier to turn the bins, too).
Location
Your location matters for potential smells (although a proper pile won’t stink), proximity to where the compost will be used, water access, and rain cover.
Like I mentioned, a smelly pile is the result of an error of the materials put in, which will be discussed later.
But, even the most experienced homesteaders may make an error here and there, and end up with a smelly pile. It’s best if the bins are set up a little away from your living area just in case.
I have my compost bins set up inside my garden fence. That way, all garden waste doesn’t have to be dragged across my homestead, and when the compost is finished, it is right where it needs to be.
You don’t have to put it right in the garden, but think about how far you will need to wheelbarrow your finished compost time and time again.
You will need water access to water your piles to keep them moist if you don’t live in an area with regular rainfall. A dried-out pile will remove the majority of the microorganisms that are working to make your compost faster, and you’ll end up cold composting.
While this isn’t a problem and you’d still end up with high-quality compost, cold composting takes a lot longer to finish.
Now, if you do live in an area with regular rain, you may have to build a roof structure for your piles so they don’t get too wet. Too much water will create an anaerobic environment, and will lead to a stinky mess that doesn’t compost well since microorganisms can’t thrive in that environment.
I’ve seen fancy designs that even capture the rainwater from the roofing to water the piles at a later time, creating a more self-sufficient compost system.
Now, while it’s important to keep the compost a bit away from your living space to prevent critters and smells (again, it shouldn’t stink, but every now and then you may catch a whiff), you do want it to be close enough to your home so it’s not a huge chore to add to the pile.
The location should also be sheltered from strong winds and full sun, ideally in partial to full shade to help keep the material moist.
If you don’t get a lot of natural rainfall (or you plan on covering your 3-bin composting system), you will also want to position your compost bins so that you can get water to them in case the material gets too dry.
Materials
You can build these bins out of any material that you may have around the homestead. I built mine out of a bunch of scrap wood that would have been burned or disposed of. Instead, I created the 3 bins that have been helping me create compost for over a year now.
Functionality doesn’t have to cost you a lot, or any money at all!
A popular method to make these bins is to build them out of old pallets. Here is a simple video showing how this works:
Here are some common materials used to make compost bins:
- scrap pieces of 2x4s and 2x6s for the vertical posts and siding
- wood fencing panels
- pallets
- wood lattice
- metal fencing with small holes to contain composting material
Other than your choice of material for the siding, you need nails, screws, or twine to secure your panels together. It’s that simple!
Be sure to use wood that hasn’t been chemically treated. While this kind of wood does stand up to the elements the longest, it also leeches harmful chemicals to its surrounding environment.
If you want a wood that’s still rot-resistant without all the chemicals, use options like redwood or cedar. This will be your best bet at creating a compost bin that stands the test of time.
Since the environment is your compost, you’d end up putting those harmful chemicals in your finished compost, garden soil, and your fruits and vegetables!
If you’re concerned about the ventilation of your bins, you might want to use chicken wire, metal fabric, or another kind of material to give you additional circulation in your bins. You don’t have to use these for all four walls, but if you use it on just one side, it can really improve the ventilation of your 3-bin system.
Purpose Of 3 The Bins
You could easily build one compost bin and fill it, and wait for it to turn into compost over time. The pile will probably heat up for a while and then convert to cold composting and take up to a year or two until it is usable.
That’s why you want to build a 3 bin system. Flipping your compost piles and mixing the ingredients regularly exposes them to more oxygen, and helps the bacteria and microorganisms thrive again and again. A flipped compost pile will heat up readily, and speed up the composting process.
If you are using the right composting materials, watering regularly, and flipping each time you fill your first bin, you should have finished compost by the time it’s ready to remove from the third bin.
If you have some stubborn materials that don’t compost quickly or didn’t have the optimal carbon to nitrogen ratios in your piles, you may find that some of the material in the third bin is finished composting and others still need more time.
The finished compost can be sifted out and the material that still needs to decompose can be tossed right back into the first bin.

You can build more than 3 bins if you don’t focus on your carbon to nitrogen ratios and neglect proper watering. Using 5-6 bins may ensure that all of the materials are finished composting by the end of the line.
But, for those of us with more attention to detail and want the compost to be finished quicker, the 3 bin system is sufficient!
Gathering Compost Materials
You can compost the huge majority of waste produced on the homestead. They can be divided into carbon materials, or browns, and nitrogen materials, or greens. Each ingredient has a specific carbon to nitrogen ratio. All of the materials combined create a C:N ratio for the whole pile itself.

For example, this mix of shredded leaves and chicken manure from a chicken run has a specific carbon:nitrogen ratio that contributes to the composting speed.
For the whole pile, the ideal ratio is between 25-30:1. So that means for each part of nitrogen, you need around 25-30 parts of carbon to create optimal hot composting conditions.
A ratio that is too low will put off nitrogen as a gas instead of it absorbing into the compost itself. A ratio that is too high will take longer to compost as the nitrogen is the main fuel for heating a pile.
While all of this sounds confusing, you can look at it this way: by volume, include 1 part greens and 2-3 parts browns. This is an easy formula to get close to the ideal ratio for hot composting. A hotter pile may reduce the volume of compost produced and a colder one will take a bit longer.
The process will continue, however. The 3 bin system will still work and create high-quality compost by the end, even if it does take a few more weeks than planned.

Here are some common carbon materials found around the homestead:
- Wood chips
- Nutshells
- Fall leaves
- Paper
- Cardboard
- Straw
- Corn stalks
- Shredded branches
- Coffee filters
- Dryer lint
- Cotton fabric
Here are some common nitrogen materials found around the homestead:
- Animal manure (except for dog and cat)
- Food waste
- Coffee grounds
- Weeds
- Tea bags
- Eggshells
- Seaweed
- Fresh grass clippings
- Exhausted garden plants
Mixing in all of these ingredients together will create a compost that is rich in a variety of nutrients. Focusing on creating compost with a limited number of ingredients narrows the ingredients that make it into the finished compost.
Watering Your Compost
Your compost piles need to stay damp. The moisture should be similar to a wrung-out sponge. If you pick up some of the materials, you should be able to just squeeze a couple of drops of water out of it.
Too damp, and your pile will turn anaerobic. Too dry, and the microorganisms won’t thrive enough to create a hot enough compost pile.
I find this easy enough to check on every other day and water each pile down as I see fit.
It’s hard to recommend a watering schedule because sun exposure, relative humidity, and temperature will all affect the moisture retention in your piles. It’s all about testing the moisture levels regularly if you want to optimize this process.
Flipping Your Piles
When you layer your compost piles correctly and keep them sufficiently moist, they will heat up and start the decomposition process. But, they won’t stay hot forever. Instead, they will start to lose heat as the decomposition process slows down.
This is why flipping your piles is so important. Regular flipping introduces more oxygen to the environment, and allows the materials to mix differently, creating a revived effort to heat up and speed up the decomposition.
The easiest way to know when your pile is ready to flip is to check the internal temperature of the pile with a compost thermometer (discussed below).
Otherwise, you can simply flip your piles when your first bin gets full. Then, you work through this process:
- Sift out the finished compost from bin #3. Any undecomposed material will be saved to put into an empty bin #1 if you have any.
- Bin #2 is flipped into the now empty bin #3. Ensure that the outside of the current pile ends up on the inside of the new pile as you turn it with a pitchfork or shovel.
- Bin #1 is flipped into bin #2 following the same process.
- The unfinished materials saved from bin #3 earlier can be thrown into bin #1.
Now bin #1 is empty again and ready to be filed. The other two piles have been flipped, and will start to heat up again. Water down each pile as you put them in your new bin if they aren’t moist enough already.
Monitoring Composting Progress
If you want to be very meticulous, you can monitor your compost pile temperatures daily. The optimal temperatures for hot composting are between 135 – 160 degrees Fahrenheit (57 – 71 Celsius). If your pile falls below this temperature, it would do better with a flip to the next bin.
Since you have 3 piles going at a time, you can choose to flip them once all of them fall below the optimal range for hot composting.
I find this process unnecessary since I don’t need the fastest compost possible. Instead, I just use the method of filling the first bin to the top and them flipping the piles. I still end up with great compost that just takes a bit longer to complete.
If you want compost within a matter of weeks, you’ll have to optimize your C:N ratios, moisture levels, and flip your piles each time they fall under the desired temperatures. It can be a lot of work but if you are in dire need of soil amendments, this could be done in your 3-bin system as well.
Here is a table with the most common composting materials found on the homestead:
| Type | Composting Material | C:N ratio |
|---|---|---|
| Browns | Wood Chips | 400 to 1 |
| Cardboard | 350 to 1 | |
| Paper | 175 to 1 | |
| Straw | 75-90 to 1 | |
| Leaves | 60-80 to 1 | |
| Greens | Cow Manure | 18 to 1 |
| Grass Clippings | 17-30 to 1 | |
| Food Waste | 17-20 to 1 | |
| Pig Manure | 12 to 1 | |
| Chicken Manure | 7 to 1 |
Layering Materials In Bin #1
Now that you know what materials are suitable for your 3 bin system, it’s time to start layering them into the first bin. This bin will be a fill-as-you-go bin until it gets all the way full, in which case it’s time to flip the piles into the next bins.
Layering browns and greens will be the easiest way to ensure your compost pile is mixed well in the beginning. Think of creating a giant lasagna. The browns are the sauce and the greens are the noodles. The noodles need a thin layer while the sauce gets piled on in-between.
You can sprinkle water on each layer to ensure the moisture is uniform throughout the pile to encourage a quicker heating cycle. You can also have premixed materials go straight into the pile without worrying about layering.

For example, in my house, I keep a 5-gallon bucket for composting materials. I put shredded junk mail (carbon), and food waste like banana peels (nitrogen) in this bucket and take it out to the bins when it gets full. Since I have already mixed the browns and greens in this bucket, I simply pour it on top without worrying about mixing.

A larger project with the same idea is my deep litter in my chicken run. I have a thick layer of almond shells in the chicken run. The chicken manure will fall onto this carbon bedding and start to compost in place, especially as my chickens stir it around looking for bugs and treats.
Once or twice a year, depending on the level of decomposition, I will collect this deep litter, and place it all in my compost bins to finish composting. The manure and shells have already been mixed well so I don’t worry about layering it in the bin.
Regardless of the methods you use, you need to ensure that your browns and greens are mixed well in your initial bin so it heats up and starts the composting process right. Keep this heap in your first bin moist.
It should be like a sponge when you squeeze it. IF it’s too dry, add a bit of water. If you get more than a drop or two of water when you squeeze the compost, it’s too wet. Turn it to balance the air and moisture and consider adding more “browns” to soak up some of the moisture.
While in the first bin, the temperature should start to increase. You should notice the pile shrinking in size over the first few weeks, too.
You can use a compost thermometer to check the temperature in the center of the pile, but you should be able to tell that it’s heating up because you can physically feel the heat over the pile when you rest your hand on it.
Observing Changes In Bin #2
Once the composting materials have been flipped into bin #2, the pile should begin heating up again to high temperatures above 135 degrees Fahrenheit / 57 Celsius. Ideally, the pile should be around 140 to 150 degrees F (60 to 65 C) in the center by the time you move your compost into the second bin.
When you relocate the pile from the first bin into the second, this will allow you to thoroughly mix the material without having to work hard to get into the center of the pile to turn it. This will allow for better aeration and more optimal composting.
If you properly flipped your pile and incorporated the outside materials of the old pile into the inside of the new pile, it will heat up. If it isn’t, water it more until you reach the right amount of moisture for the microorganisms to flourish.

Sifting Your Finished Compost From Bin #3
After the second bin is totally full, you can move it to the third one to allow it to decompose even further. It usually makes the most sense to also transfer the contents of your first bin into the second at this time to keep the cycle moving. Now you have room in the first bin to keep adding more ingredients.
When it comes time to add to the third bin, you can use a simple sifter made from metal hardware cloth. It will allow the finished compost to fall through to a wheelbarrow below and collect the larger materials that haven’t finished composting. Load your compost from bin #2 into bin #3, using the sifter to help collect and separate materials.
Attaching your hardware cloth to 2x4s is a popular way to handle this since it adds the sturdiness necessary to handle the heavy shovelfuls of compost.
Like I mentioned earlier, simply put the unfinished materials back into bin #1 to continue composting. The compost you have sifted out is ready to use in the garden, or wherever you need a rich, nutrient-rich soil amendment.
Using this system regularly will reduce all need to purchase soil and even fertilizers for your garden over time!
Where To Use Your Compost
The best place to use this compost is around your garden plants and fruit and nut trees. Use them where the nutrients will work to feed the plants and trees that end up feeding you and your family.
You only need to apply it once or twice a year in the garden and around trees for a nice, slow-release fertilizer effect that will also improve soil quality over time.
Common Problems
Here are the most common problems I’ve seen with compost piles in the 3-bin system:
- Piles not heating up.
- Piles getting smelly.
- Excessive pile shrinking.
- A lot of leftover material after going through all 3 bins.
When your piles aren’t heating up, you either need more biomass, more nitrogen sources, or more moisture. If your piles are stacked to the top of the bins, they are sufficient in size. If they also pass the moisture test and feel like a wrung-out sponge, they are moist enough.
This means they need more nitrogen to heat it. Put nitrogen-rich materials like animal manure in the pile next time you turn in.
On the flip side of things, you might notice that your compost piles are getting too hot. If that’s the case, you probably don’t have enough air and carbon. To rectify this situation, rotate your pile and try to mix in some carbons.
If your piles are getting smelly, ensure you aren’t over-watering. This creates an anaerobic environment and stinks. Water less and mix in more carbon materials to soak up excess liquid if needed.
Also, don’t compost food waste from animals (dairy, meat, etc.) as it tends to attract pests with its smell. Often, a compost pile starts to smell because you aren’t mixing the materials in the pile often enough. The more often you mix your pile, the faster it will begin to decompose and the less likely it is to stink.
Sometimes, a stinky compost pile will attract animals. Make sure you aren’t adding ingredients like fat, animal byproducts, or meat. These can attract vermin and other pests.
If your piles are shrinking like crazy, you don’t have enough carbon materials to sequester the nitrogen being released by the greens. Add more carbon material, like wood chips or shredded paper, next time you turn the pile.
If you come to the end of the 3 bins and still have a lot of uncomposted materials, ensure that they are shredded. Shredded materials, like small wood chips, will compost quicker than large materials, like twigs.
The more surface area you can create on each composting ingredient, the quicker they will compost! The same rule applies if you notice that you have very large pieces of compost ingredients that aren’t decomposing.
Final Words
Composting on the homestead is a great way to recycle waste, and increase the yields in your garden and orchard.
Using a simple 3-bin compost system is the easiest way to streamline the process without using a ton of space. Have you used a 3-bin system for composting? How’d you like it?
No comments:
Post a Comment