
There are a lot of great survival food products out there. At the same time, there are many survival foods that are simply not worth buying.
Before you buy survival food online or at the store, it may surprise you to learn that you can make the same thing at home for just a fraction of the cost. When you buy prepackaged MREs from some big camping company, it’s doubtful that you’re only paying for the food inside.
There’s a good chance you’re also paying for things like packaging, manufacturing, shipping, tax, and retail overhead costs. The actual food part of the MRE is more than likely something you could throw together by yourself for much less.
When you make your own MREs and survival foods, you’re in control of the choice and quality of ingredients, packaging, and storage. This cuts out all the middlemen between you and your MREs and gives you a better idea of shelf life.
Related: 3 MREs Recipes You Can Make At Home
In other words, you know it’s safe and it hasn’t been sitting in a hot warehouse or stockroom for months or years. This way, you won’t get any nasty surprises when you’re ready to eat your MRE survival food!
Here are just a few expensive survival foods that you can make a more affordable version of at home.
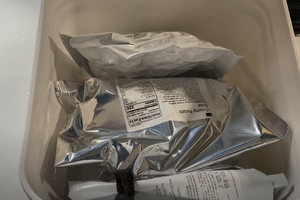
1. Freeze-Dried And Dehydrated Foods
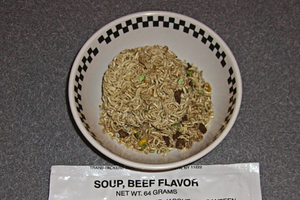 The most popular MREs are usually freeze-dried or dehydrated soups, stews, and one-pan meals.
For premium survival food meals like this, you can expect to pay close to $80-$300 for around 10 single-serving meals – or between $10-30 per bowl. Now, that’s some expensive soup!
With that level of investment, you could build those same MREs with cash to spare. Or, better yet, you could buy enough food to freeze-dry or dehydrate your own meals for several months, at least.
Related: 50 Foods to Dehydrate for Your Stockpile
Dehydrating or drying your own food is easy. You can use a home freeze dryer or food dehydrator if you have one. Still, there are more than a few ways to dry and dehydrate your food without counting on electricity, like using the sun and wind.
Additionally, buying already freeze-dried foods by themselves – such as fruit, jerky, grains, or vegetables – is usually more economical. This is especially true if you don’t specifically seek out foods marketed as survival items.
When you make your own freeze-dried or dehydrated MRE soups and stews, you end up paying less for a heartier and healthier meal. Here is an MRE recipes that you can make at home using freeze-dried and dehydrated ingredients.
Beef stew:
Ingredients:
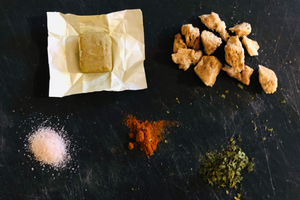 ¼ cup dried vegetables such as carrot, peas, tomatoes, potatoes, or onions
- 2 tablespoons of dried meat, like jerky or pemmican, cut into small pieces
- salt, pepper, onion powder, garlic powder, and any other spices
- beef bouillon cube
Instructions:
- Seal ingredients in a mylar pouch or vacuum-sealed bag with oxygen absorbers.
- For cooking, remove oxygen absorbers and add hot water to the bag. Close the bag and allow your MRE to cook to desired texture before eating.
Depending on your choice of ingredients, this recipe costs around $3-5 per prepared MRE.
2. Survival Bars
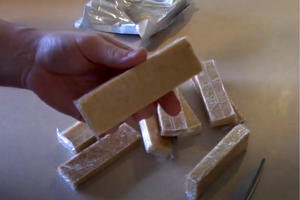 When looking at the ingredients for popular survival bars, the contents don’t always reflect the cost.
At their most basic level, most bars are made with the same ingredients: enriched wheat flour or enriched all-purpose flour, sugar, some kind of oil and of course, preservatives.
When you make your own survival bars, you get to customize the ingredients and storage methods so you know exactly how long they should last and how they were made.
Before making your own survival bars, it’s important to note that the biggest threat to the shelf life is exposure to moisture.
Too much moisture can encourage bacteria and molds to grow that can ruin your bars in a matter of days if not refrigerated.
⇒ How To Make Survival Bars At Home And Add Them To Your Stockpile
To keep your bars in good shape for several months at room temperature, it’s important to dehydrate or dry your bars out as much as possible before packaging.
Aim to use ingredients that have a lower moisture content to help extend the life of your survival bars.
Classic Peanut Butter And Oatmeal Bar
Ingredients:
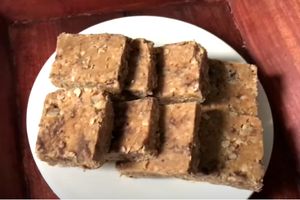 2 cups old-fashioned oats
- 1 cup low-fat peanut butter powder
- 1 cup of sugar
- 3-4 tablespoons of honey
- 1 teaspoon vanilla extract
- ½ teaspoon salt
- 3 tablespoons of water
- 1 cup dehydrated low-fat milk powder – you can sub milk powder for dairy-free milk powder if needed
- 1 3-oz. package of plain or flavored gelatin mix, unprepared (for texture and flavor)
Instructions:
- Preheat your oven to 200 degrees Fahrenheit
- Combine all dry ingredients until everything is incorporated and set aside.
- Add gelatin, water, and honey to a saucepan on medium to medium-low. Stir often until the mixture comes to a boil, then remove from heat and stir for 1 minute. Allow mixture to cool slightly.
- Combine dry and wet ingredients into a bowl and combine until the mixture holds together.
- Line your baking dish with foil or parchment paper. Then, press the cooled oat bar mix down onto the dish with a flat-bottomed measuring cup or wooden spoon until it forms an even layer.
- Place your pre-sliced bars in your preheated oven or solar dehydrator for around 2 hours – your bars should be very dry and hard when they’re finished.
- Remove from the oven and allow to cool. Store a bar or two in an airtight container, mylar bag, or vacuum-sealed bag, with oxygen-absorbing packets.
Depending on your choice of ingredients, this recipe costs around $10 per dozen oatmeal peanut butter bars.
3. Survival Food Buckets
 I don’t know if there is a better example of overpriced MREs in the survival food industry than the emergency food bucket market.
More than this, some of these survival meal kits are filled with low-quality, repetitive meals that are incredibly overpriced.
On the lower end, you can buy these kits for around $200. On the higher end, expect to pay thousands of dollars.
Related: What Really Happens if You Eat a Bucket of Survival Food When SHTF
Basically, these food bucket kits seem like a good idea at first – until you start asking questions. How long have these expensive survival kits been sitting?
Where and with what were they made? Will the food inside be edible enough when you really need it?
When you build your own survival food bucket, you don’t have to worry about those things.
The best part is that you can build your own survival food kit for around $20. All you need is a 5-gallon bucket and some homemade MREs to store enough food to feed one person for a month.
Your bucket can be very simple, or you can get creative and add more variety to your meals. Here’s one idea for a 5-gallon DIY survival food kit bucket:
5-Gallon DIY Survival Food Bucket:
Ingredients:
- 1 lb. dried beans of your choice or mixed variety
- 1 lb. white rice
- sealed packages of salt, pepper, sugar, bouillon, or other spices
- DIY dehydrated/ freeze-dried MREs like soup or one-pan MRE above
- DIY hardtack survival bars
Instructions:
Pack bagged and sealed MREs tightly in a 5-gallon bucket along with oxygen absorbers. Keep in a cool, dry place away from sunlight if possible. Eat within the appropriate timeframe for your selected foods.
Long-lasting survival foods like freeze-dried MREs, survival food bars, and other emergency supplies are great to have in your SHTF stockpile.
But, before you go out and buy those expensive survival foods, take a look at the cost of ingredients compared to the sticker price. You might be surprised at how much money you can save by making these long-lasting foods in your own kitchen.
No comments:
Post a Comment