By
It seems as if 99% of humans have grown a new appendage: the cellular telephone. The happy cell phone is almost indispensable for most and even provides GPS coordinates complete with maps, robotic voice instructions, etc. These make land navigation a cinch, right?
The user enters their location, then the destination, and bingo! Point A to Point B plotted and calculated, with rest stops and great places to shop with their debit cards listed along the way. A perfect world, right?
Here’s the other part of that scenario:
Suddenly, the car loses power, slowing to a crawl and then coming to a stop. The phone screens go dark. Mr. and Mrs. Happyfamily stare at one another, and the kids’ computer movie screen in the back goes out. A glow akin to a second sunrise is seen shimmering across the clouds.
No, it’s not an area of “no service” or a power surge. An EMP, an electromagnetic pulse, as just been detonated over the continental U.S. The missiles will soon follow the EMP. The cell phone era will have officially come to a close.
Some may attribute such to “fearmongering,” but take a look around you…
Everything else warned about on virtually every single platform – all of the sites, the blogs – it’s all coming to pass. Those formerly labeled “crackpot conspiracy theorists” (a moniker created, by the way, by our “government” to marginalize dissenting views) are, in essence, correct and accurate.
It’s been incremental: the pandemic, the destruction of food-producing plants, the corralling of the masses into tighter surveillance with more obstacles to their movement, the rising prices, the shortages in supplies.
No, you don’t have to trust these words. Trust your instincts. Trust in your common sense, and look around you. Put aside whatever pin you wear, blue donkey or red elephant, because both are meaningless when it all hits the fan. Put them aside, and look at what has happened to the U.S. and the world in the past ten years. In just the past five, for that matter.
The best resources are the ones you build within your mind and heart. That being said, let’s jump into land navigation.
The first rule of land navigation: Master the “low tech” and never rely completely on “high tech.”
Years ago, someone showed me their new wrist compass (the individual was in the service), and I nodded without saying anything. When questioned, I responded with, “What do you do if the battery runs out on it, or if it goes dead on you in the middle of an op?”
There are steps you can take to reduce the effects, should such a thing happen to you – what I call the “foreseeable unforeseen,” meaning you don’t know when the high-tech gizmo will fall apart, but you need to treat that gizmo as if it could shoot sparks and springs at any time.
Low-tech skill 1: Map Reading
There’s nothing like the good, old-fashioned, foldable map. Most people hate them, but that map can be one of your most reliable friends. The best ones come from USGS (U.S. Geological Survey) and the UTMGPS (Universal Traverse Mercator Grid Projection System).
You need to build up a good collection of physical, printed maps for your uses now and later.
Those maps provide you with elevations, contour lines, major and minor terrain features, latitude and longitude markers, grids, magnetic azimuths, declination, built-up areas, roads, and so forth. The map corresponding to the area you live in/travel in has everything you need to find your way around.
Civilian maps don’t concern themselves with these items in great detail. Civilian maps are “systemically-oriented,” meaning they have roads, towns, and cities. The mapmaker assumes you’re driving in a car to your destination. They don’t care about elevations, water sources, wooded areas, or other variables that are important. A lake is featured because the road runs across a bridge. Civilian maps are all travel and commerce-oriented.
You can still use them, mind you, but they don’t include the detail that you need for when the substance hits the fan. And one of the most important details you can learn about your area is the terrain features: the wooded areas and the places where water can be obtained.
So take a map (military or civilian) of the area you live, and plot all of the important hide-sites, forested areas, water sources, and potential bivouac areas beforehand and then physically visit all of these sites.
Those maps give you distances and directions you may need in the course of a breakdown or when fleeing a disaster – man-made or natural.
J.’s advice: Never mark directly on a map.
You can clip a sheet of plastic over your map to use (old-school) grease pencils or magic markers. You can laminate the map and mark on it, but always get rid of the marks. Don’t leave them on the map.
If you can follow marked directions to your hide-site, cache points, and route of travel, then so can someone else if they have your map.
There are plenty of resources available for you to study. My personal recommendation is to pick up a copy of FM 21-26, the Army’s guide to map reading and land navigation. The FM (stands for “Field Manual”) gives you everything you’ll need: every topic mentioned regarding map reading, as well as using a compass, terrain association, day and night conditions, and so forth. As military map-reading is more comprehensive, after studying the manual, you’ll find it simple to use civilian maps.
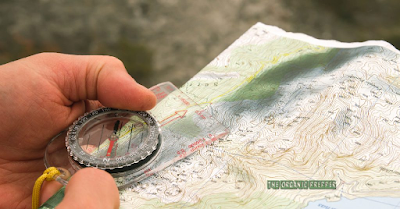
Low-tech skill 2: You have to know how to use a compass.
The compass, as you know, lines up with the magnetic poles of the Earth. The compass uses the 360 degrees of a circle, and each of those degree-markings, when employed in land navigation, is referred to as an azimuth. So, it should be a simple matter, then: look on the map, find where you’re going, and the compass points the way, right?
Not entirely. That’s fine for a generalized short distance marked by roads and noticeable terrain features. Walking “cross-country” is a different matter altogether. You need the declination.
There are three “types” of north: grid north, magnetic north, and true north. Declination is the difference in angle between any two of these three norths. The important ones for you to focus upon are grid north and magnetic north. Grid north is the “north” found on your map. Magnetic north is the north you find with your compass.
A military map provides you with a declination diagram that indicates the magnetic variance for the area and how to convert it so that you walk a correct, accurate azimuth.
It’s a subject in itself, but I’m giving you the basic overview here. For more information on using a compass, go here.
In the service, we went by this simple acronym: RALS.
This means, “right add, left subtract.” North on the map and on the compass is 360 degrees. Left of this 360 degree-mark – on an arrow pointing to, say, 350 degrees for a declination – that gives you a westerly variance. You must compute this variance before using your compass.
Right add, left subtract. That 10-degree variance if you’re traveling due east, and your plotted azimuth needs to be 90 degrees on the map? First, you must “add” that 10-degree variance we just mentioned to your compass heading.
You’ll be walking to the east (to the “right” of the 360-degree mark) and to account for the magnetic pull (the variance of 10 degrees to the west), you’ll add that variance to your compass heading. So, you’ll follow on a heading of 100 degrees, and the “pull” (magnetic variance to the west of 10 degrees) will mean you’re actually walking the route at 90 degrees, synchronized with what you plotted on the map.
This is simplified, but with study and practice you’ll see how it works.
If you’re off by even a degree in your calculations, this can translate into miles off target on a long-distance leg. Fortunately, the military maps not only give you the declination, but they tell you whether or not to add or subtract. As the poles move and shift, you must check on the declination and magnetic variance for your locale periodically, say every six months to a year.
Low-tech skill 3: Can you calculate your pace count?
The standard is the mile, the “holy hand-grenade” with the number three attached. Immutable and unchangeable for us “English-types.” The desire to convert the English-speaking nations to metrics was an abysmal failure, and that’s all fine and good.
We also need metrics, though. The military uses meters on its maps and in the calculations of everything from weapons systems to calibrations of equipment.
It’s a simple matter to convert the distances. A kilometer is 0.6, or six-tenths of a mile. There are 1.6 kilometers per mile. So, 20 miles converted to kilometers is 20 x 1.6 km/mile, to yield 32 kilometers. Thirty kilometers converted to miles (30 x 0.6) yields 18 miles.
(Land nav isn’t the only thing you’re going to need to know about when the power goes out. Check out our free QUICKSTART Guide to what to eat in a power outage as well.
The reason this is done is the increments.
Miles do not “break up” readily into even increments that can be quickly calculated or readily usable. For land navigation, this will be apparent to you once you find your pace count, a critical task that is completely personal, individual, and unique for you.
The pace count is a measurement of the number of steps you take in a given distance to cross that distance. The standard for the United States military is 100 meters. Now, 100 meters is equivalent to about 300 feet. Remember, a meter is about the distance of a yard.
Using a tape measure (the spooling kind, not the 30-footer), tie a ribbon to a tree, measure off 100 meters, and affix a ribbon to a second tree. That is your pace-count verifier. You can use other fixed points of measurement for this, but ensure they’re fixed – not the volleyball net post or gram-gram’s rocking chair on the porch.
Once you have this distance, you walk it and count off; not every step, but a step left and then right. That equals “one” pace. The number you have when you reach that 100-meter point is your specific pace count. When you have that? Next, put on a heavy backpack, and do it again. You’ll find a slight difference, as with a load, you usually take shorter steps, increasing the count.
You need to know your pace count, loaded and unloaded. Other factors will affect your count, such as walking through sticker bushes, over clear-cuts (fallen logs, timber, and stumps), through/across swamps and marshes, etc.
Once you have this pace count, you’ll be ready to rock and roll.
Plot your distance on your map and the grid azimuth to it. Then, you’ll convert for the declination. Then, you’ll walk it out until you reach that objective.
Pace count beads are a good tool.
They are affixed to a rope or cord. You can make your own out of 550 parachute cord. Nine at the top, separated by a knot, with five beneath, and a space and a knot below, at the bottom. They’re “beads on a string,” and when you walk 100 meters, you pull down one of those beads. When they all stack up, you’ve traveled 900 meters, and you jerk the stack back to the top and pull down one of the “bottom” beads on the lower level where the 1000-meter bead markers reside.
After you complete a whole “series,” you’ll have traveled 3 miles, or 5,000 meters – or 5 kilometers. Then you just keep track of that distance on a note card and march on. No complex “1/32 of a mile” or any nonsense such as that.
Field-expedient methods of land navigation are important too.
The sun and the stars can aid your navigation efforts, with or without a compass or a map. Our ancestors used them for thousands of years, and you can use them, too. Let’s list a method for each, for day and for night techniques, along with some others you can use.
The Sun
One of the easiest methods of “natural” land navigation to use is the shadow-tip method for finding where you’re heading. The sun is perceived as moving from east to west. Take a stick about an inch thick and about two feet long and jam it into the ground. The sun will throw the stick’s shadow onto the ground.
Mark the tip of the shadow with a rock. Now, wait about half an hour. The “new” shadow will have moved. Mark the tip of this second shadow.
Now draw a line in the dirt from rock 1 to rock two. Rock 1 puts the shadow tip to the west, and Rock 2’s point is to the east. Knowing this, then bisect the line with another straight line through the center and orient yourself. This is your North-South line.
The Stars
Find the “Big Dipper” and the front leading edge – those two stars. Use your fingertips, and place them “on” the stars in front of your face. Keeping your fingertips apart for your “star points,” now go five of those distances off the top corner cup-star of the dipper. There it will be – the North Star.
You can verify this. On the opposite “side,” across from the dipper is Cassiopeia, the “Lazy-W.” Go to the center star of that “Lazy W,” and measure five width distances out from that center, apex star, and yea verily, the North Star will be there.
Terrain Association
A known landmark or feature can aid you greatly in knowing where you are (half the battle) and knowing where you’re heading (the other half). The military maps are best for this. When you learn your terrain features, such as large lakes, rivers, mountains, etc., you can correlate your position to them relative to what’s on your map and your location on the ground.
The Natural World
Most major rivers (such as the Mississippi) flow from north to south. In the woods, moss usually grows on the north side of the base of the trees. The flights of the migratory birds during specific times of the year will clue you in by their direction of travel. The sun (if you wait out the whole day) will give you your position according to sunrise and sunset.
(Want uninterrupted access to The Organic Prepper? Check out our paid-subscription newsletter.)
People tend to think of land navigation as an “insurmountable obstacle.”
It is neither insurmountable nor an obstacle. It is a skill that, when you perfect it, you can refine into an “art” for yourself. Land nav can be one of those “fun for the whole family” adventures, where everyone learns new skills and takes something away from it. Once again, Ben Franklin’s adage, “An ounce of prevention’s worth a pound of cure,” holds true.
Take the time to study more about land navigation, and how to perform it both correctly and smoothly. There’s a difference. You can do something right and still pull out your eyeteeth (figuratively) doing it.
The “art” is when it is completely natural to you and unforced, and you perform it as easily as slipping on a pair of boots. You can do it! Just identify the areas you need to study and get to work!
What are your thoughts on land navigation?
Is this a skill you already possess or one you need to learn? Do you have any additional tips to add to this article? Let’s talk about it in the comments section.
About Jeremiah Johnson
Jeremiah Johnson is the nom de plume of a retired Green Beret of the U.S. Army Special Forces. Mr. Johnson is also a Gunsmith and a Master Herbalist. He graduated from the Special Forces course at SERE (survival, evasion, resistance, and escape) School, and is an expert in small unit tactics, land navigation, survival, and disaster-preparedness. He lives in a cabin in the Rocky Mountains of Western Montana.
No comments:
Post a Comment