Original Article
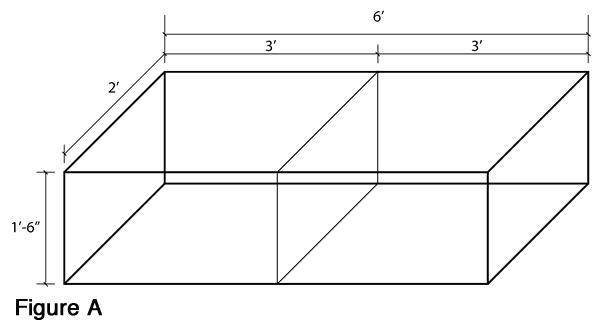
There are a ton of ways to build a rabbit hutch, and more rabbit hutch designs on the web than you can shake a cotton tail at. The rabbit hutch design in this article is based loosely on advice from Storey’s Guide to Raising Rabbits: Breeds, Care, Facilities by Bob Bennet (a treasure trove of information), along with recommendations by local commercial breeders and a hutch builder. The finished rabbit hutch will measure 6’ wide x 1’6” tall x 2’ deep and will house two rabbits in separate compartments. Should you feel the need for a larger cage (some breeders recommend a 2’6” depth hutch over 2’) or more compartments, simply adjust the measurements accordingly.
Storey’s guide instructs readers to bend the Baby Saver Wire to a right angle using a 2X4 for corners. Forming the corners by bending rather than cutting the individual pieces eliminates some of the cutting and does preserve more of the galvanized coating. For these instructions, I’ve chosen not to as purely a personal preference, but the following directions can easily be adapted should you prefer bending the corners. I feel cutting the sides makes the joined additions easier in the long run for larger rabbit opperations.
When purchasing your welded wire mesh (NOT HARDWARE CLOTH), ensure that it is type “Galvanized After Welding”. Galvanized before welding leaves an unprotected area of metal at every point the mesh joined. Water and rabbit urine will then leave you with a rusted cage in much less time than Galvanized After Welding wire mesh.
Pneumatic shears, if available, are the way to go. The wire cutters will wear your hands out in a hurry.
Gloves are a must, especially if you are going to use wire cutters to cut the wire mesh. Not doing so is a recipe for nasty blisters. The gloves will also protect your hands from the sharp edges that result from cutting the wire mesh.
Using a metal file to smooth out the sharp edges of the cut wire mesh is feasible, but very time consuming. If you do not have a Dremel tool, it is a good time to consider buying one.
14 Gauge sharp metal rods will go flying as they are cut from the mesh. Wearing safety glasses is highly recommended – unless you have a thing for eye patches.
Many books and sites will recommend using J-Clips to join the pieces of the cage together. C-Rings are sturdier and will not loosen over time like J-Clips. This was a suggestion from a local commercial Rabbit Hutch builder.


Hole for door and feeder box highlighted in green.
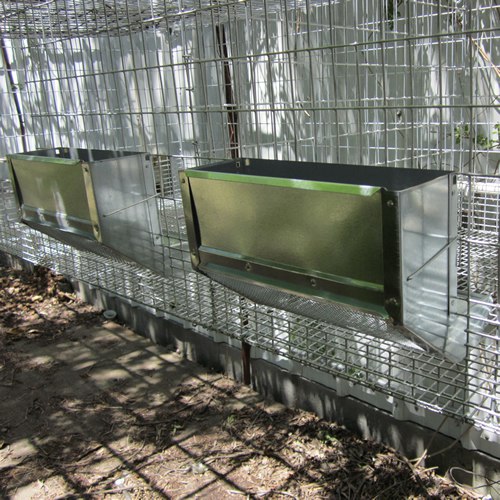
Finished Suspended Rabbit HutchSuspending a rabbit hutch can make for much easier cleanup. It also means that there are no legs or frame for the rabbits to urinate on and ruin. Most “pet” type available Rabbit Hutches are wood framed. Many commercial breeders will recommend against hutches that have any wood the rabbits can urinate on. The wood soaks up the urine and quickly becomes rather unsanitary and can never be properly disinfected.
Make sure that all chains and hardware used are Zinc coated for outdoor use, and that the chains are of sufficient gauge to support the weight of your hutch (doesn’t take much).
Turnbuckles can be used on each length of chain for those wishing to perfectly level suspended hutches.
In my exact situation and space, it was necessary to suspend the roof, then suspend the rabbit hutches from the suspended roof. Chains of different lengths were used to give the roof a pitch. Chains of different lengths (front to back) were then used to suspend the rabbit hutches and level them.
Rabbits are very quiet (read with Elmer Fudd voice). This makes them a perfect choice for people concerned with: attracting attention, annoying neighbors, or waking you up at the plumber’s crack of dawn.
Lower in fat, less cholesterol, and less calorically dense than almost any other animal, Rabbits make an excellent health conscious protein source.
Space requirements are minimal. The typical domestic meat Rabbit breeds require roughly 9 cubic feet per animal (hutch 3’x2’x1’-6”). This also ties into the fact that they are very easy to care for.
They breed like Rabbits – duh. While modern Chickens do breed faster, Rabbits can produce approximately 8 offspring every 2.5 months that are ready for the pan or pot in just another 8 – 10 weeks. Breeding quickly means more fresh meat on your plate more often. At a dressed-out weight of 5Lbs from the typical domestic meat Rabbit at fryer age, it’s enough to feed two people generously for two meals.
Your garden will love them. Rabbit manure is one of the best things for gardening, and according to The Urban Homestead, it is the only manure that can be applied directly to plants without “burning” them. Some gardeners raise rabbits solely for their manure. Next time you are in a gardening center or feed store check out the price of rabbit manure, it will floor you.
Rabbits are a fantastic livestock animal, whether you’re an Urban Survivalist like me, or are one of the many different types of people who want to become more self sufficient or health conscious.

Storey’s guide instructs readers to bend the Baby Saver Wire to a right angle using a 2X4 for corners. Forming the corners by bending rather than cutting the individual pieces eliminates some of the cutting and does preserve more of the galvanized coating. For these instructions, I’ve chosen not to as purely a personal preference, but the following directions can easily be adapted should you prefer bending the corners. I feel cutting the sides makes the joined additions easier in the long run for larger rabbit opperations.
What You Will Need for Building a Rabbit Hutch
Tools:- Tape Measure
- Marker
- Safety Glasses
- Work Gloves
- Heavy Duty Wire Cutters, Pneumatic Shears, or Electric Shears
- C-Ring Pliers (Also known as Hog Ring)
- Dremel Tool with at least 4 heavy grit sanding bands or a Metal Hand File
- 21’ of 14 gauge Baby Saver Wire Mesh (Sides)
- 6’ of 1”x2” 14 gauge wire mesh (Roof)
- 6’ of 1”x1/2” 14 gauge wire mesh (Floor)
- 1 lb. of ⅜” galvanized C-Rings
- 2 door latches
- 2 Feeder boxes
Quick Things to Note
Baby Saver Wire is a welded wire mesh that has a grid of 1”x1/2” approximately 4” up the side. The remaining 12” of the mesh is 1”x2”.When purchasing your welded wire mesh (NOT HARDWARE CLOTH), ensure that it is type “Galvanized After Welding”. Galvanized before welding leaves an unprotected area of metal at every point the mesh joined. Water and rabbit urine will then leave you with a rusted cage in much less time than Galvanized After Welding wire mesh.
Pneumatic shears, if available, are the way to go. The wire cutters will wear your hands out in a hurry.
Gloves are a must, especially if you are going to use wire cutters to cut the wire mesh. Not doing so is a recipe for nasty blisters. The gloves will also protect your hands from the sharp edges that result from cutting the wire mesh.
Using a metal file to smooth out the sharp edges of the cut wire mesh is feasible, but very time consuming. If you do not have a Dremel tool, it is a good time to consider buying one.
14 Gauge sharp metal rods will go flying as they are cut from the mesh. Wearing safety glasses is highly recommended – unless you have a thing for eye patches.
Many books and sites will recommend using J-Clips to join the pieces of the cage together. C-Rings are sturdier and will not loosen over time like J-Clips. This was a suggestion from a local commercial Rabbit Hutch builder.
Let’s Start Building a Rabbit Hutch
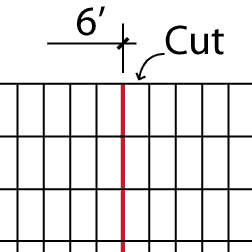
- Roll out 1”x2” wire mesh, measure out 6’, mark rod at 6’ across the width of the wire mesh with Sharpie.
Begin cutting wire mesh just past your 6’ mark. Double check you are on the correct side before cutting.
- Roll out Baby Saver Wire, measure out 6’, mark rod at 6’ across the width of the wire mesh with Sharpie.
- Begin cutting wire mesh just past your 6’ mark. Double check you are on the correct side before cutting.
- Repeat steps 3 and 4 to produce another 6’ section for the opposing wall.
- Measure out 2’ of Baby Saver Wire, mark rod at 2’ across the width of the wire mesh with Sharpie.
- Begin cutting wire mesh just past your 2’ mark. Double check you are on the correct side before cutting.
- Repeat steps 6 and 7 two more times.
- Lay your pieces flat out on the floor as in Figure B. Pieces A through D are Baby Saver Wire. Piece E is the ½” x 1” floor wire. Center Divider Baby Saver Wire and Roof (1”x2”) not shown.
- Using C-Rings, join corners and center of Piece A to Piece E.
Step 10: Joining pieces - Repeat Step 10 all the way around the pieces of the hutch attaching the sides to Piece E.
- Where Piece D and E meet, measure 3’ to the center rod of Piece E. Mark with Sharpie across the entire width of Piece E.
- Using C-Rings, attach the left over 2’ section of Baby Saver Wire to the center marking of Piece E. This will divide the hutch into two separate spaces.
- Stand up Piece A and B until their corners meet and form a right angle.
- Using C-Rings, secure the top corner of the newly formed right angle.
- Continue adding C-Rings down the corner formed by Pieces A and B at each opening until you get to the bottom. (This amount of C-Rings may be overkill, but they are cheap and this ensures strong corners).
- Repeat step 16 joining B to C, then C to D, finally D to A.
- Stand center divider up until it is at a 90 angle. Join the top corner of the center divider to Piece C. Continue adding C-Rings down the joint between Piece C and the divider at each opening till you get to the bottom.
- Repeat step 18 to join Piece A to the center divider.
- Lay the Roof (6’ piece of Wire Mesh with 1”x2” openings) on top.
- Begin joining the Roof to the sides using C-Rings. Pick a corner and work your way around adding a C-Ring at every other opening.
- Measure to center rod of Roof (3’) and mark.
- Join Divider to Roof at 3’ mark made in Step 22.


Adding Doors and Feeder Boxes:
You should now have something that is starting to look a lot like a Rabbit Hutch.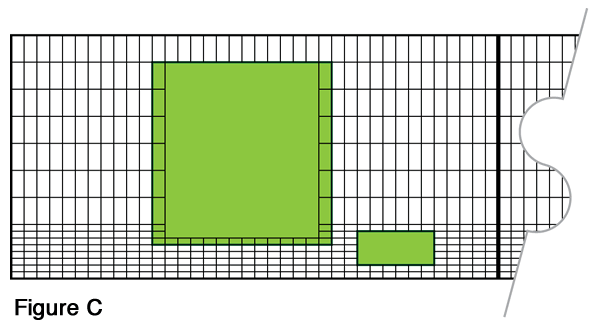
Hole for door and feeder box highlighted in green.
- Turn rough Rabbit Hutch over onto Side C.
- From your left over 1”x2” Wire Mesh, cut out two pieces measuring 14” tall x15” wide. These will be the doors.
- With your marker, mark a 13” tall x 14” wide area on the hutch where you want the door. Double check your marks – you can always cut more wire out, but you can’t put it back. (The hole you will be cutting out of the hutch for the door will be 1” smaller than the door on the bottom, right, and left side, but not the top. Make sure to take into consideration you will need at least 1” between the door and the feeder box when laying out your door.)
- Repeat step 3 on the left side of the door. It is important to remember that you will need the hole you are cutting into the hutch for the door to be 1” smaller.
- The top should line up with no overhang.
- Install your latch on the door by placing the latch facing down. Set the door on top of the latch. Bend the flanges of the latch down with pliers as much as you can. Hammer them the rest of the way till they are tightly in place.
Rabbit Hutch Door Latch - Turn the door on a diagonal to the opening in the hutch and put the door through the opening.
- Measure your feeder box for the size of an opening it will require (they come in several sizes).
- Measure out and mark the area of the hutch needed to cut out for the feeder box. You only need a hole big enough for the trough of the feeder box.
- Dry fit the feeder box to ensure that it fits. You my have a small amount of space on the sides and bottom between the feeder box and hutch. This is normal.
- Remove feeder box and prepare to grind down the sharp edges of the hole cut out for the door and the feeder box.
- Using a Dremel tool with a heavy grit sanding drum (or metal file), remove all the sharp edges and over hangs made during the process of cutting the holes.
- Line the top of the door up with the top of the opening in the hutch and ensure that you have 1” on either side and the bottom. Use C-Rings to attach the top of the door with the top of the opening thus creating a hinge.
- Install feeder box. Feeder boxes come with a rotating wire that pokes out on either side and then makes a right angle. Push the feeder box into its hole, then lift the right angle of the wire on the feeder box just enough to then push it down over the wire of the hutch. Many feeder boxes coming in 5 ½” and 9 ½” widths. If this is the case, you will have a small gap on either side of the feeder box – it’s ok.
Rabbit Hutch Feeder Box - Repeat the previous steps on the opposite side of the hutch.

Suspending Your Rabbit Hutch
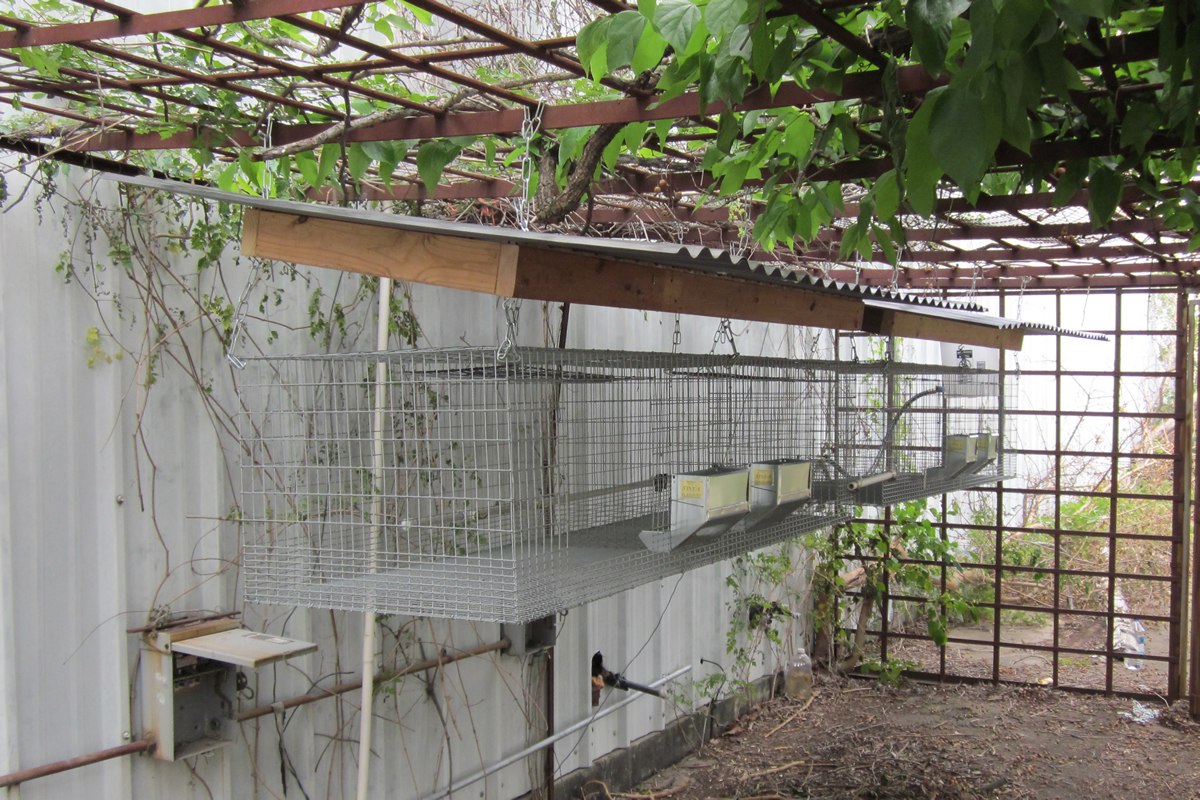
Finished Suspended Rabbit Hutch
Make sure that all chains and hardware used are Zinc coated for outdoor use, and that the chains are of sufficient gauge to support the weight of your hutch (doesn’t take much).
Turnbuckles can be used on each length of chain for those wishing to perfectly level suspended hutches.
In my exact situation and space, it was necessary to suspend the roof, then suspend the rabbit hutches from the suspended roof. Chains of different lengths were used to give the roof a pitch. Chains of different lengths (front to back) were then used to suspend the rabbit hutches and level them.
Quick Rabbit Facts
Rabbits are not a rodent. They are a Lagomorph, a gnawing mammal that is a member of the taxonomic order Lagomorpha.Rabbits are very quiet (read with Elmer Fudd voice). This makes them a perfect choice for people concerned with: attracting attention, annoying neighbors, or waking you up at the plumber’s crack of dawn.
Lower in fat, less cholesterol, and less calorically dense than almost any other animal, Rabbits make an excellent health conscious protein source.
Space requirements are minimal. The typical domestic meat Rabbit breeds require roughly 9 cubic feet per animal (hutch 3’x2’x1’-6”). This also ties into the fact that they are very easy to care for.
They breed like Rabbits – duh. While modern Chickens do breed faster, Rabbits can produce approximately 8 offspring every 2.5 months that are ready for the pan or pot in just another 8 – 10 weeks. Breeding quickly means more fresh meat on your plate more often. At a dressed-out weight of 5Lbs from the typical domestic meat Rabbit at fryer age, it’s enough to feed two people generously for two meals.
Your garden will love them. Rabbit manure is one of the best things for gardening, and according to The Urban Homestead, it is the only manure that can be applied directly to plants without “burning” them. Some gardeners raise rabbits solely for their manure. Next time you are in a gardening center or feed store check out the price of rabbit manure, it will floor you.
Rabbits are a fantastic livestock animal, whether you’re an Urban Survivalist like me, or are one of the many different types of people who want to become more self sufficient or health conscious.
No comments:
Post a Comment