Few baked goods stir up nostalgia quite like Grandma’s date-filled cookies. Even without a recipe card tucked into a flour-dusted drawer, the memory of these soft, tender cookies with their rich, spiced date centers lives on in kitchens across America. For many families, date-filled cookies weren’t just a treat; they were a tradition, a symbol of care, and a reminder that love was often expressed through baking.
I can still see my mother in an apron, with flour flying everywhere. I have wonderful memories of making cookies with my mother. She taught me to cook from scratch; what a blessing she was to me.
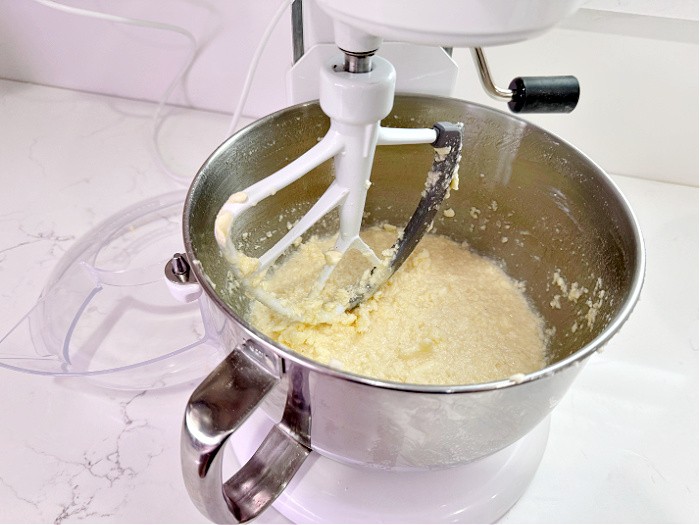
We doubled the recipe today and used my 6-quart KitchenAid stand mixer. The KitchenAid’s motor is not strong enough to mix 11 cups of flour. I should have used my Bosch bread mixer; the KitchenAid was struggling. It still works, but I was afraid I was going to burn up the motor.
Kitchen Items You May Need:
- Stand Mixer or Hand Mixer
- Saucepan
- Cookie Cutter
- Rolling Pin
- Pastry Silicone Cloth
The Roots of Date-Filled Cookies in American Kitchens
Date-filled cookies became popular in the United States in the late 19th and early 20th centuries, when dates were considered a pantry staple rather than a specialty item. Imported primarily from the Middle East and North Africa, dates were prized for their natural sweetness, long shelf life, and nutritional value.
Before refined sugar became affordable and widely available, home bakers relied on fruits like dates, figs, and raisins to sweeten desserts. Date paste — slow-cooked with spices — became a practical and flavorful filling for cookies, pastries, and breads.
By the early 1900s, date-filled cookies had become a fixture in rural and farm kitchens, especially in the Midwest, Appalachia, and New England.
Why Grandma Always Had Date-Filled Cookies
For grandmothers of earlier generations, baking wasn’t a hobby; it was a responsibility. Date-filled cookies checked every box:
- Made from affordable pantry ingredients
- Filling and satisfying
- Easy to store for days
- Perfect for sharing with family and neighbors
These cookies were often baked in large batches, stored in tins, and served with coffee, milk, or tea. They showed up after church, during card games, and on cold afternoons when something warm from the oven felt like comfort itself.
To Grandma, date-filled cookies were practical love.
A Cookie Tied to Memory and Emotion
Mention date-filled cookies to anyone who grew up with them, and you’ll likely hear stories like:
- “My grandma always kept them in a blue tin.”
- “She made them every Christmas without fail.”
- “The smell alone takes me right back to her kitchen.”
Unlike trendy desserts, date-filled cookies weren’t flashy. They were dependable. Familiar. Homemade in the truest sense.
These cookies often represented:
- Time spent together in the kitchen
- Lessons learned by watching, not measuring
- Recipes passed down orally, not written
Old-Fashioned Baking Before Shortcuts
Long before boxed mixes and pre-made fillings, everything in a date-filled cookie was done from scratch. Dates were chopped by hand. Dough was mixed in bowls worn smooth from decades of use. Nothing was rushed.
This slower approach to baking created more than just cookies; it made a connection.
Grandma’s date-filled cookies remind us of a time when:
- Desserts were seasonal and intentional
- Waste was avoided
- Baking was an act of care, not convenience
Why Date-Filled Cookies Are Making a Comeback
Today, many home bakers are rediscovering vintage desserts, and date-filled cookies are quietly returning to the spotlight.
Modern interest in:
- Whole foods
- Reduced refined sugar
- Traditional baking methods
They have sparked renewed appreciation for desserts sweetened naturally with fruit. Beyond nutrition, there’s also a desire to reconnect with heritage baking; foods that tell a story and ground us in something familiar and comforting.
Dates: Everything You Need to Know About Them
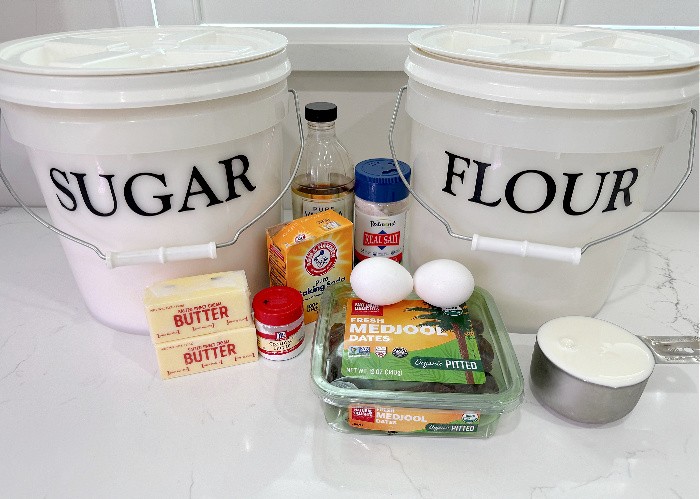
Cookie Dough Ingredients
Sugar: Sugar provides sweetness, of course, but it also helps create the cookie’s structure. As it blends with butter, it traps air, giving the cookies a lighter texture and encouraging gentle browning as they bake.
Butter: Softened butter is the foundation of rich flavor and tender texture. When creamed with sugar, it creates a smooth, airy base that keeps the cookies soft rather than dense.
Egg: The egg acts as a binder, holding the dough together while adding moisture and richness. It also contributes to the cookies’ structure and helps them bake evenly.
Milk: Milk adds moisture and softens the dough, creating a tender crumb. It also helps dissolve sugar and blend the dry ingredients smoothly into the dough.
Vanilla: Vanilla enhances all the other flavors in the cookie. Even in small amounts, it adds warmth and depth, giving the cookies that familiar homemade aroma.
Cream of Tartar: Cream of tartar provides a slight tang and reacts with baking soda to help the cookies rise. It also contributes to a soft, tender texture and a subtle old-fashioned flavor often found in vintage cookie recipes.
Salt: Salt balances the sweetness and sharpens the flavors, preventing the cookies from tasting flat or overly sugary.
Baking Soda: Baking soda is the leavening agent that gives the cookies lift. When combined with cream of tartar, it creates carbon dioxide, allowing the dough to rise and bake up light and soft.
Flour: Flour forms the structure of the cookies. This generous amount creates a sturdy dough that can hold the date filling without spreading too thin during baking.
Date Filling Ingredients
Dates or Raisins can be substituted: Dates bring natural sweetness and a deep, caramel-like flavor to the filling. When cooked, they break down into a thick, jam-like consistency. Raisins can be substituted for a milder, slightly tangier filling.
Water: softens the dried fruit as it cooks, allowing the dates to break down and blend into a smooth, spreadable filling.
Sugar: Sugar sweetens the filling and helps thicken it as it cooks, creating that classic sticky, rich center that contrasts beautifully with the cookie dough
Flour: Flour acts as a thickener, helping the filling appropriately set so it stays inside the cookies rather than running out during baking.
Make the Cookie Dough
Step One: Gather Ingredients
Preheat the oven to 350°F (176°C).
Step Two: Combine Ingredients
Combine all of the ingredients except the flour.
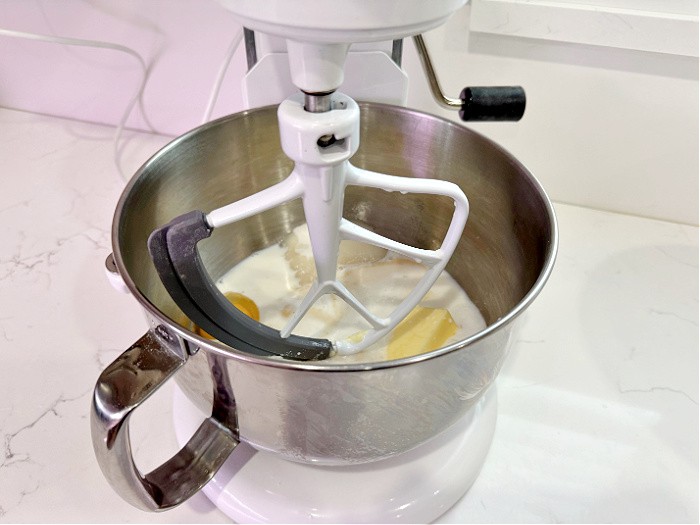
Step Three: Cream Until Smooth
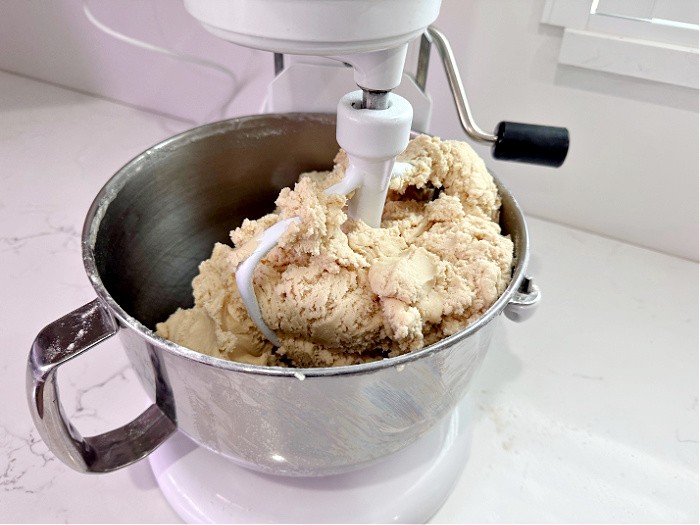
Cream until smooth, then slowly add the flour, one cup at a time. This last year, I’ve had trouble getting the butter I buy to “soften,” even when I put it out the night before. It’s so frustrating. My recipes always seem to work out, but I remember when butter and sugar were creamier. I buy Costco butter and freeze it. Just a tidbit for you if you are having trouble.
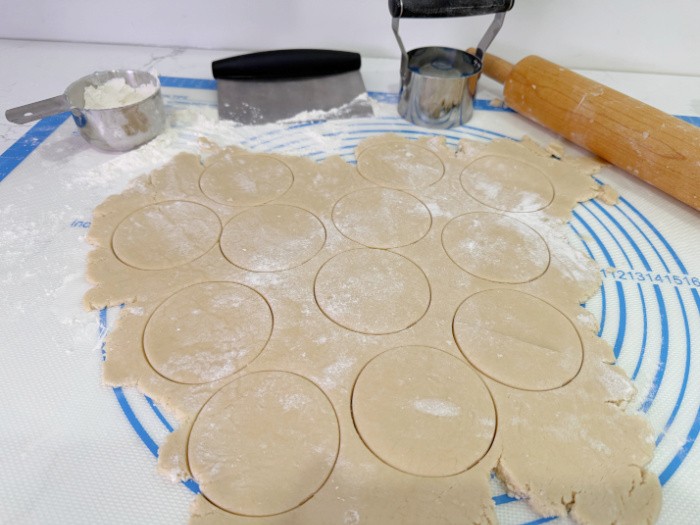
Step Four: Flour The Countertop
Flour the countertop and roll out the sticky dough with a floured rolling pin to about 1/8 to 1/4 inch thick.
Step Five: Cut The Cookies
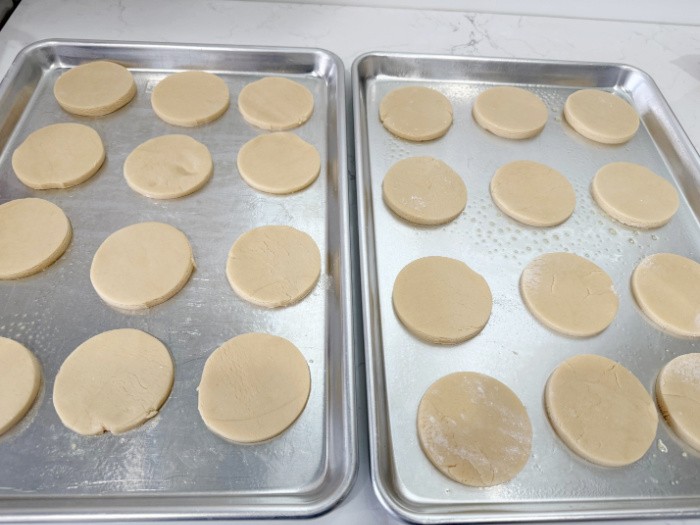
Use a cookie cutter to cut out cookies to the size you desire.
Place on a greased cookie sheet
Date-Filling Instructions
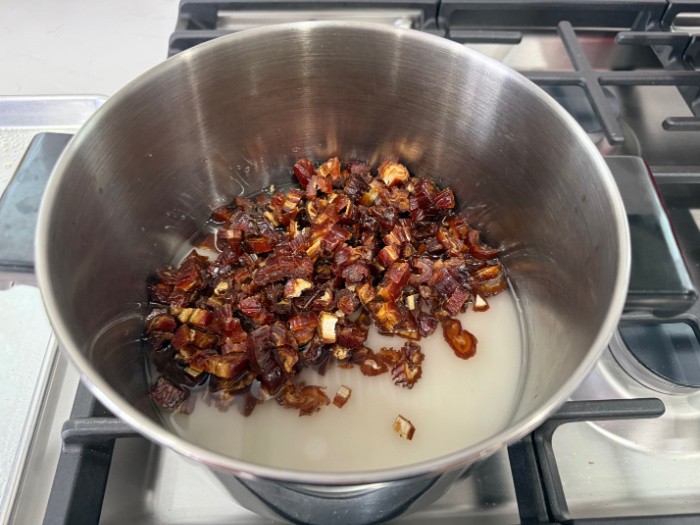
Step One: Combine Ingredients in Pan
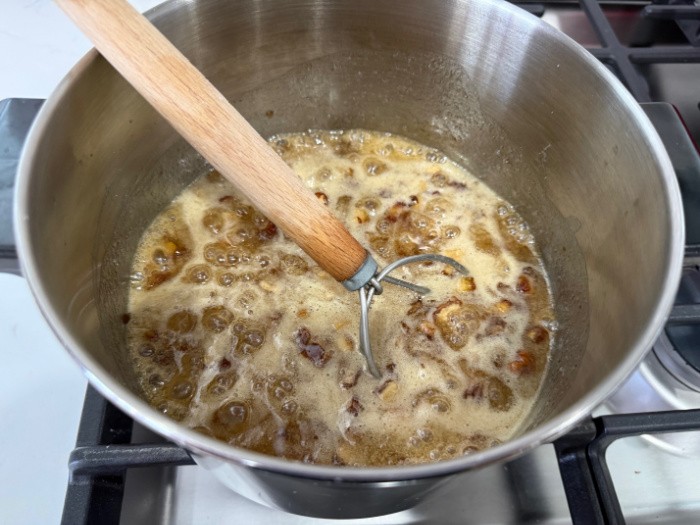
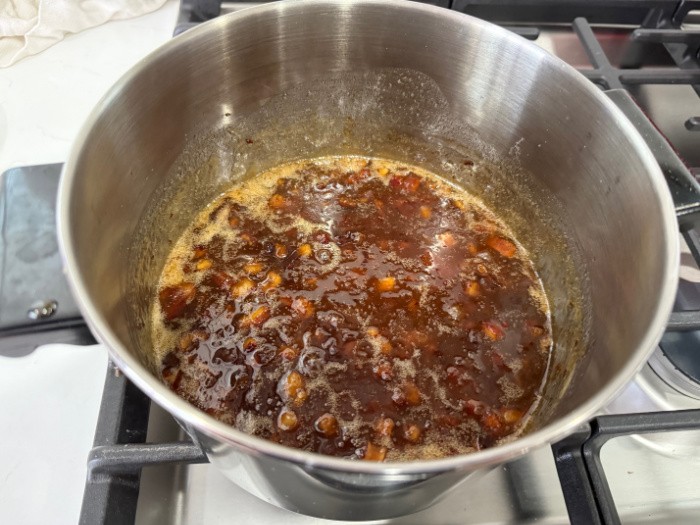
Combine the ingredients in a saucepan and stir constantly. Bring the mixture to a boil, then simmer until thickened.
Cook Down
Simmer Until Thick
Step Two: Remove Pan From Stove
Remove the pan from the heat and let it cool slightly.
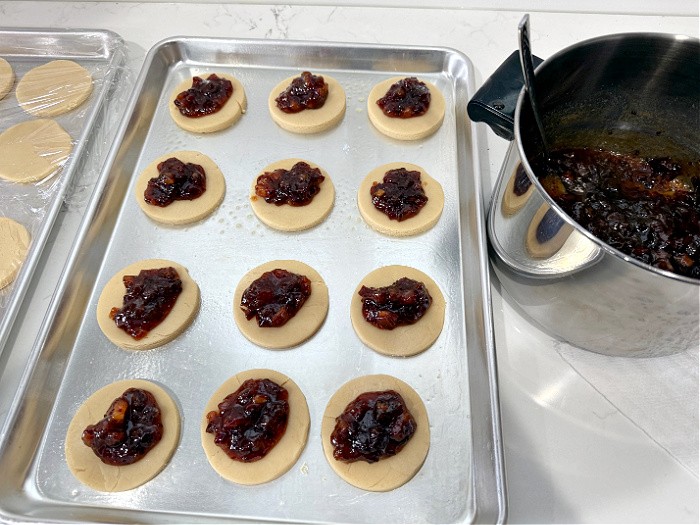
Step Three: Scoop Filling
Scoop one heaping tablespoon of the filling into the middle of one rolled-out cookie circle, then place another cookie on top.
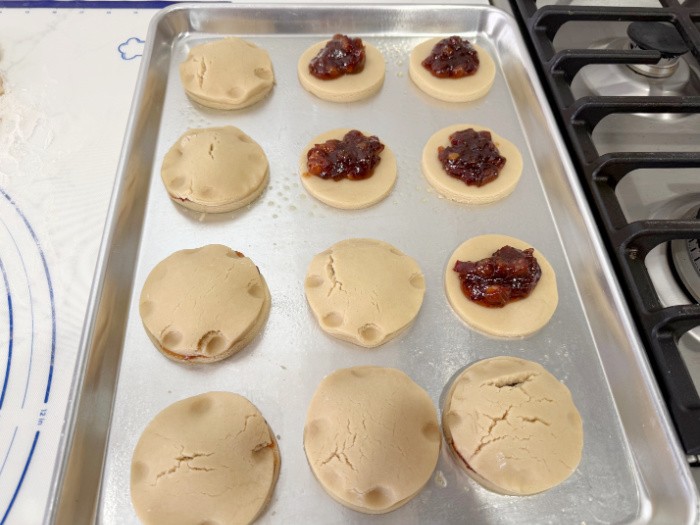
Step Four: Pinch Edges of Dough
Pinch the edges together with your fingers or a fork. Bake for 10-20 minutes, depending on the thickness of the cookie dough. Bake them in the oven at 350°F (176°C).
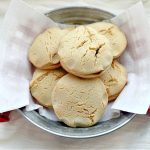
Step Five: Bake the Cookies
Bake longer if you like a crisp cookie. This recipe makes 12-24 cookies, depending on the size of the cookie cutter you use.
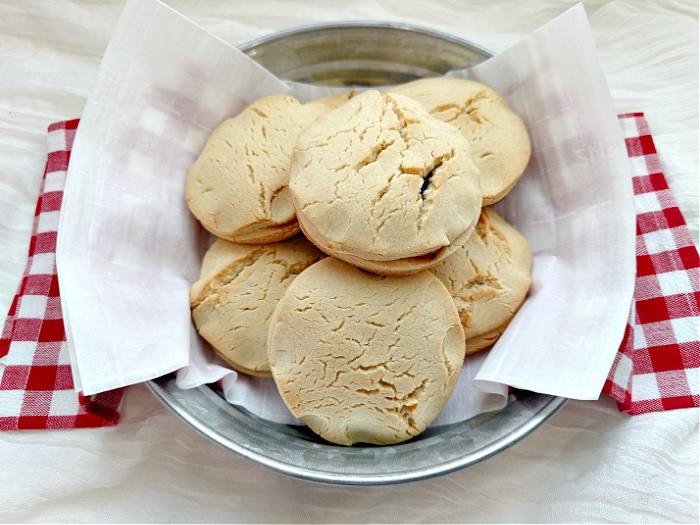
Date-Filled Cookies
Ingredients
- 1 cup sugar
- 1 cup softened butter
- 1 egg
- 1/2 cup milk
- 1 teaspoon vanilla
- 2 teaspoons cream of tartar
- 1/2 teaspoon salt
- 1 teaspoon baking soda
- 5-1/2 cups flour
Date Filling Ingredients
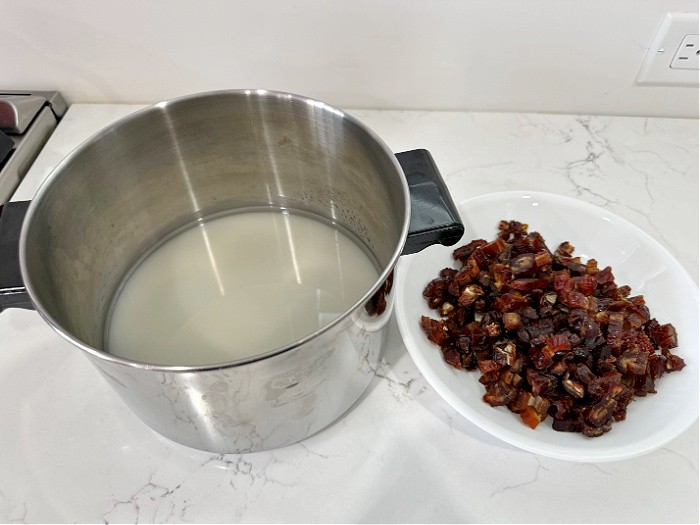
- 1 cup dates-cut in pieces (you can substitute raisins)
- 1/2 cup water
- 1 cup sugar
- 1 tablespoon of flour
Instructions
Cookie Dough Instructions
-
Combine all of the ingredients except the flour.
-
Cream until smooth and slowly add the flour one cup at a time.
-
Flour the countertop and roll out the sticky dough with a floured rolling pin to about 1/8 to 1/4 inch thick.
-
Use a cookie cutter to cut out the size of the cookie you desire.
-
Preheat the oven to (350°F) = (176°C) degrees.
Raisin Filling Instructions
-
Combine the ingredients in a saucepan and stir constantly. Bring the mixture to a boil and then simmer until thick.
-
Remove the pan from the heat and let cool slightly.
-
Scoop one heaping tablespoon of the filling in the middle of one rolled-out cookie circle and place another cookie on top.
-
Pinch the edges together with your fingers or a fork. Bake for 10-20 minutes depending on the thickness of the cookie dough.
-
Bake longer if you like a crisp cookie. This recipe makes 12-24 cookies depending on the size cutter you use.
What Can I Serve With These Date-Filled Cookies
Grandma’s date-filled cookies pair beautifully with simple, comforting accompaniments that match their old-fashioned charm. Here are some classic and cozy ideas:
Warm Drinks
- Hot coffee, especially with cream, is a traditional pairing
- Black tea or herbal tea dates pair wonderfully with mild teas
- Chai or spiced tea complements the warm, sweet filling
- Hot cocoa is a favorite for children and cold winter afternoons
Cold Beverages
- Cold milk, the timeless, dunk-worthy classic
- Buttermilk or fresh cream is very traditional in farmhouse kitchens
- Iced coffee or cold brew balances the cookie’s sweetness
Light Dessert Pairings
- Fresh apple slices or pears; add freshness and crunch
- Cheese slices (cheddar or mild Colby); an old-fashioned sweet-savory pairing
- Vanilla ice cream turns the cookies into a simple plated dessert
Holiday & Gathering Ideas
- Cookie trays with gingerbread, sugar cookies, or oatmeal cookies
- After-dinner coffee service with cookies served on small plates
- Church socials or afternoon visits with cookies and coffee
Simple Serving Touches
- Stack cookies on a vintage plate or cake stand
- Serve from a tin lined with wax paper for that true grandma feel
- Dust lightly with powdered sugar for a finished look (optional)
These cookies shine best when served, just like Grandma would have done.
Final Thoughts
Grandma’s date-filled cookies aren’t just an old-fashioned dessert; they’re a reminder of who we come from and how food connects us. In a world that moves faster every day, these humble cookies invite us to slow down, remember, and appreciate the simple joys that once filled our homes. Sometimes, the sweetest part isn’t the cookie itself, it’s the memory it carries. May God bless this world, Linda
The post Grandma’s Date-Filled Cookies: A Taste of Tradition appeared first on Food Storage Moms.
from Food Storage Moms
No comments:
Post a Comment