
Today it’s all about how to make bread in a thermal cooker. I have to thank Cheryl T. for this suggestion. I watched a class by Cindy Miller on how to make bread this way, but I never took the time to do it. Cheryl T. shared her tips on how she made it. She used a Wonder Oven.
You may ask what is a Wonder Oven. It’s sometimes called a Wonder Box, as well. It’s made with fabric, similar to a bean bag chair. But it’s not a chair; it’s a pillow within another pillow on top where the fabric sections are filled with Small Beads (Polystyrene) or something similar.
It keeps food hot and cold as well. My friend, Jamie, over at Prepared Housewives, has a great post on how to make a Wonder Oven.
In case you missed this post, How To Use A Thermal Cooker
What is a Thermal Cooker?
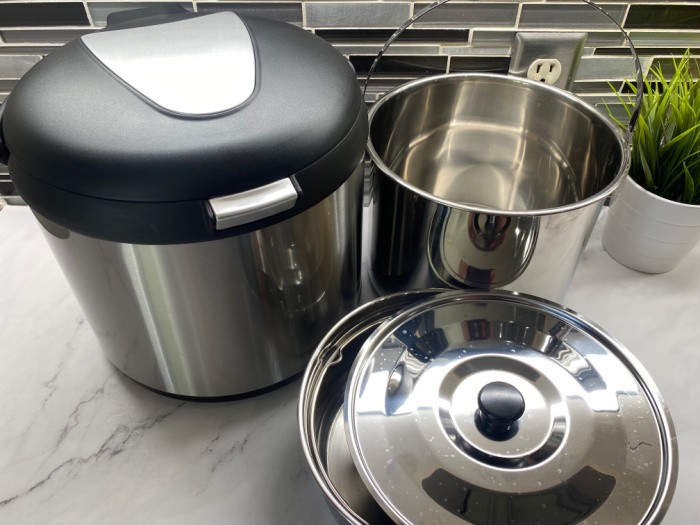
Anyway, I have had thermal cookers for years, literally. I first heard about them from Amy and Jack Loveless, who make Saratoga Jack’s Thermal Cookers. Mine were in my storage unit, so I bought this one to show you how to use them. Tayama Stainless Steel Thermal Cooker, Black,7 Qt. This one is very similar to my other ones.
It’s stainless steel and heavy-duty. The smaller thermal cookers are too small, in my opinion. The 7-quart is the best size for how I use them.
I quote Wikipedia, “A thermal cooker is a cooking device that uses thermal insulation to retain heat and cook food without the continuous use of fuel or another heat source. It is a modern implementation of a hay box, which uses hay or straw to insulate a cooking pot.”
Please remember, it’s not safe to “bake” or “can” anything in mason jars in a conventional oven. This method is baking bread without a flame or electricity. This is a slow cooker without power.
Boil The Water For Four Full Minutes
You just need to bring the contents to a boil for at least four full minutes, then place the inner pan with the lid inside the Wonder Oven, or in my case, the Thermal Cooker. It will “bake” for about 4 hours in either one of these.
Keep in mind, that it won’t have a crust because it doesn’t have air to dry the outside. This is a bonus for those family members who don’t like the crust on their sandwiches.
You can use a Butane Stove to bring the contents to a boil for 4 minutes and then place the contents with the lid into either the Wonder Oven or Thermal cooker. This cooking solution is perfect if we lose power for days or weeks.
It’s a slow cooker that uses very little fuel to get started. It boils for four full minutes and then is placed in the outside pan, closed the lid, and it will bake or cook your food.
Another bonus is it will keep your food cold when needed. For instance, if you are going to a family reunion or to the park and want to take your favorite salad, make it the night before, place it in the inner pot with the lid, and store it in the refrigerator.
In the morning, place the inner pot into the outside pot and close the lid. It will insulate the contents and keep your salad cold for a few hours. As I mentioned, it works with hot or cold food.
Items You Will Need In The Kitchen:
- 7-Quart Thermal Cooker
- Trivet
- Canning Jar Lifter
- Mason Wide-Mouth Pint Jars with Lids and Rings
- Dough Scraper

Oven Canning is Not Safe
I quote from Penn State Extension: “Oven Canning is extremely hazardous. The oven canning method involves placing jars in an oven and heating them. In oven canning, product temperatures never exceed the boiling point because the jars are not covered. It is, therefore, not safe to use for low-acid products (e.g. meats, most vegetables) which require temperatures higher than 212°F.
Oven canning is not a recommended process. The glass jars are not designed to withstand the intense dry heat and may shatter in the oven. The danger of breakage and burns while removing them from the oven is also a concern.
Also, and most importantly, the transfer of heat into the jars is much slower through the air in an oven than in a water bath or a pressurized steam canner. The recipes that we recommend have been scientifically tested using a water bath or pressure canner and should be followed exactly as written.
Otherwise, there is a heightened risk of spoilage or worse, survival of Clostridium botulinum spores, the source of deadly botulism poisoning.”
How To Make Bread In A Thermal Cooker
Step One: Prepare Your Cooker
These are the pieces included in a thermal cooker. It has an outside unit, with two inside pans and one lid. You can use both inside pans or just one like I did today. I used the larger inside pan today with the lid.
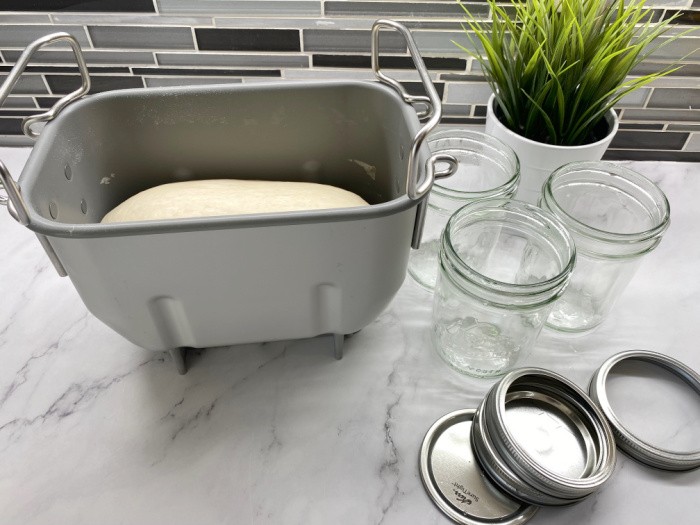
Step Two: Gather Dough Packages
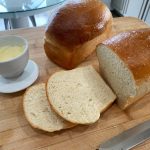
I made my favorite bread dough. You can make whatever recipes work for you. I made three jars of bread and two regular loaves of bread.
Step Three: Knead Dough
Knead the dough and let your bread rise. You can mix your bread in a bowl or use your mixer. It’s the same recipe for bread that you use right now. If you rather try others, I have some of my recipes below.
Step Four: Cut Dough
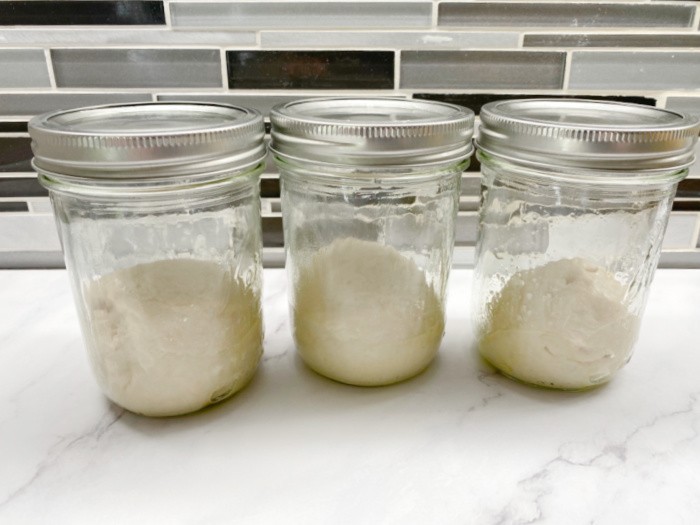
A helpful tip is to always cut your dough with a dough scraper or a knife. Please don’t stretch or pull your dough. The recipe I used was my two-one-pound loaves option. I made two regular smaller loaves and then divided the dough into three sections that I could put in the jars. I filled the jars about 1/3 full.
You don’t need to let them rise again. You may ask why. In my first batch, I filled the jars halfway up and covered them with plastic wrap.
Yes, they did rise to the top, but the lids popped off when I was bringing the water to a boil for 4 full minutes. I had to discard the dough and start over. This is why we practice when we aren’t in the middle of a disaster.
Be sure and spray vegetable spray in your jars before placing your bread dough in them so the small loaves will come out more easily.
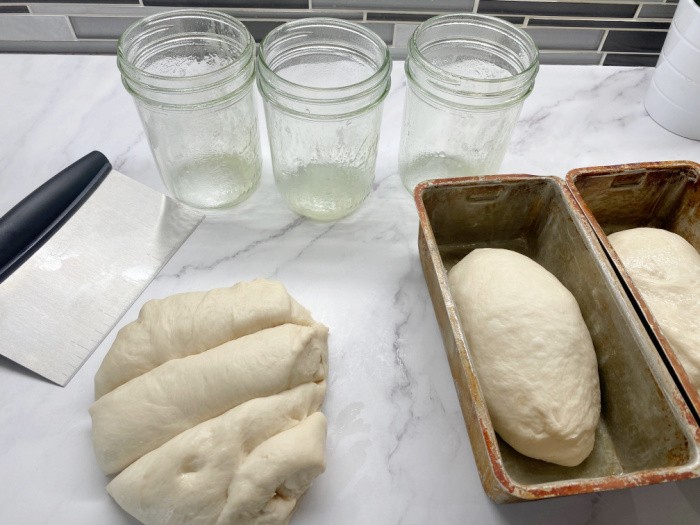
Step Five: Put Dough In Jars
These are filled about 1/3 full and I put the lids and rings on them. I didn’t let the dough rise again. These are ready for the thermal cooker pan.
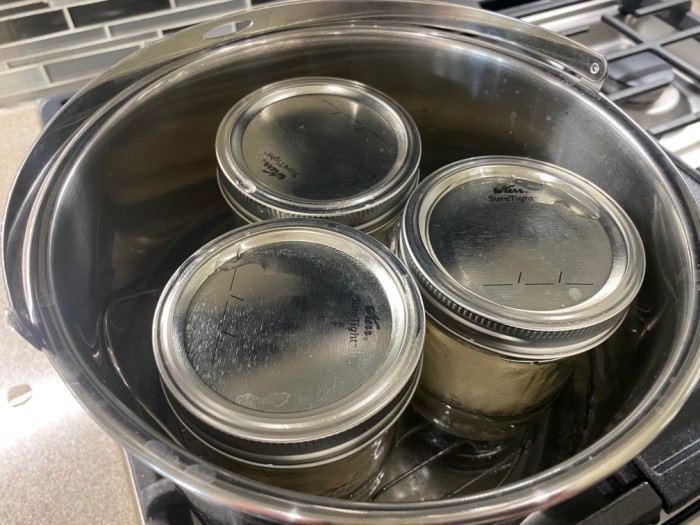
Step Six: Put Jars and Water In Pan
I did learn you need a trivet in the thermal cooker, much like water bath canning. Fill the water 1/2 way up the side of the jars in the thermal cooker pan. Bring the water to a full rolling boil for 4 minutes. Here is where a Butane Stove would be perfect to bring the water to a rolling boil. Butane Stove
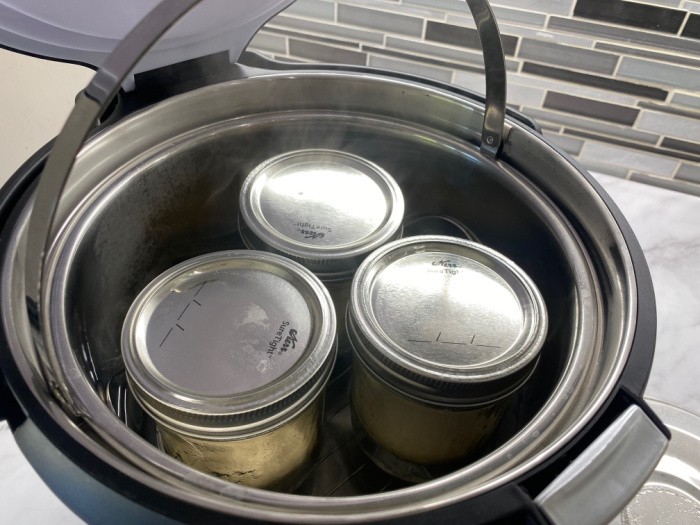
Step Seven: Put Pan In Thermal Cooker
Hopefully, you can see the steam from the jars as I place the boiling pot of water with the jars in the thermal cooker. You quickly place the pan with the lid inside the thermal cooker. Close the outside cover/lid on the thermal cooker.
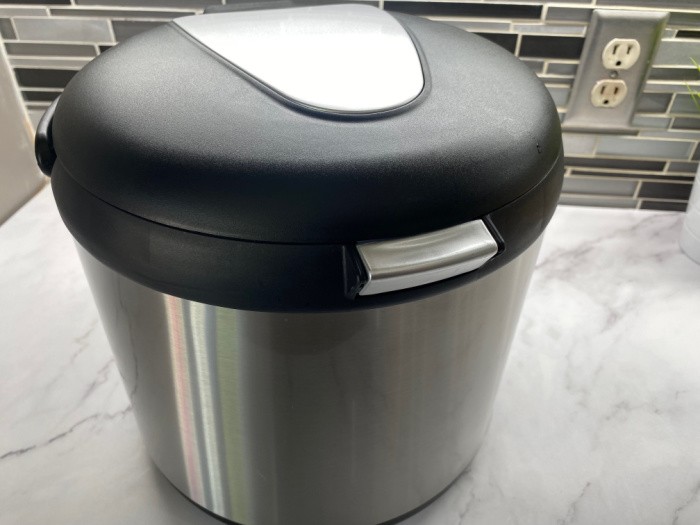
Step Eight: Close & Start Cooker
Here is the thermal cooker with the jars baking inside. I let the thermal cooker sit on the countertop for four hours.
Finished Product
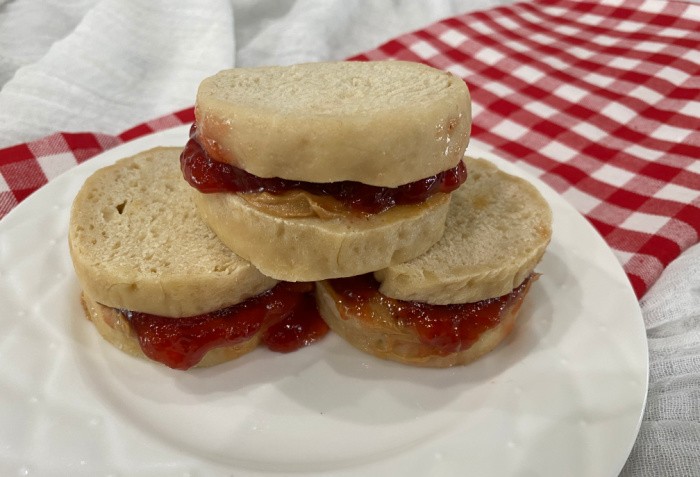
You will need canning tongs to lift the jars out of the steaming water in the Thermal Cooker. Let the jars cool a bit and the loaves of bread just slip out of the jars. You can slice the small loaves and eat this warm bread with butter and jam. You can also make some small sandwiches. Life is so good!
Make Some Sandwiches
This was a cartwheel moment for me. No, I couldn’t do a cartwheel, but I would if I could. LOL! I love making this bread!
White Bread Recipe Made In A Bowl
Heidi’s White Bread Recipe Without a Bread Mixer/Maker
Ingredients
- 1-1/2 cups water
- 4 cups bread or white flour
- 1/4 cup sugar
- 2 tablespoons dry instant milk
- 2 teaspoons salt
- 2 tablespoons butter (let soften)
- 1 tablespoon SAF Instant Yeast
Instructions
-
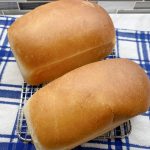
1. Combine all of the ingredients in a large mixing bowl. Stir with a Danish whisk or large wooden spoon. 2. After mixing, scoop the bread dough onto a floured countertop and knead for about 7-8 minutes. 3. Place the bread dough in a greased bowl and cover it with plastic wrap. 4. Let the dough rise until doubled in size. 5. Punch down the dough and divide the dough into two loaves and place these in greased pans (this recipe makes two-1 pound loaves). 6. Let the dough rise once again (using the same plastic wrap) until it doubles in size. 7. Preheat your oven to (350°F) = 176°C). Remove the plastic wrap. Bake for 28-30 minutes or until baked through. Let cool on cooling racks. Enjoy.
White Bread Recipe In A Bread Mixer
Heidi’s Bread Machine Recipe/TWO one-pound loaves
Ingredients
- 1-1/2 cups water
- 4 cups bread flour
- 1/4 cup sugar
- 2 tablespoons dry instant milk
- 2 teaspoons salt
- 2 tablespoons butter
- 1 tablespoon Saf Instant yeast
Instructions
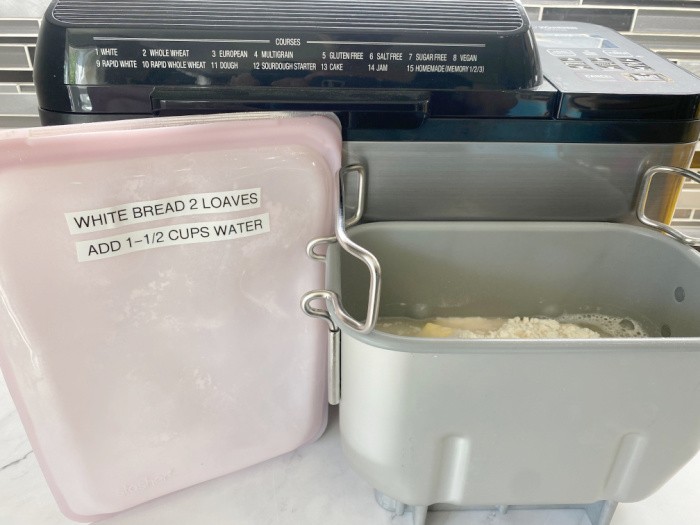
Zojirushi Bread Mixer Instructions
-
Add the ingredients listed to the Baking Pan in the order listed. Press the COURSE button and select Course No. 11 (for DOUGH ONLY) and press the start button. After it stops, remove the dough from the Dough Bread Pan. Use a dough scraper to cut the dough into two equal-sized pieces for the two loaves of bread. I use bread pans this size: 7.75 x 3.75 x 2.5 Inches. Grease your bread pans and place the dough in them and cover with plastic wrap. Let rise until double the size. Remove the plastic wrap. Preheat your oven to (350°F) = 176°C). Bake for 28-30 minutes or until baked through. PLEASE CHECK YOUR BREAD MIXER BRAND'S INSTRUCTIONS.
Step-By-Step Instructions (Additional Help)
-
1. Set the Baking Pan into the Main Body and close the lid. 2. Insert the Power Plug into an electrical outlet. 3. Press the "COURSE" UP button until it reaches Course #11 (for DOUGH ONLY), this is what I did today. 4. Push the Start button. 5. You'll also see the word "Rest" next to #11 telling you that it is in the "rest" phase as the unit warms up the ingredients. 6. This "rest" phase should last about 20-25 minutes. 7. You'll hear the unit move into the "knead" phase as the kneading blades start spinning to knead the dough. 8. The screen will change from "rest" to "knead" during this period. 9. After a few minutes, the unit will make a buzzing sound and you'll notice the word "add" flashing on the screen. This is the appropriate time to add things you want in your dough, like nuts, raisins, etc. You can open the lid, add the desired additional ingredients, and then close the lid without changing any of the settings. 10. Once the knead phase is complete you'll see the word "rise" on the screen next to #11. This is the phase where the yeast kicks in and does its thing. 11. When there are approximately 30 minutes remaining in the dough-making process, you'll see the time setting change from the estimated completion time to 30 minutes, which means there is that much time remaining. This clock setting will change in 1-minute increments until the dough-making phase is finished. When I could see the dough was ready through the glass opening in the lid, I skipped this step. I turned off the machine and unplugged it. 12. After it stops, you remove the dough from the Dough Bread Pan. 13. Use a dough scraper to cut the dough into two equal sizes and then mold them into two loaves of bread. (I use bread pans this size: 7.75 x 3.75 x 2.5 Inches.) 14. Place the loaves into your greased bread pans, cover with plastic wrap and let double in size. 15. Remove the plastic wrap. 16. Preheat your conventional oven to (350°F) = 176°C) bake for 28-30 minutes or until baked through. PLEASE CHECK YOUR BREAD MIXER BRAND'S INSTRUCTIONS.
Saratoga Jack’s Thermal Cooker
Mark and I have two of the 7-liter Saratoga Jack units, as well as the 5.5-liter model. The latch on the 5.5 Liter unit is a challenge for me. It’s hard to open and close for me. I have one of the original 7-liter units as well as one of the new more heavy-duty models they have now. They are great units, if you can find one, but the one I purchased for this article is cheaper and still worked great. I would recommend either style.
Butane Stoves To Boil The Water
You have heard me before recommending you have a butane stove with extra canisters of fuel in your preparedness stash. I gave all four of my daughters one for Christmas years ago. Here’s the deal, you need a way to boil water either for drinking water, washing dishes, washing clothes, personal hygiene, or fixing a hot meal after a disaster when the power goes out. This unit is perfect for bringing the pot to a rolling boil for 4 minutes, I know because I have done it. Butane Stove with Extra Fuel.
Can I cook frozen food in a thermal cooker?
No, you cannot, it will not be able to get the temperature up to a safe temperature while it bakes from a frozen state.
In case you missed these bread posts:
- French Bread In One Hour
- Easy To Make Bread For One
- Bread Making Just Got Easier
- How To Make My No-Fail Homemade Bread
Final Word
I hope you enjoyed my post on how to make bread In a thermal cooker! There is nothing better than the smell of homemade bread! It’s amazing how many different ways we can make bread these days.
Please try a variety of ways to make your bread so that you have the option to cook bread whether in a conventional oven, thermal cooker, bread machine, or Dutch oven. May God Bless this world, Linda
The post How To Make Bread In A Thermal Cooker appeared first on Food Storage Moms.
from Food Storage Moms
No comments:
Post a Comment