Saturday, May 27, 2023
Wednesday, April 19, 2023
How to Recondition Gasoline Step-by-Step
by
If you live on a hard-working homestead, chances are you have plenty of vehicles and other machines that use gasoline to run.

Smart homesteaders will always keep a good supply on hand so they don’t get caught short at a critical moment.
However, it rarely fails that some stored gasoline, either in a can or a barrel, will be forgotten in the hustle and bustle of everyday life.
When you remember it, or even worse, when you need it you find out that the gasoline is old, cruddy, and probably unusable. Tough break when you need to fuel up and get back to business!
It’s just the way things are. All gasoline but particularly our modern gasoline will break down over time, lose potency and eventually fail to function in the engines that use it.
But, with the right know-how and a little bit of luck, it is possible to recondition old gasoline and bring it back to life where it will work nearly as well as new in an engine.
This article will tell you how and everything else you need to know about the process.
Friday, March 17, 2023
Thursday, April 14, 2022
The Best Places Where You Can Store Fuels Safely In An Emergency

One of the more difficult things to stockpile is any sort of fuel. That’s primarily because by definition anything we use as a fuel, is flammable. Therefore, there is always risk in storing it; a risk that is directly proportional to how flammable the fuel itself is. On top of that issue, not all fuels store well, losing their potency over time.
Nevertheless, people have stored some fuels for centuries and even the fossil fuels we are so dependent on for more than 100 years. So it is clear that we can store fuel; we just need to figure out how to store it safely.
Part of that is knowing where to store it; part is coming up with the right containers; and part is doing whatever else is necessary to keep that particular fuel in a usable condition. This obviously varies from one fuel to the next.
As preppers, the two fuels we are most interested in are wood and gasoline. But those aren’t the only fuels we might find ourselves using. Other petroleum-based fuels, like kerosene and lamp oil are extremely useful too, especially in a post-disaster scenario where the electrical grid is down.
While it might prove to be impossible to store enough fuel to see us through the next decade, it is clearly possible to store enough to help us through a post-disaster time, especially if we use it sparingly. The right precautions and the right preparation are all it takes.
Sunday, March 6, 2022
Saturday, July 31, 2021
Sunday, May 27, 2018
The 6 Most Popular Types of Fuel to Store for Emergencies
In our everyday lives we are dependent on fuel to maintain our comfortable lifestyles. During a disaster however, we are even more dependent on fuel to maintain our basic survival needs. Having an emergency supply of fuel can help create warmth in your home to assist in regulating your body temperature, assist in cooking food, and also helps in powering essential emergency tools such as generators, household appliances.
Wednesday, October 3, 2012
Propane or gas: How to choose a lantern and/or stove fuel
Original Article
http://www.survivalcommonsense.comPropane or gas? What type of emergency implement fuel is the best choice for you?
by Leon Pantenburg

Should you have a propane or gas lantern or stove? Tank or canister? What are the advantages, disadvantages and what considerations should you be aware of?
") My
collection includes kerosene, gasoline and propane lanterns. The best
choice will depend on the situation, weight, safety and availability of
fuel. (Pantenburg photos)
My
collection includes kerosene, gasoline and propane lanterns. The best
choice will depend on the situation, weight, safety and availability of
fuel. (Pantenburg photos)Your emergency preparations should include some thoughts about lighting, heating and cooking implements over the long term. Basically, your choices will boil down to two main categories: propane or liquid fuel (gasoline).
Before you buy anything though, consider where the appliance will be used. Are you car camping, where weight is not an issue, or backpacking above the tree line, where weight will be a major consideration? What temperatures will the item most likely be used in? How important is long term use and the ability to replenish the fuel?
Here are some shopping considerations:
- Convenience and ease of use:Does the fuel source
affect how easily the implement can be used? There is no pouring,
priming or pumping with propane. With gas, the implement must be filled,
and sometimes primed and pumped. While the gas implement is operating,
it will occasionally need to be pumped.
Propane or gasoline? Check out the shopping considerations to decide.
- Fuel availability: The dual-fuel gas implements can use unleaded gasoline, at a fraction of the cost of Coleman fuel or white gas. I’ve bought Coleman gas at tiny little stores in out-of-the-way areas of northern Minnesota, where the store inventory was sketchy at best. Conversely, I’ve also seen standard 16.4 oz disposable propane gas cylinders at many of these same stores. I’m guessing gas is still easier to find, but bulk propane is also very common and cheap.
- Cost: Last week at the local WalMart, the disposable propane cylinders were on sale for about $6 for two cylinders, versus almost $10 per gallon for Coleman fuel. The dual-fuel gas stoves and lanterns are the clear winners in the cost-effectiveness category, with unleaded gasoline from the pump costing about $4 per gallon. Not to mention, a dual-fuel implement can be re-fueled with a siphon hose from a vehicle gas tank.
- Safety: As a Boy scout volunteer, I see safety around fire as paramount. I’ve noticed that the propane lanterns and stoves are easier, and hence safer, for the boys to light and use. There is no priming, pouring or fuel to spill. The idea of a container of gasoline anywhere near an open fire, with kids around, makes my blood run cold.
- Implement design: My Coleman model 442 backpacking gas stove has a listed weigh of 24 ounces. That, in part, is due to the pump and generator required for a gas stove. My single burner propane stove that screws on top of a propane cylinder weighs less than half that.
- “Green” design: I don’t like the disposable propane cylinders – they work great, but it seems to be a terrible waste to throw away the empties. For a long-term situation, such as a lengthy campout, though, a bulk propane tank can be filled for about $2-something a gallon, making that option an economic favorite.
- Temperature: Cold affects propane’s effectiveness. In extreme cold, a propane cylinder may not work at all. Gasoline is not affected. That’s one reason why I have so many gas-powered implements.
")
Wednesday, March 9, 2011
Coping with High Gasoline Prices

Coping with High Gasoline Prices
All over the country, people are cringing as they see gas prices rapidly increasing. I won’t tell you to go out and buy a more fuel efficient car, if you already have a “paid for” truck because that may not be practical. Unless you are already in the market for a new car and have the funds, I would not recommend getting into more debt. Here are a few ideas to consider:
- Combine errands as much as possible. I am going to start mapping out a route to cover all my errands at once and avoid having to drive too much
- Go to a grocery store that offers gasoline discount rewards if that is available in your area.
- Consider public transportation. If you live close to a bus line or metro rail then it is worth a look.
- Check into van pools at work. Our office does not have an official van pool but they have a referral service. One lady I work with who lives 30 miles away applied and was matched up with a group. The members take turns driving and are very organized about backups. She has saved a lot of money since joining.
- Make sure your car gets regularly serviced and tires are inflated properly.
- If your child has classmates living nearby, set up a car pool with the other parents and take turns driving the neighborhood kids to school
- Try walking instead of driving, but only if it’s safe to do so in your neighborhood.
- Drive within the speed limit. Speeding will cause you to waste gas, and possibly get a ticket, which will just ruin your day.
- Research the internet for lower gas prices in your area before going out to fill up the car.
- Start cutting back your other discretionary expenses, like entertainment and eating out, to offset the higher cost of gas.

Sunday, January 16, 2011
Scavenging for Fuel
 A lot of people seem to have a lack of imagination when it comes to being prepared for a lot of things. One of the quandaries that seem most perplexing is what are we going to do for fuels after the major melt down occurs and there is no more power, no more fuel deliveries, the gas stations are shut down and there are millions of cars sitting on the roadside and hundreds of thousands of homes with no heat because their generators ran out of gas, and on and on….
There is a simple solution, and it really is a rather cheap solution as well. Of course, you need to remember that doing what I am going to say here has some danger attached to it, not to mention the fact that it is technically illegal. You simply steal or more appropriately, scavenge the fuels you need from others. In the face of an ultimate meltdown and it’s you verses the rest of the world, there won’t be any law enforcement. There will be roving gangs of thugs and nasty deviants that will be causing no end of trouble, and there will quite likely be some sort of military occupation to give you problems. Don’t forget about these problems either, they will be there simmering on the back burner, waiting for enough heat for them to come to a full boil.
There exists on the market a wide assortment of oil and gas rated pumps that are used for everything from cleaning out the huge underground tanks at the filling station to a home heating oil tank in the basement. All of them are quite expensive, and even a small one can cost you several hundreds of dollars. The reason for this is that they are explosion proof and some can even be submerged into a tank of gasoline with no ill effects.
One thing you can do is to take an aftermarket submersible fuel pump designed for an automobiles gas tank and modify it for multiple uses. There are different models on the market, but what you will want to do is attach a long nylon or poly tubing that is resistant to gas and attach it to where the feed goes on the pump in place of the gas line fitting. Connect two 12 gauge wires to the electrical connector and run them along the tubing, taping them with appropriate tape every 6 to 8 inches. Remember to make the tubing and wire assembly long enough to get you away from the tank you will be draining, just in case.
Separate the wires and tubing when you have a long enough assembly for your task. Wire in a double pole single throw switch near the end of the wires, and then attach a cigarette lighter style plug to the ends of the wire. Make sure the polarity is correct for the pump you are using as you don’t want the pump to run backwards. Place the end of the tubing into a fill container, and then submerge the fuel pump into the tank you wish to drain. Making sure the switch is in the off position, plug cord into your cars cigarette lighter socket. Another option is to use gator clips and a twelve volt battery for the power source. Turn the switch on and settle back while the pump does all the work.
Bear in mind that this setup can take a long time to drain a tank as these automotive fuel pumps really aren’t designed for high volume.
That being the case, here’s what I’ve chosen for my bag of survival tricks: a cheap drill pump and some tubing, with fittings. The pump I chose runs about thirteen bucks in most hardware shops, and it pumps 3.6 gallons of fuel at five feet of head, and will pump about 90 feet before it runs out of oomph.
Attach about twenty feet of tubing via a hose fitting to the inlet side of the pump. Attach another 50 feet to the outlet side the same way. If you are pumping gasoline, use one of those old fashioned hand drills as the power source to avoid risk of sparks and explosion. A battery powered drill will safely do the job in other situations. If a battery drill isn’t available a regular drill powered off a generator will be just the ticket.
Just remember that in dire straits you may not want to run a generator as you prowl around sucking your neighbors’ oil tanks dry. Those roving gangs of thugs just may hear you and put an end to your misery of living without power. Make sure you have one of those hand drills no matter what you think your prospects will be. They may not be so fast at getting the job done, but there is no risk of stray sparks setting the vapors off, and they make little noise. And as an afterthought, attach a mesh strainer to the pickup end to keep gunk from being picked up and deposited into your fill containers.
Remember also that there is great risk of explosion if you don’t do these types of tasks carefully and take all necessary precautions to prevent calamity from paying a visit. And again, I want to stress that you will most likely face the risk of being charged with theft, unless of course we do actually suffer the ultimate meltdown, and the resulting loss of governmental control and ensuing anarchy. Be careful and use your brains to think whatever course of action you chose through to the end.
Just as an anecdotal note here, during the great New England ice storm of 98 we were without power for over two weeks. I drained the heating oil out of the tank for our boiler this way and used that fuel in our Omni top hat heater. It never got below 70 in our home and I cooked our meals on top of the heater. How’s that for survival savvy?
Friday, October 15, 2010
Keep Gas Can Storage For Disaster

Having gas storage is almost as important as having food and water storage during disasters. It’s all about the gas can and fuel stabilizer. This world runs on gas and you will most certainly need it, especially during the beginning phase of disasters.
If you are away from home during the beginning of a disaster, you will need gas in your car to get home, or to get away. If you are at home, you may need gas in your car to get away, depending. Early in a disaster, even if you are well stocked with food and supplies, a wise thing to do is drive to your nearest gas station and fill your gas tank, provided their is still electricity to run the pumps.
If the disaster is one that triggers your bug-out plan, then you may need a lot of gas in your car to get to your planned bug-out-location or your pre-planned stay at a distant relative or friends house. You may need more gas than your gas tank can hold. This is one reason it is so important to have a number of filled gas cans ready to use.
The plastic gas can is readily available, costs significantly less than metal, and is common in a 5 gallon size. Gas weighs about 6 pounds per gallon, so a 5 gallon gas can will weigh 30 pounds, a manageable weight to lug around. How many gas cans you keep at the ready is your decision. Keep in mind that you can only fit so many gas cans in your car, along with the rest of your things. Gas will become worth a lot of “money” (barter) during a disaster, so having a decent supply will be to your benefit.
Proper gas storage is important for safety sake and for optimizing the length of time before the gas goes bad. Common sense applies to gas storage. Although a properly sealed gas can should not leak vapor, good ventilation in the storage area is wise. Keeping the gas can out of the sun and excessive heat will minimize the expansion and contraction of the can. Use a product like Stabil (STA-BIL) to add to the gas for long term storage, and it will keep the gas fresh for 12 months. When your gas storage approaches 12 months, pour it into your car’s gas tank and refill them with fresh gas.
STA-BIL 22214 Fuel Stabilizer – 32 Fl oz.
On a side note, always keep your car gas tank as full as possible. A good rule is to never let it go below a half tank. Keep in mind that many car gas gauges are not accurate, and for example may remain above the half tank level longer than it should, and then rather quickly drop down to empty. Some might say that this is designed purposely in some cars, to have the driver feel better that there is gas in the car or the appearance of better fuel economy. In any event, when in doubt, fill ‘er up.
Go out this weekend and make a good investment by purchasing a few gas cans. Fill them up, add some Stabil, and tuck them away.
If you enjoyed this post, or topics of preparedness, consider subscribing to our survival blog RSS feed or Email notification of new posts on the Modern Survival Blog
Modern Survival Blog
- Could You Escape from LA?
- Will Kim Jong il Respond With Nuke?
- A Hurricane Preparedness List
- Disaster Preparedness Binder
- Bartering Reborn
- Hurricane Season Begins – 2010
- Oklahoma Tornado Tests New Radar
- Cooking After The Collapse
- Will Iceland’s Katla Volcano Blow Next?
- Global Power Grid Vulnerability Into 2012
Thursday, June 3, 2010
Burning Characteristics of Wood
 Image via Wikipedia
Here's a pretty good site with information on the burning characteristics of different types of wood.
It lists wood from almost 50 different species of trees, and includes information about green and dry weight per cord, BTUs per cord, percent of ash, ease of splitting, smoke, sparks, coals, fragrance, and overall quality.
I'd reprint the chart here, but the site is copyrighted. Here's the link:
http://www.thefireplacechannel.com/burningwood.html

Friday, March 26, 2010
Esbit Fuel vs. Wetfire cubes
The stove I used was a POS little foldable piece of stamped metal that came is sold as an "emergency stove" with three Esbit tablets. I thought it looked like in might fit in one of my survival tins, but it was a bit too big. I should have just made a cheap pop can stove to use with these tablets, but that is another story. Conditions were warm (about 70 degrees--living in the desert has its perks this time of year) with a light breeze. No wind screen was used, my "pot" was a GSI Nalgene nesting cup, filled with 2 cups of tap water. No lid.
I know these are not ideal conditions--I could have used a better stove, windscreen, a lid, a cup of water instead of two cups, but I wanted to see what these cubes were capable of.
I took some pictures, but they didn't turn out well--I blame the piece of junk camera, not my photography skills :).
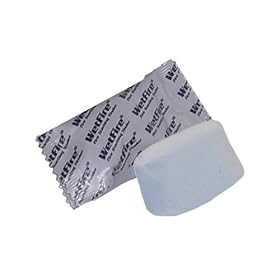 WetFire Tinder Cubes
You've probably WetFire Tinder Cubes
The directions instruct you to shave off a portion of the cube and then use that as "tinder" to help light the rest of the cube. I did so and was able to light the cube on my second try with a ferro rod. Pretty good.
The cube burned for approximately 6 minutes and 45 seconds before going out. It was not able to get the water boiling, but there was some small bubbles on the bottom and side of the cup. This suggests temperatures between 155F and 170F. I should have had a thermometer on hand, but I would be surprised if the water did not get sufficiently hot to pasteurize any bugs in it. You do not need to bring water to a rolling boil to pasteurize it--temperatures above 149F will start to kill the nasty creatures. Of course, boiling is an obviously safer bet--no guessing at the temperature of the water and hoping that it got hot enough for long enough to kill the creatures.
The Wetfire cube actually left a small nugget of fuel--I broke that open and found some intact fuel inside, which I was then able to re-light. This leftover fuel burned for another 15 to 20 seconds and then went out.
Esbit Fuel Tablets

I was unable to get the tablet to light with a ferro rod, despite several minutes of trying. Fair to say that these will not work for ferro rod tinder if that is your preferred fire lighting method. It lit fairly easily with a match...but that means you need to have a match/lighter or other ready source of fire.
The Esbit tablet burned for 10 minutes and 25 seconds, and the water looked quite a bit hotter than with the Wetfire tinder, but certainly not boiling. Just more tiny bubbles and some steam.
Conclusion
During the test conditions, neither product was able to bring the 2 cups of water to a boil. They did get the water hot, probably hot enough to kill any creatures living in it, and definitely hot enough to use for hot chocolate, a Mountain House meal, or a hot shave in the morning. The WetFire tinder cube lit easily, the Esbit tablet were harder to light but burned longer and hotter. Esbit tablets are about 1/2 the price of WetFire tinder.
Between the two, which would I choose for my kits? The WetFire tinder. It's a very robust/water resistant tinder that burns so long that you can some basic heating/cooking on. With one of these and a source of sparks, you've got at least one very sure fire. In a survival situation, you would probably use only small pieces of the WetFire cube to start up each fire--stretching one little cube out long enough to start several fires. If my life depended on using a piece of tinder to get a fire going, this would be what I would use.
Why not the Esbit tablets? They are a little tricky to light--in pretty ideal circumstances, I spent several minutes trying to light the cube with a ferro rod and failed. Holding a lit match to it for a few seconds did the trick...so, basically, you need a ready source of flame, not sparks to get this thing going. And if I have an open source of flame for 5-10 seconds, I can light any kind of scavenged/brought along tinder. Sure, that tinder probably will not burn as long and as hot as an Esbit cube--you're not going to cook over a PJ cotton ball, dryer lint, piece of inner tube, etc., but you can use it to get a real fire going.
The Esbits are better for pure heating and cooking, but neither of these would be my first (or second or third) choice as a standalone cooking solution. As a real "stove," these don't cut it. They just don't have the oomph to do a whole lot--especially when you compare it to the tiny alcohol and fuel canister stoves out on the market, where you can actually cook and boil for not a whole lot more weight.
So, WetFire tinder cubes are the winner for me.
WetFire Tinder Cubes >
Esbit Fuel Tablets >
Saturday, March 13, 2010
Running out of gas?

http://www.youtube.com/watch?v=Mgu9BdHeUYg
(of course instead of a propane stove like this person is using, you would use a wood or charcoal fire for a heat source)
---there are also many other designs that are a bit more complicated and might be a bit more evicient but this still seems to work.
Saturday, February 27, 2010
Kerosene Lantern

**Caution: Lanterns consume good air and exhaust bad air, so use only when well ventilated.**
There is a difference in lighting quantity and quality, as the kerosene lantern is quite dim when compared to the two-mantle gas lantern. The light output of a kerosene lantern is comparable to a 40W-60W light bulb.
As a rule of thumb, the typical kerosene lantern burns approximately 1 ounce of fuel per hour. Burning at the rate of 5 hours each day, the following approximate amounts of kerosene would be used:
Kerosene Lantern Fuel Consumption:
- Day 1/2 pint of fuel
- Week 2 quarts of fuel
- Month 2 gallons of fuel
- Year 25 gallons of fuel
Republished with permission from: Making the Best of Basics. Chapter 17: Energy and Fuels Storage. By James Stevens. If this information was of value to you, please visit our sponsor.
Tuesday, February 23, 2010
For safety sake, homestead fuel storage must be handled properly by Emory Warner Issue #43
Home storage of fuel is a necessity for homesteaders. Even if you are still on the grid, your truck, tractor, standby generator, etc. will still require fuel. I intend to offer appropriate methods of storage for LP gas, gasoline, diesel fuel, and kerosene. I will also offer some tips on safe fuel handling.
 Salvaged 275 gallon horizontal fuel tank with hand fuel pump and filter. This type of pump is suited for all fuels; current use is for diesel fuel. Salvaged 275 gallon horizontal fuel tank with hand fuel pump and filter. This type of pump is suited for all fuels; current use is for diesel fuel. |
 Thirty dollar drum pump mounted on a 55-gallon drum of kerosene. This type of piston pump is not suitable for gasoline. Thirty dollar drum pump mounted on a 55-gallon drum of kerosene. This type of piston pump is not suitable for gasoline. |
 One type of approved and properly marked portable fuel cans. One type of approved and properly marked portable fuel cans. |
 A horizontal drum storage system. Front and rear 2x6s are notched to hold drums and are bolted to 4x4 posts. Braces are 2x4s. This would be nice to have under a lean-to beside the tractor shed. A horizontal drum storage system. Front and rear 2x6s are notched to hold drums and are bolted to 4x4 posts. Braces are 2x4s. This would be nice to have under a lean-to beside the tractor shed. |
![Reblog this post [with Zemanta]](https://lh3.googleusercontent.com/blogger_img_proxy/AEn0k_uMfkGwCQCWE_YEi_oNe_WW-0_1GWHjUYXRnaR-f1kTkk60r8gFv04n7NGOY30nUA1tFJF8GfvMPn2ezY0KDNSCEttAO5YqJUEN4sz5PpniV-91RcjyVAuCfBAhO2R_-K7APs5A_DWLOtFtwl4IeYyl=s0-d)
Sunday, July 19, 2009
Managing Emergency Fuel Stocks
In addition to vehicles, you may need extra fuel for an ATV that you might scout on, and you probably have a generator set that runs on either gas or diesel (some Kohler whole-house fixed gensets run on propane).
Regardless of what it's for, emergency fuel (defined as any fuel beyond what's in the main fuel tanks of the vehicle/generator/ATV/Boat) needs to be stored properly, transferred properly and preserved properly.
Read on.
STORING FUEL
There might be a difference in storing fuel depending on what type of fuel it is. Gasoline is difficult to store, but diesel isn't. Depending on how much you are going to store, you might use steel barrels, plastic fuel tanks, fuel bladders or just jerry jugs, either steel or plastic.
For diesel, you don't need to vent the storage tank, but it's a good idea. Diesel doesn't evaporate, but it does attract water out of the air more than gasoline. You need to have some ability to remove that trapped water, which lies in the bottom of your tank and grows algae in it, which then clogs up your fuel filters, usually at a critical time. Use two additives in diesel that is stored for longer than 2 months: an anti-gel (anti-wax) and a fuel biocide (kills the algae). If you live far North, you may wish to add up to 15% K-1 Kerosene to your diesel for easier starting of your equipment.
For gasoline, you have to deal with the volatility issue. Gasoline creates vapor pressure at fairly low temperatures, and can pressurize a sealed tank to the failure point. You have to provide for venting the vapor off. Problem: the vapor is heavier than air and explosive, so it seeks low ground and will blow things up if it ignites. Solution: keep the tanks cool (in the shade), keep their vents cracked to allow them to vent, and make sure the vented vapor isn't going to be trapped in a low place or have a source of ignition. The classic garage fire is usually started by vapors from a jerry jug of gas venting, with the vapors accumulating, and rising up high enough to reach the pilot light on a hot water heater or furnace, or get into a fridge compressor motor, or some other source of spark. The fire is prevented by storing the gas outside, away from anywhere it will accumulate in low places (under a toolshed, for example). Use a gasoline stabilizer (Stabil by Gold Eagle is what I use) if you are keeping the gas for over two months.
Barrels: try to cover the tops of barrels with a tarp to discourage standing water in the rimmed tops. That water will eventually seep past the barrel bung and get into the fuel. Keep the barrels off the ground, so they don't rust. Use wooden pallets of good quality, or interlocking rubber matting sections that are designed for this use. Depending on your area, there may be fire regulations on storing more than a few gallons of fuel above ground, and there are DEFINITELY regulations on storing it below ground (permanent tanks). Follow the regulations. Make or buy ground leads (at least #10 wire with copper-plated toothed spring clamps) and connect all the barrels together and to a ground rod driven 3 feet into the ground. Barrels can take some sun, but shade is best. If gasoline is stored in barrels, provide a vent.
Bladders: These are a way to store fuel in collapsible containers. Very nice. Very expensive, they can cost hundreds of dollars. Pay attention to the temperature limits of the bladders, both upper and lower limits, before you buy them. Bladders are best stored full in a plywood box made for that particular size bladder. Attach all the hosing for the fill, drain and vent before filling (gets real messy to do that with a full bladder). Sun is not good for these tanks, so store them in the shade.
Plastic tanks: Rotomolded plastic tanks are probably the best compromise for storing diesel fuel, and aren't bad for gasoline, either. Make sure the plastic is the right density for diesel or gas, as the composition of these tanks varies. They cost about a buck a gallon (over 25 gallons) to buy, and come with several locations for fill, drain and vents, which you install yourself. Most plastic tanks (Tempo is the best known brand) handle temperature extremes well, but check anyway before you buy. The downside of plastic tanks is that they can't be grounded, so extra care must be taken when filling or draining, both actions create static electricity in the fuel mass. Try to keep the sun off plastic tanks. Outboard gas tanks come with all the fittings, and handle easily, and can take more vapor pressure than jerry jugs, so they are really the best choice in a 4-to-6 gallon tank, but they cost $30 or so, compared to $7 for a plastic jerry jug.
Jerry jugs: anything 6 gallons and under with handles for pouring. They come in plastic (color-coded for the type of fuel, diesel ones are yellow), or steel (Blitz is the only manufacturer left, I think). Don't fill them to the rim, leave at least a half-gallon of extra room in them. keep them out of the sun, and storage on pallets is best.
TRANSFERRING FUEL
This is where most fires start in fuel supplies. There is only one proper way to do it, and that does NOT involve pouring the fuel into a funnel positioned in the fill opening of the tank being fueled.
The only proper way to transfer fuel is by fuel hose. Get an appropriate length of Coast-Guard rated fuel hose, at least 3/8" ID if you are going to siphon. Push the hose into your storage tank slowly, so it fills, then cap off the transferring end with your finger and pull the hose out of the storage tank enough to put into the mouth of the tank to be fueled, which must be lower in elevation. Remove the finger and the fuel should flow. When it is flowing, put the transferring end down into the tank being filled, the lower, the better.
The way I prefer is to use an outboard-tank hose set. These sets come with a priming bulb and sufficient hose to transfer fuel from apickup bed into the pickup's gas tank. I buy a 12"X3/8" pipe nipple (galvanized iron), and a 45-degree Street Elbow of the same size. Screw the elbow onto one end of the nipple, tightly (with vise or vise-grips), and put the other end into a Tempo outboard hose ser of 3/8" size, in the SHORT END OF THE SET. Fasten a hose clamp over the joint to keep it together. To use this set-up, just drop the nipple end into a tank or jerry jug, put the ling end into the vehicle fuel tank, and squeeze several times on the bulb until you feel and hear fuel flowing.
I once had an electric fuel pump set up for this purpose, but quit using it when I realized that there was a potential for sparks, and that is not good.
Another important consideration here is tank capacity. Don't try to empty a 6-gallon jerry jug into a truck fuel tank that has 5 gallons of room in it. You'll make a mess, create a hazard and waste precious fuel. Know your tank capacities before you start refuelling.
Visit: Kentucky-Preppers-Network.blogspot.com
CodeNameBullseye.blogspot.com
Copy this article for your blog. See copyright policy
for more great articles visit: prepperbook.blogspot.com