Submissions     Contact     Advertise     Donate     BlogRoll     Subscribe                         

Monday, March 31, 2025

Funeral Potatoes aka The Best Cheesy Potato Casserole

The Best Cheesy Potato Casserole

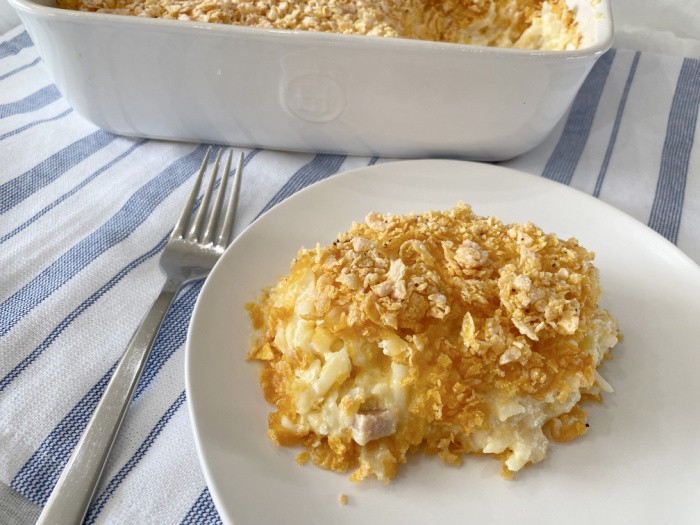
This is truly the best cheesy potato casserole in the world. It’s at least 50 years old and going strong. In Utah, this recipe is also known as “funeral potatoes”. The reason is when we have a funeral in Utah, typically we serve lunch to the family of the deceased. It’s a time to remember the good times with family and friends with a meal being served to those in attendance.

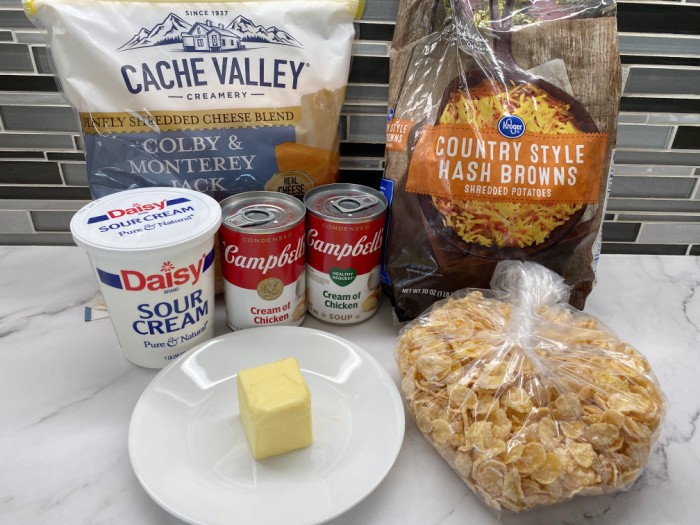
I’m usually asked to make my infamous chocolate cake as a dessert for those special lunch meals. In case you missed this post, try this Best Chocolate Cake Ever. Okay, back to the cheesy potatoes. This dish has frozen hash browns, sour cream, butter, shredded cheese, and cream of chicken soup, and is topped off with your favorite version of frosted flakes.

I’d be surprised if we all didn’t have our own family recipe for cheesy potatoes. Where I live (Utah), we not only serve these cheesy potatoes at funeral lunches, but also at church activities, neighborhood parties, family reunions, and regular family meals. They really are yummy and so easy to make, so I decided to show you how to make them today using some frozen hashbrowns, and also using dehydrated potatoes.

Kitchen Items You May Need

I must say my mouth is watering just thinking about these! First, let’s talk about preparing your dehydrated potatoes for use in the recipe.

Ingredients

  • Shredded Potatoes: Potatoes are a nightshade vegetable and are grown for their starchy edible tubers.
  • Sour Cream: Used to add more flavor to the cheesy potatoes. It has a 20% fat content. The cream is mixed with a lactic aid that creates that sour taste we all love! It also helps to thicken the cream.
  • Cream of Chicken Soup: A savory and smooth creamy chicken soup made of chicken stock, seasonings, small bits of chicken, celery, and cream.
  • Butter: Helps to keep the potatoes from crumbling; prevents the water from evaporating, which creates moist and soft cheesy potatoes.
  • Grated Colby Jack Cheese: A very smooth, moist, and mild cheese. It is the perfect choice for this cheesy potato casserole due to its melting capabilities which helps to combine all of the ingredients together.
  • Frosted Flakes or Corn Flakes: The perfect topping! Use Frosted Flakes for a sweeter crunch and Corn Flakes for a more mild yet savory crunch. You are also welcome to use a cracker of choice or other topping.
The Best Cheesy Potato Casserole

The Best Cheesy Potato Casserole Recipe

Step One: Gather the Ingredients – Preheat Oven

Preheat your oven to (350°F) = (176°C). Gather all of the ingredients so you’re ready to make the recipe.

Ingredients

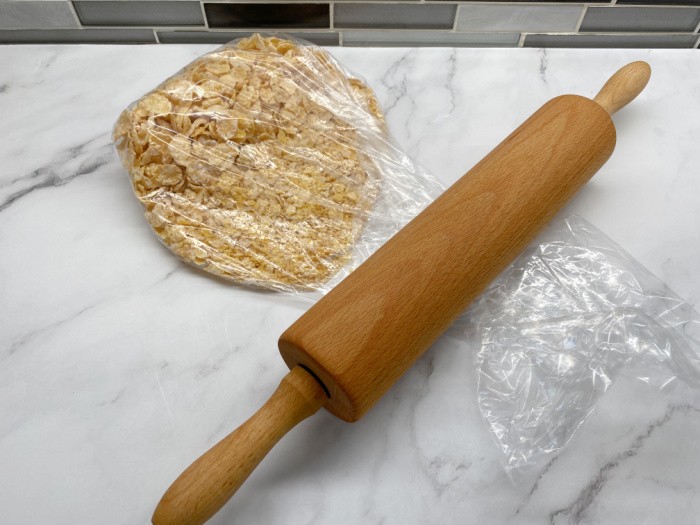
Step Two: Crush the Frosted Flakes

Crush the Frosted flakes in a bag. Note that you can use another cereal or even your favorite cracker you feel would be a good fit flavor-wise. You may be wondering why I use Frosted Flakes. I get it. One day many years ago, we were out of cornflakes and crackers. The only cereal we had was Frosted Flakes. So we crushed the yummy cereal and now we only use them. I’ve heard from readers that they like crushed potato chips too. I guess the topping you add could be made from dozens of crunchy things you like.

Crush The Frosted Flakes

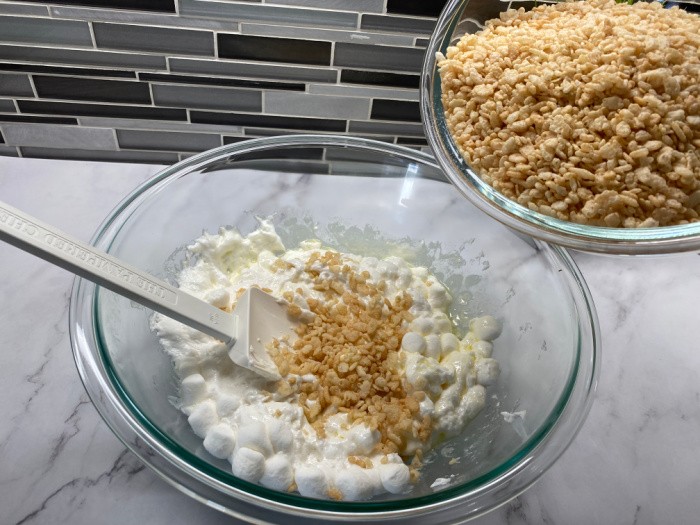
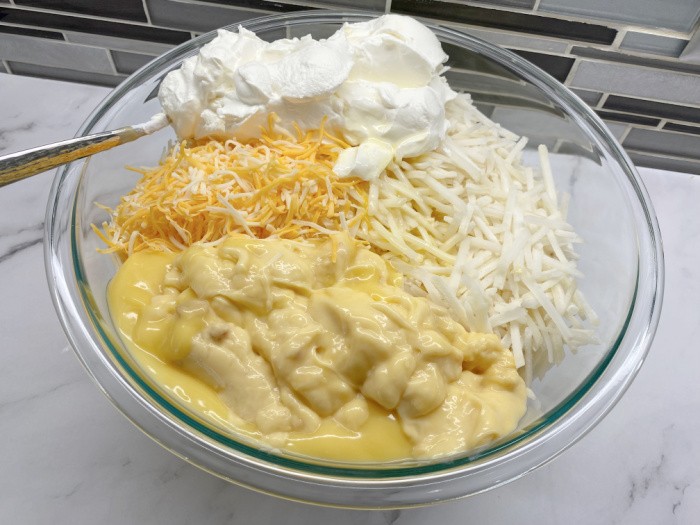
Step Three: Combine the Ingredients

Combine all of the ingredients in a large bowl, and sprinkle with salt and pepper.

Combine the ingredients

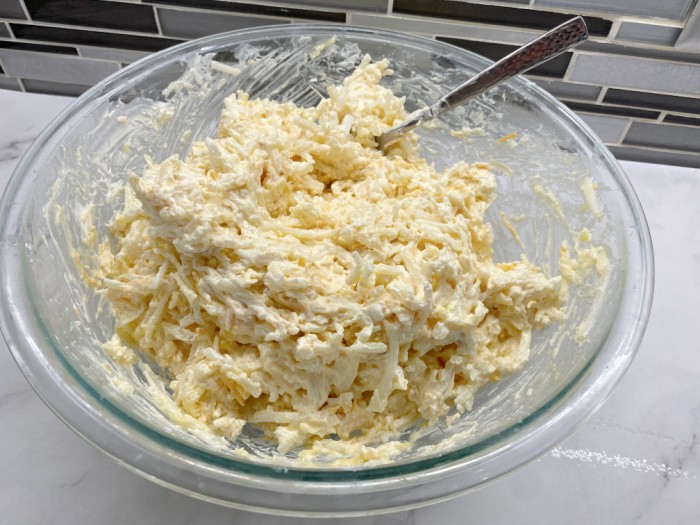
Step Four: Stir Until Smooth

Stir the ingredients until smooth.

The Best Cheesy Potato Casserole

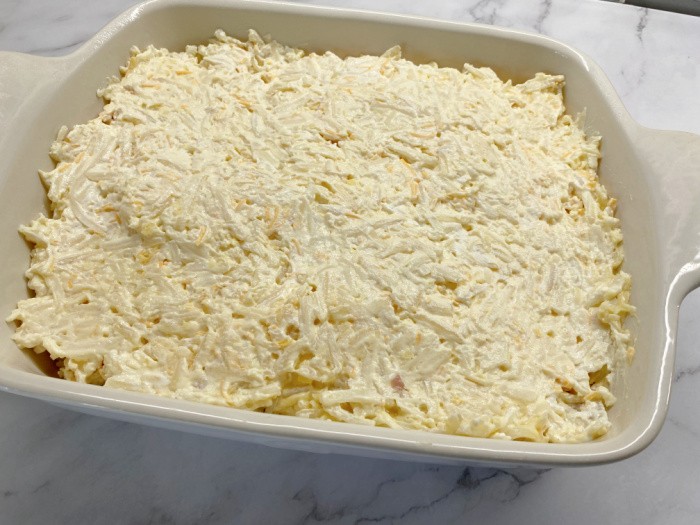
Step Five: Scoop the Mixture Into The Pan

Grease a 9 by 13-inch pan with cooking spray and scoop the mixture into the pan or baking dish.

Scoop into pan

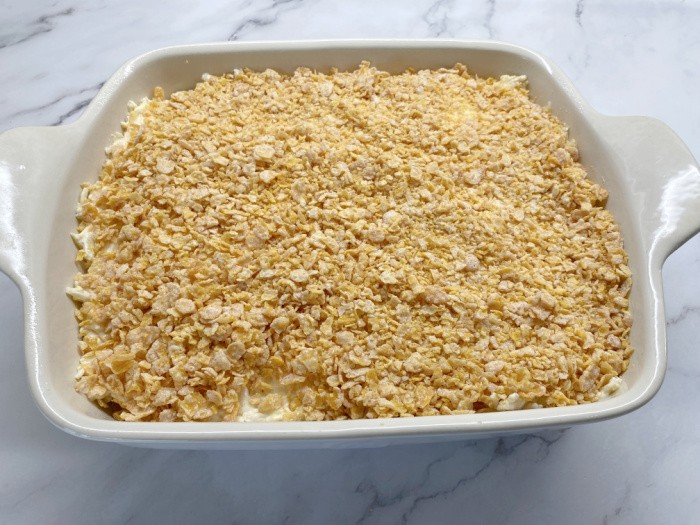
Stir Six: Bake as Directed

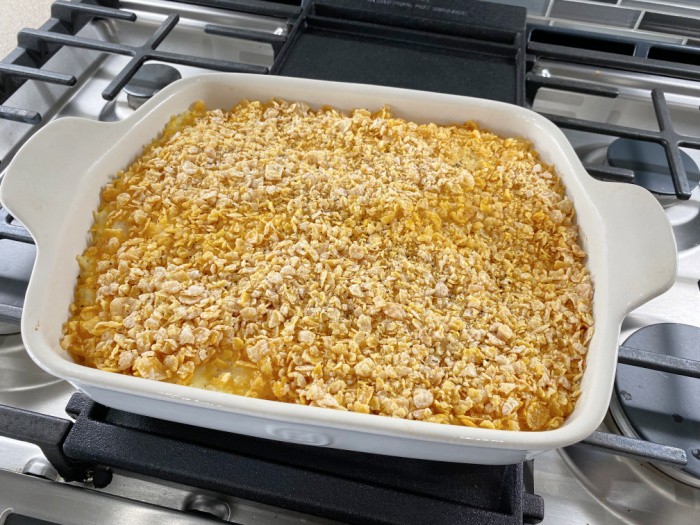
I crush the frosted flakes and sprinkle them over the casserole. Bake at (350°F) = (176°C) degrees covered with foil for 1 hour, or until bubbly.
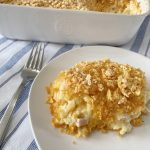
Sprinkle Frosted Flakes On Top

Finished Product

Whether you use frozen hash browns or dehydrated potatoes from your pantry or the store, this recipe will prove to be one you’ll grow to love and serve. When our extended family visits, there are two recipes I always have to make, these cheesy potatoes and cream chipped beef on toast. I used to think they came to see their grandma, now I wonder if it isn’t so they can enjoy my meals!

The Best Cheesy Potato Casserole

The Best Cheesy Potato Casserole Recipe

The Best Cheesy Potato Casserole
Print

The Best Cheesy Potato Casserole Recipe

Course Side Dish
Cuisine American
Prep Time 20 minutes
Cook Time 1 hour
Total Time 1 hour 20 minutes
Servings 8 people
Author Linda Loosli

Ingredients

  • 12 cooked and shredded potatoes or 30 or 32-ounce bag of frozen hash browns
  • 1 pint Sour Cream
  • 2 cans Cream of Chicken Soup
  • 1/4 cup Butter, melted
  • 2-3 cups Cheese-shredded
  • 1 cup crushed Frosted Flakes type cereal

Instructions

  • Gather all of your ingredients. Preheat your oven to (350°F) = (176°C).
  • Crush the Frosted Flakes in a bag. Note: You are welcome to use another cereal or favorite cracker, if desired, in place of the Frosted Flakes. The Frosted Flakes give the casserole a sweet flavored topping that is delicious and pairs well with the other ingredients.
  • Combine all of the ingredients in a large bowl, and sprinkle with salt and pepper. (Except for the Frosted Flakes and butter, set them aside).
  • Stir the ingredients until smooth.
  • Grease a 9 by 13-inch pan with cooking spray and scoop the mixture into the pan or casserole dish.
  • Bake at (350°F) = (176°C) degrees covered with aluminum foil for 1 hour or until bubbly.

Frosted Flakes Topping

  • Combine the melted butter and crushed Frosted Flakes, you will sprinkle these on the casserole before baking or add them to the baked casserole, for the last 15 minutes of baking.

How do I store the leftovers after baking them?

I store them in an airtight Tupperware-type container for 2-3 days in the refrigerator.

Can I freeze the leftovers?

The nice thing about this recipe is it does make a lot. Our family usually finishes off the recipe, but if you have leftovers, place them in an airtight container for freezer storage. They will be good for 2-3 months. Thaw them in the refrigerator, and bake them covered as directed to heat them through.

Can I use a different cheese?

Yes, I have used plain cheddar cheese, Mozzarella cheese, Monterey Jack cheese, and even spicy Jack cheese once. The spicy Jack cheese I had to grate it by hand. It was delicious! I know people who use Swiss cheese in this recipe. You could also sprinkle parmesan cheese over the top for a cheesy crust.

For a bolder flavor, you could add different types of cheese, such as smoked gouda or sharp cheddar cheese. This recipe is so versatile.

Can I use a different shape of potatoes?

I have used the small 1/2-inch frozen potatoes as well. Any shape works. The shredded hashbrowns are the ones that most people in Utah use. When I was younger I boiled potatoes, now I buy them frozen and shredded.

What type of potatoes should I use for this recipe?

You can use any type of potato you prefer, but russet potatoes work best because they have a fluffy texture when cooked.

Are there any variations that could be made to this recipe?

I really love the recipe as is! But if you are interested in adding some additional ingredients or making any variations, I would recommend any of the following.

  • Substitute the traditional potatoes for sweet potatoes for a sweeter taste.
  • Top with crushed Cornflakes, Ritz crackers, or bread crumbs.
  • Use cream of mushroom soup or cream of celery soup instead of cream of chicken soup.
  • Add diced jalapenos for a spicy kick.
  • Add cooked bacon or ham for added flavor and protein.
  • Top the casserole with crispy bacon pieces for an added crunch.
  • Add a pinch of nutmeg, paprika, or thyme for an added depth of flavor.
  • You could add some minced garlic to the melted butter.
  • Melt some Velveta cheese to make a creamy cheese sauce in place of the shredded cheese.

The options are endless!

Is this cheesy potato casserole gluten free?

The Frosted Flakes or Cornflake topping in this recipe is most likely NOT gluten-free. If this is a concern in your family, I would recommend eliminating the cereal topping or using a cereal or cracker that is certified gluten free. As with any food allergy, I would highly recommend reviewing the ingredients on any product that you use in this recipe, or on any other packaging, if you decide to add or substitute any additional ingredients.

What can I serve with these cheesy potatoes?

How To Use Dehydrated Potatoes For Cheesy Potatoes:

All you do is open a container or package of dehydrated potatoes, no slicing or peeling and let them sit in water covered for about 45 minutes. Drain and they are ready to use. Just reconstitute the dehydrated ones as directed on the container and you’re ready to go.

I promise your cheesy potato casserole will be totally consumed at your next get-together! Although not listed as an ingredient, you can sprinkle a little green onion on top to add some extra flavor. With the potatoes, soup, Frosted Flakes, and other ingredients listed below, this really is a tasty recipe. Sometimes I’m tempted to serve it on its own without any meat portions, particularly when I serve it to friends who lean towards vegetarian meals.

Potatoes tend to make you feel full, and with the cheese and other items included you have a meal most all family members will be asking to be repeated pretty often. We’ve also made these in a series of pans and frozen some for future meals.

You can take them out of the freezer the night before you plan to serve them. Let the ingredients defrost, then place the covered pan in the oven. Be ready to pass out the recipe.

You’ll note that the recipe calling for frozen hash browns is the same as the dehydrated version, just without any rehydration steps, just time to thaw the frozen potatoes.

Final Word

Let me know if you decide to make this one and only best cheesy potato casserole! recipe. It really is the perfect side dish to serve at any family gathering or special occasion. We love to serve it for Easter or Christmas dinner. It is always a hit with any crowd!

It’s funny how certain foods can be attached to an ethnic group or location, even to the point they are called “signature foods.” Examples might be Chicago or New York pizza, Philly and their cheesesteak sandwiches, and San Francisco’s famous sourdough bread. I’m not aware of another place where people are likely to make this cheesy potatoes recipe like they are here in Utah. Utah also became famous for its green jello with carrots when the Olympics were held here in 2002.

Let’s spread the word by serving this at your next company party, neighborhood dinner, or family reunion. You’ll get rave reviews and have a new “family favorite” you can serve anytime. Let me know how it was received by your hungry guests. May God bless this world. Linda

The post Funeral Potatoes aka The Best Cheesy Potato Casserole appeared first on Food Storage Moms.


from Food Storage Moms

My Must-Have Herbs and Herbal Remedies for Everyday Wellness

[…]

The post My Must-Have Herbs and Herbal Remedies for Everyday Wellness appeared first on The Survival Mom.


from The Survival Mom https://ift.tt/omQuUtC

The Only Emergency Preparedness Checklist You’ll Ever Need

You know that nagging feeling in the back of your mind when a storm knocks out the power, or the news mentions another supply chain hiccup? That’s your survival instinct whispering, “Hey, maybe we should get our act together.” The good news? You don’t need a bunker or a year’s worth of freeze-dried meals to ... Read more...

from Prepper's Will

How to Make an Herbal First Aid Kit

Estimated reading time: 14 minutes

How to Make an Herbal First Aid Kit

An herbal first aid kit can be a vital lifeline when modern medicine is out of reach. In situations where access to healthcare is limited, this kit serves as an alternative solution, bolstering health and wellness using natural remedies.

A fully stocked kit is packed with various herbs, oils, salves, and infusions, each providing unique restorative and preventive benefits. In this article, we'll explore the essential components to include in your herbal first aid kit and why they're crucial for survival in less-than-ideal scenarios.

Benefits of Medicinal Plants

Medicinal plants are powerhouses of wellness, offering natural solutions to a broad array of health issues. For example, many can alleviate inflammation, a root cause of many chronic diseases. Different herbs can contain potent anti-inflammatory compounds that help soothe inflamed tissues and promote healing from wounds.

Infections, both viral and bacterial, can be managed with plants like garlic and echinacea, because of their immune-boosting abilities. These herbs not only prevent infection but also speed up recovery while reducing the severity of the illness.

Digestive issues, a common complaint in today's stress-driven society, can be eased with herbs like peppermint and chamomile. These plants calm the digestive tract, helping with bloating, nausea, and indigestion.

For those who don't have a green thumb, the ease and simplicity of growing and preparing these plants can be achieved by anyone. Many of these plants are hardy species, thriving in a variety of conditions, and can be foraged during specific times of the year.

You also don't need a chemistry degree to use them. Turning them into DIY remedies is straightforward – often, it's as simple as infusing them in hot water or oil.

One big plus is that medicinal plants often present minimal side effects. Though powerful, their mechanisms of action are often gentler than synthetic remedies, making them a safer choice for many people. It's important to stress, however, that individual reactions can vary and to proceed with caution when using them.

Essential Plants to Grow in Your Garden

Fresh Herbs

A home garden acts as a personal pharmacy, ensuring a continuous supply of medicinal herbs when you cannot forage or purchase them. Here are some of the essential herbs to consider growing:

Calendula

Calendula

A potent healing herb, Calendula is renowned for its anti-inflammatory, antiviral, and antibacterial properties, making it excellent for treating wounds, burns, and rashes. It can even be used to create soothing oils and salves for the skin. This vibrant, yellow-orange flower prefers full sun and well-drained soil.

  • Growing: Prefers full sun and well-drained soil. Blooms continuously if flowers are harvested regularly.
  • Storage: Dry flowers thoroughly and store in airtight containers. Can also be infused in oil.
  • Uses: Heals wounds, burns, rashes, and skin irritations due to its anti-inflammatory, antiviral, and antibacterial properties.
  • Best Ways to Use: Teas, salves, infused oils, and topical creams.

Chamomile

Chamomile

Chamomile helps calm the digestive tract and induce sleep. It thrives in cool conditions and should be planted in part shade.

  • Growing: Prefers cool temperatures and part shade but can tolerate full sun. Well-drained soil is essential.
  • Storage: Dry flower heads in a warm, dark place. Store in airtight containers.
  • Uses: Aids sleep, digestion, and stress relief; also has anti-inflammatory properties.
  • Best Ways to Use: Teas, tinctures, and compresses for skin irritation.

Dandelion

Dandelion

Dandelion helps with liver detoxification and grows in a variety of climates with full sun.

  • Growing: Thrives in various climates and full sun. Grows wild but can also be cultivated.
  • Storage: Dry leaves and roots separately. Store in airtight containers.
  • Uses: Supports liver detoxification, aids digestion, and has diuretic properties.
  • Best Ways to Use: Teas, tinctures, fresh greens in salads, and roasted root coffee substitute.

Echinacea

Purple Coneflower

Echinacea, known for boosting our immune system, is effective in managing infections. It thrives in good drainage soil and full sun.

  • Growing: Prefers well-drained soil and full sun. It is a hardy perennial that self-seeds easily. Sow seeds in early spring or start indoors for best results.
  • Storage: Dry the roots and flowers in a cool, dark place. Store in airtight containers away from sunlight.
  • Uses: Known for boosting the immune system, it helps fight colds, flu, and infections.
  • Best Ways to Use: Tinctures, teas, and capsules. The root is the most potent medicinal part.

Garlic

Garlic

Garlic offers immune-boosting abilities and is easy to grow in well-draining soil with plenty of sun.

  • Growing: Easy to grow in well-drained soil with full sun. Plant cloves in the fall for a summer harvest.
  • Storage: Cure bulbs by hanging them in a dry, well-ventilated place. Store in a cool, dark spot.
  • Uses: Boosts immunity, fights infections, and lowers blood pressure.
  • Best Ways to Use: Fresh, fermented (as black garlic), infused in honey, or made into an oil for topical use.

Lavender

Lavender

Besides its calming scent, lavender has antiseptic and anti-inflammatory properties. It requires well-drained soil, full sun, and good air circulation.

  • Growing: Thrives in well-drained, sandy soil with full sun and good air circulation. Prune regularly for bushier growth.
  • Storage: Hang flower stalks upside down in a dark, dry place. Store dried flowers in an airtight container.
  • Uses: Antiseptic, anti-inflammatory, and calming properties make it great for relaxation, burns, and skin irritation.
  • Best Ways to Use: Teas, infused oils, sachets, and essential oils.

Peppermint

Peppermint

Excellent for soothing digestive issues and clearing up a clogged sinus, peppermint is easy to grow and prefers partial shade.

  • Growing: Grows aggressively, so it’s best kept in containers. Prefers moist, rich soil and partial shade but can tolerate full sun.
  • Storage: Dry leaves on a screen in a well-ventilated area. Store in glass jars or vacuum-sealed bags.
  • Uses: Helps with digestive issues, nausea, headaches, and respiratory congestion.
  • Best Ways to Use: Teas, essential oil, infused water, or applied topically for pain relief.

Rosemary

Rosemary

Known for improving digestion and alleviating muscle pain, rosemary prefers well-drained soil and at least six to eight hours of sunlight.

  • Growing: Needs well-drained soil and at least 6–8 hours of sun per day. Can be grown indoors in winter.
  • Storage: Hang sprigs to dry, then store in airtight containers. Can also be infused in oil.
  • Uses: Aids digestion, improves memory, and relieves muscle pain. Has antimicrobial properties.
  • Best Ways to Use: Teas, tinctures, essential oils, and culinary uses.

St. John's Wort

St. John's Wort

This popular plant is known for its mood-boosting properties, St. John's Wort is often used as a natural remedy for depression, anxiety, and sleep disorders. It thrives in full sun and well-drained soil. This plant should be used with caution as it can interact negatively with certain medications.

  • Growing: Prefers full sun and well-drained soil. It can spread aggressively, so manage carefully.
  • Storage: Dry flowers and leaves in a dark, warm place. Store in glass jars.
  • Uses: Treats mild depression, anxiety, and sleep disorders. Also useful for wound healing.
  • Best Ways to Use: Tinctures, infused oils, teas, and capsules. Use with caution as it interacts with many medications.

As a general rule, most medicinal plants prefer well-drained soil, good air circulation, and plenty of sunlight. It's a good idea to dry the herbs to preserve their potency, this can be achieved in a dry space where the plants can be left to hang for several days.

Commonly Found Medicinal Plants in North America

There may come a time when you are unable to cultivate your garden. However, for those plants that you cannot grow, foraging is always an option. Here are a few examples of plants that you can gather:

Elderberry

Elderberry

Elderberries are rich in immune-boosting compounds. They are often used in syrups and teas to combat flu and cold symptoms. The berries can be harvested in late summer and early fall.

  • Growing: Found in moist areas; prefers full sun to partial shade.
  • Storage: Dry berries or make them into syrup.
  • Uses: Boosts immunity, treats colds and flu.
  • Best Ways to Use: Syrups, teas, and tinctures.

Jewelweed

Jewelweed

This plant, often found in damp soil and partial shade, is a trusted remedy for poison ivy rashes. The flowers are the most potent part and can be harvested between mid-summer and the first frost of the year.

  • Growing: Prefers damp, shady areas and moist, rich soil. Self-seeds easily and thrives in wetland areas.
  • Storage: Best used fresh, but can be infused in oil or turned into a salve for long-term use.
  • Uses: Treats poison ivy, bug bites, and minor burns.
  • Best Ways to Use: Fresh juice applied directly to the skin or made into salves and tinctures.

Plantain

Plantain

Almost seen as a weed, plantain is an incredibly versatile medicinal plant that grows on lawns and roadsides. It assists in wound healing and insect bites. You can harvest it from the spring into the first frost. 

  • Growing: Found in lawns and roadsides; grows in most soil types and partial to full sun.
  • Storage: Dry leaves for later use in teas and salves.
  • Uses: Treats wounds, insect bites, and digestive issues.
  • Best Ways to Use: Poultices, teas, and salves.

Willow

Willow

The bark of the willow tree, found near water bodies or in moist soil, contains salicin, a natural pain reliever. It can be used for making tea or tinctures. It's best harvested during the spring when the sap begins to run.

  • Growing: Prefers moist soil and full sun to partial shade. Can be grown from cuttings.
  • Storage: Harvest and dry the bark in the spring when the sap is running. Store in airtight containers.
  • Uses: Natural pain reliever, reduces fever, and has anti-inflammatory effects.
  • Best Ways to Use: Teas, tinctures, or powdered bark.

Yarrow

Yarrow

This brilliant white flower commonly grows in meadows and on roadsides across North America. Yarrow is known for its ability to stop bleeding and can be used topically on wounds. The leaves can be harvested at any time of year but they are most potent in spring and early summer. Wait until the flowers have fully opened before harvesting. 

  • Growing: Found in meadows and roadsides; prefers well-drained soil and full sun.
  • Storage: Dry flowers and leaves, store in airtight containers.
  • Uses: Stops bleeding, speeds wound healing, and aids digestion.
  • Best Ways to Use: Poultices, teas, and extracts.

For most of these items, you can dry them to preserve the medicinal qualities but fresh plants can always be used in a variety of preparations.

Preparations to Stockpile: Salves, Oils, and Infusions

When considering herbal preparations to stockpile, it's essential to focus on versatility and ease of use. Herbal remedies come in various forms, each serving a unique purpose, and can be stored effectively for future use.

Salves

Thick ointments made by infusing herbs in oil and combined with beeswax, are excellent for topical applications. They're especially useful for treating skin ailments like burns, wounds, rashes, or dry skin. Salves made from calendula, plantain, and jewelweed are particularly effective thanks to their healing, anti-inflammatory, and soothing properties.

To make a salve, you need to steep the chosen herbs in oil (like coconut or olive oil) on low heat for several hours, strain the mixture, then add beeswax, stirring until it melts. Pour into small jars to cool and solidify.

Herbal oils

These are beneficial for a variety of health issues. For instance, garlic oil is lauded for its immune-boosting properties, making it a valuable addition to your herbal stockpile. St. John's Wort oil can help with nerve pain, while lavender oil is a popular choice for relaxation and sleep aid.

Herbal oils are prepared by steeping herbs in a carrier oil, such as olive or almond oil, for several weeks, then straining and storing them in dark glass bottles.

Infusions

These usually refer to teas or decoctions prepared by steeping or boiling herbs in water. They're perfect for internal use, especially for treating digestive issues, boosting the immune system, or promoting sleep. Peppermint, chamomile, and ginger are excellent choices for infusions. They can be prepared simply by pouring boiling water over herbs and allowing them to steep for 10-15 minutes.

Using herbal preparations is in your best interest because of their potent therapeutic properties, ease of use, and simple recipes. They harness the natural healing power of plants, offering a holistic alternative when the drugstore isn’t opening up any time soon.

Creating a compact travel kit from your primary collection of herbal remedies could be a lifesaver in times of need. Include in it all of the plant infusions that can help target a broad array of issues instead of just focusing on a few plants that are good for one thing.

Final Thoughts

One thing that cannot be stressed enough is that proper identification of these plants is key before consumption. Misidentification can lead to unnecessary health complications. Keeping a small field guide handy is a practical way to cross-reference and verify the herbs you're using.

One way to practice is to go out for walks in your local woods and see if you can identify any herbs. Then you can take them home and try out a few recipes to see which one suits your needs.

You May Also Like:

The post How to Make an Herbal First Aid Kit appeared first on Urban Survival Site.


from Urban Survival Site

20 Ingenious Ways To Fool Looters When Stepping On Your Property

In a crisis, your home is your last line of defense. And looters know it. When SHTF, desperate individuals will target properties that look vulnerable, searching for food, supplies, and anything valuable. But what if you could turn your home into a psychological minefield, confusing and deterring intruders before they even set foot inside? What […]

The post 20 Ingenious Ways To Fool Looters When Stepping On Your Property appeared first on Ask a Prepper.


from Ask a Prepper https://ift.tt/Cs8RLqe

Sunday, March 30, 2025

20 Reasons Why You Should Consider Getting Chickens

Chickens Outside

Owning chickens may not be the first thing that comes to mind when considering a pet, but let me tell you, it’s a decision worth considering. Chickens are adorable and fascinating creatures and offer many benefits that make them a brilliant addition to any household. Today, I want to talk about 20 reasons why you should consider getting chickens.

20 Reasons Why You Should Consider Getting Chickens

1. Fresh Eggs Every Day

One of the most obvious advantages of owning chickens is the abundance of fresh eggs available in your own backyard. Imagine entering your backyard every morning to collect a basket of delicious, organic eggs. No more trips to the grocery store for supermarket eggs or worrying about the quality of your eggs. 8 Types of Eggs You Can Eat

2. Natural Pest Control

Your own chickens are excellent at controlling insects and pests in your yard. They love to forage for bugs, snails, beetles, grasshoppers, spiders, and grubs, reducing the need for harmful pesticides. Say goodbye to unwanted pests and hello to a thriving garden. Keeping Pests Away from Food Storage

3. Fertilizer for Your Garden

In addition to pest control, chickens provide a constant supply of natural free fertilizer. Chicken manure or chicken poop is rich in nitrogen, phosphorus, and potassium, essential nutrients for healthy plant growth. Your garden will flourish with the help of these guys! 12 Budget-Friendly Beautiful Garden Tips

The good thing is that you can feel comfortable spreading the manure in the garden since you know it doesn’t have harmful chemicals. If you have a seasonal garden, mix the chicken manure with food scraps, leaves, lawn clippings, and other materials to make a compost pile. That way, you’ll have ready fertilizer for the following year’s plantings.

4. Entertainment Value

Chickens are highly entertaining creatures. Their quirky behaviors will provide entertainment for everyone. Watching them scratch, peck, set up a natural pecking order, and interact with each other is quite funny! Whether it’s to raise some of your food, form a new hobby, or be entertained, chickens can be fun to be around.

5. Educational Opportunities

Owning chickens can be a fantastic educational experience for everyone, particularly kids. It teaches them responsibility, compassion, and the cycle of life. Kids can learn about incubation, hatching, and the care required to raise healthy chickens. Your kids might take to the chickens more than you ever thought. Home Economic Skills You Should Teach Your Kids

6. Stress Relief

Spending time with chickens has been proven to reduce stress. Watching them roam around as free-range chickens producing free-range eggs, listening to their soothing clucks, and knowing they are reducing pests can relieve stress. Take the time to feel the softness of their feathers because it can have a calming effect on you. Managing the Mental Stress of Prepping

7. Sustainability

When keeping chickens, you are taking a step towards sustainable living. You’re reducing your reliance on everyday food production and leaning toward a self-sufficient lifestyle. It’s a small way to be self-sufficient and reap a positive reward. 17 Ways to Become More Self-Sufficient

8. Low Maintenance

Contrary to popular belief, chickens are relatively low-maintenance pets that happen to lay eggs. Your backyard flock requires minimal space, basic shelter, and regular access to food and water. You can quickly meet their needs with little effort, even with a busy schedule.

If you worry about natural predators attacking your chickens while also providing some shelter from adverse weather conditions, keeping them in a chicken coop is an option. Allowing them to be backyard chickens is optimal, mainly if you’ve seen them raised in factory farms with the related cramped conditions. Providing them with a nesting box is a nice touch that shouldn’t cost you much.

9. Natural Weed Control

Chickens are skilled weed eaters. They love to peck at grass and weeds, reducing the need for manual weeding. Let them loose in your garden, and watch as they control much of the unwanted vegetation, leaving you with a beautifully maintained space.

10. Companionship

While chickens may not snuggle up on your lap like a dog or cat, they still offer companionship in their unique way. Chickens are social animals that can form bonds with their owners. They enjoy human interaction and thrive in a good environment.

11. Reduce Food Waste

Chickens are fantastic at reducing food waste. They happily consume kitchen scraps, vegetable peelings, and leftovers as their chicken feed, turning them into nutritious eggs and manure. It’s an excellent way to use food that would otherwise go to waste. How To Store Your Food Storage

12. Pest Deterrent

Did you know that chickens can also deter larger pests? Their presence alone can remove rats, mice, and snakes from your property. With chickens around, many unwanted visitors will think twice before making themselves home on your property.

13. Eggshell Art

When you have chickens, you also have access to beautifully colored eggshells. These shells can be used for various art projects, such as dyeing and painting. Sometimes, it’s fun to cook with eggs with different colored shells.

14. Encourages Physical Activity

Caring for chickens involves some physical activity, whether feeding them, cleaning their coop, or letting them out to roam. This can be an excellent way to incorporate exercise into your daily routine and stay somewhat active. Fitness for Survival

15. Connect with Nature

Owning your chickens and raising them allows you to reconnect with nature. Watching them interact with the environment is relaxing and a great way to escape the daily grind.

16. Source of Income

If you have the space and resources, owning chickens can be profitable, depending on your egg production. Selling surplus eggs, chicks, or even fully grown chickens can provide you with income. Cash vs. Credit Card: Which is Better in an Emergency? Make sure your location’s zoning laws allow raising and breeding the chickens.

17. Community Building

Owning chickens can be a great way to connect with your community. You can join local poultry groups, participate in chicken-related events, and even share your knowledge and experiences with others, even some local farmers. How to Make a Community in Your Neighborhood

18. Teach Responsibility to Children

Having chickens teaches children responsibility from a young age. They learn the importance of feeding, watering, and caring for another living being. This is one of my favorite reasons to consider getting chickens. 9 Necessary Survival Skills For Kids: It’s Never Too Young to Learn

19. Great for the Economy and Environment

Keeping chickens aligns with sustainable practices by promoting a healthy economy. Their waste can be composted and used as fertilizer for your garden, closing the loop and reducing waste. 15 Valuable Skills I Learned In Home Economics

20. Connection with a Food Source

In a time of mass-produced food, owning chickens allows you to reconnect with your food source. You have control over their diet, ensuring that they are well-nourished and healthy.

It’s also a great way to eat healthily. Flocks of chickens, made up of hens and some roosters, can provide the protein you need, along with vitamin E and omega-3 fatty acids, which are nutrients we all need. Chicken meat tends to be low in cholesterol, which is great for good heart health. Their meat tastes great in so many meal entrees, making deciding to raise your chickens an easy decision.

Chicken Toys

More Tips

Final Word

Are you intrigued by the reasons you should consider getting chickens? Owning chickens can benefit your life, whether you live in a rural or urban setting. If you have the time, space, and physical ability to have chickens, go for it. If you’ve had some experience raising chickens, I’d love to have you comment about why it was such a positive experience for you and your family. May God bless this World, Linda

Copyright Images: Chickens Outside Depositphotos_52996331_S by Yulia-zl18, Chickens Outside 1 Depositphotos_52996023_S by Yulia-zl18

The post 20 Reasons Why You Should Consider Getting Chickens appeared first on Food Storage Moms.


from Food Storage Moms

Saturday, March 29, 2025

What To Stock Up On In April

The 18 Best Barn Cat Breeds for Your Homestead

Dogs get all the credit as man’s best friend and working companion, but you shouldn’t underestimate the contribution that cats have made to keeping human holdings safe. When it comes to pest control, particularly the elimination of rodents which can spread disease and cause damage, cats are peerless and constantly vigilant predators. Cats have accompanied ... Read more

The 18 Best Barn Cat Breeds for Your Homestead can be read in full at New Life On A Homestead- Be sure to check it out!


from New Life On A Homestead

Friday, March 28, 2025

15 Easy Ways To Boost Garden Harvests

Estimated reading time: 5 minutes

15 Easy Ways To Boost Garden Harvests

There's nothing quite like the satisfaction of growing your own food. Not only does home-grown produce taste great, but you are in control of what fertilizers and pesticides come into contact with your garden.

Whether you are a new or a seasoned garden, you may be looking for ways to increase your yield this year. If you have space for cultivating more beds, that's one way. However, even if you have limited space, here are 15 strategies to boost your harvest.

Want to save this post for later? Click Here to Pin It On Pinterest!

1. Select High-Yield Plants

Some plants, and some varieties within a category, just naturally produce more than other plants. For example, in the space required by one cauliflower plant, you could grow nearly a dozen pole or bush bean plants. 

By choosing from the following high-yield plants, you can get a bigger harvest with the same amount of work.

  • Beans
  • Peas
  • Potatoes
  • Squash
  • Tomatoes (especially cherry tomatoes)
  • Zucchini

Once they are established well, apples, raspberries, and other berries produce heavy crops.

2. Extend Your Growing Season

You can start early and end late by starting seedlings indoors in late winter or early spring and bringing them undercover in the fall.

Use grow lights indoors to start plants and season-stretching devices such as cold frames, cloches, row covers, and tunnels to protect fall crops from early frost.

3. Try Staggered Spacing

You don't need to plant in straight, parallel rows. You can stagger them throughout the beds for more efficient use of your garden space. A technique known as block planting allows you to take advantage of spaces, such as the corners, that are often wasted in row planting. This method works well in small spaces and when you are using raised beds or blocks of concrete, wood, or bricks to create a border.

Also, make sure you are not wasting space by planting your veggies too far apart. Check the instructions on your seed packets or plant tags carefully. Use a ruler to ensure you are giving plants enough room to grow, but not too much. Another way to maximize planting space is to minimize the walkway space around your beds.

4. Practice Interplanting

Another way to get more out of your garden is with interplanting. With this strategy, you plant two crops in the same area by mixing slow- and fast-growing vegetables. You can harvest the quick-growing vegetables – like radishes or lettuce, for example – before the slower-growing ones (like parsnips or corn) need the extra space.

5. Sow A Succession Crop

With succession planting, you use the same garden space for more than one plant. After you harvest the early cold-weather crop (like some lettuces), you plant a heat-loving summer plant (like tomatoes). Then, you can grow plants that will be ready to harvest in early fall (like bush beans or kale). Be sure to nourish the soil with compost between your crops.

6. Grow Up

Gardening does not have to just go in a horizontal direction. You can maximize your space and increase your yield with vertical gardening. Any plant with a vining nature can be trained to grow upward with the help of a stake, cage, trellis, or a fence.

Strawberries, cucumbers, vining tomatoes, climbing peas and beans, and sprawling squashes are a few examples. Despite what you think, even heavy fruits, such as melons, can produce well when they grow vertically. When they are trained to grow up, they develop thicker stems to handle the weight.

Another advantage of vertical gardening is that these plants are less susceptible to fungal disease.

7. Use More Than The Ground

Another way to boost your harvest is to grow plants in new places. Many varieties of fruits and vegetables do well in containers on your deck or balcony. You can grow herbs in your windowsills and strawberries in hanging baskets.

8. Make Room For Flowers

Flowers in a vegetable bed? Yes, indeed. Not only do they look pretty, but they attract pollinating bees. And don't forget that many flowers — including nasturtiums, calendula, and bee balm — are edible.

9. Use Rainwater To Irrigate Your Garden

Rainwater is softer and has more nutrients and fewer chemicals than city water. Collect rainwater from your roof and use it to water your fruits and vegetables.

No matter what type of water you use, it's essential to irrigate consistently. If your tomatoes tend to form cracks, it may be due to inconsistent watering. Consider soaker hoses on timers to water plants at ground level on a regular basis.

10. Stay On Top Of Weeds

How does better weeding increase your yield? It's simple – weeds compete with your fruits and vegetable plants for water and soil nutrients. Be consistent in pulling weeds that invade your beds.

11. Nourish Your Plants

Fertilizer goes a long way in helping your plants produce a higher yield. It also helps them grow strong enough to fend off disease and pests.

12. Monitor And Manage Pests

Speaking of pests and disease, keep a close eye on your pets to nip any potential problems in the bud. Some pests do mostly cosmetic damage, and others can devastate your entire crop. Consult with your local University Extension Office for tips on pest and disease management in your area.

13. Harvest When The Fruit Is Young

When you pick young fruit, it encourages the plant to produce more fruit. Yes, the fruit may continue to grow, but it usually tastes better when it's young. And you'll get a higher overall yield.

Like this post? Don't Forget to Pin It On Pinterest!

You May Also Like:

The post 15 Easy Ways To Boost Garden Harvests appeared first on Homestead Survival Site.


from Homestead Survival Site https://ift.tt/jIl0ozt

What To Plant In April

How Can A City Prepper Improve Their Survival Plan?

You’ve got your bug-out bag packed, a stash of canned goods under the bed, and maybe even a water filter tucked away in your closet. But if you’re a city prepper, you know urban survival isn’t just about having supplies—it’s about adapting to a landscape where space is tight, resources are contested, and danger can ... Read more...

from Prepper's Will

7 “Safe” US States That Might Soon Be a Target

States like Montana, North Dakota, Missouri, Arizona, and Idaho are generally considered to be very safe places to live. On paper, they have a modest population density, they don’t tend to be hit by too many major disasters. Since the end of the Cold War, their threat index from attacks by foreign powers seems to […]

The post 7 “Safe” US States That Might Soon Be a Target appeared first on Ask a Prepper.


from Ask a Prepper https://ift.tt/5gPTNu9

Thursday, March 27, 2025

Easter Rice Krispie Treats

Easter Rice Krispie Treats

You will love making these Easter Rice Krispie Treats! I love holidays and making items my kids or grandkids will love to enjoy. It’s all about memories in the kitchen, right?

I think we all grew up making Rice Krispie treats, this recipe takes it up a notch. We had some grandkids coming over last Sunday and we made them before they came as a special surprise for when they arrived. These treats make the cutest table centerpiece at this special time of year when families get together. Oh, and they taste great too!

These Easter Rice Krispie Treats are a little crunchy inside and out. We fill them with Easter candy after the mixture sets up. My choice was M&M Peanuts! The candies looked a little like eggs, so I grabbed them at the grocery store.

With what’s going on in the world, we need to do some fun things with family and friends. Please take the time to enjoy the people around you. This would be a fun and delicious project to make together, especially for the kids!

Easter Rice Krispie Treats

Kitchen Items You May Need:

Ingredients – Easter Rice Krispie Treats

  • Mini Marshmallows: Small, bite-sized versions of regular-sized marshmallows. They’re made with sugar, water, corn syrup, modified corn starch, gelatin, and flavoring such as vanilla extract. Along with the butter, they act as a binding agent to hold the treat together.
  • Salted or Unsalted Butter: Used to help hold the treat together and to give the treat a rich, creamy flavor and a nice, glossy finish. It also helps the marshmallows to melt faster and mix more evenly with the rice.
  • Rice Krispie Cereal: Made of puffed rice and sugar, it provides a crispy texture and sweetness that is complementary to the marshmallow and butter. The puffed rice pieces stick together when melted marshmallows are added, allowing the treats to hold their shape.
  • Green Food Coloring: A type of food dye that is used to give food a green color. Combined with the rice cereal it gives the look of green grass.
  • Easter Candies: Store-bought candies – Cadbury Mini Easter Eggs, easter M&M’s, Jelly Beans, Reese’s Peanut Butter Eggs, or Reese’s Easter Bunnies, pastel sprinkles, Peeps, chocolate eggs, or any other Easter candies of your choosing. The ideal touch would be to use candies made with pastel colors.
  • Shredded Coconut (optional): Adds a unique flavor, texture, and look to the Rice Krispie treat baskets. High in healthy fats and fiber, which makes it a nutritious addition.

Easter Rice Krispie Treats

Step One: Gather the Ingredients

Gather your ingredients so you’re ready to start the recipe. You only need 4 ingredients and the green food coloring. Of course, you can make your own food coloring from scratch, but I have never done that. Plus, you need to decide on the candy you want to fill the little baskets.

Ingredients

Step Two: Place 6 Cups of Marshmallows in a Glass Mixing Bowl

Grab a large glass mixing bowl and place 6 cups of mini marshmallows in it. The recipe calls for 7 cups, but you will set one cup aside at this point.

6 cups marshmallows

Step Three: Pour Melted Butter over the Marshmallows – Microwave for 1 Minute

Pour the melted butter over the marshmallows and microwave for about one minute. Watch it closely. You can also melt the marshmallows and butter in a large saucepan or large pan on low heat.

Melt the marshmallows

Step Four: Combine Cereal with Melted Marshmallows and Butter

Remove the melted marshmallows and butter from the microwave and add them along with the Rice Krispie cereal and mix them until the rice is completely covered.

Add the Rice Krispies

Step Five: Stir in One Cup of Marshmallows

Then add the last cup of mini marshmallows you had set aside to the bowl and stir them in.

Easter Rice Krispie Treats

Step Six: Add a Few Drops of Green Food Coloring

Add a few drops of the green coloring. Keyword, a few, as in very little, unless you want the mixture to be very green. Either way, the little baskets are so cute! Stir in the green food coloring until you create the color you want.

Easter Rice Krispie Treats

Step Seven: Spray Muffin Tins – Scoop 1/4 Cup Mixture into Muffin Cups – Create a Cavity

Now, lightly spray the muffin tins with cooking spray to ease in getting them out of the muffin tins when it’s time to add the candy. Scoop about 1/4 cup of the marshmallow mixture into each muffin cup. Make sure to make as deep a cavity in the mixture as possible so you can fill the baskets (or nests) with Easter candy. With the small size of each muffin cup, the cavity won’t be very big, but do the best you can.

Easter Rice Krispie Treats

Step Eight: Set for 1 Hour – Remove from Muffin Tin – Fill with Easter Candy

Let them set up for about one hour in the muffin tins. This gives them time to harden up a bit. Use a thin spatula to remove them. Fill with your favorite Easter candy. Optional, place some shredded coconut in the baskets before you place the “eggs” of Easter candy in them. Enjoy.

Final Product

Easter Rice Krispie Treats

Easter Rice Krispie Treats Recipe

Easter Rice Krispie Treats
Print

Easter Rice Krispie Treats

Course Dessert
Cuisine American
Prep Time 20 minutes
Set Up Time 1 hour
Total Time 1 hour 20 minutes
Servings 12 people
Author Linda Loosli

Ingredients

  • 7 cups mini marshmallows (set one cup aside)
  • 4 tablespoons butter, melted
  • 6 cups Rice Krispie cereal
  • green food coloring
  • Easter candies to place in the baskets
  • shredded coconut for baskets, optional

Instructions

  • Gather all of your ingredients.
  • Grab a large glass mixing bowl and place 6 cups of mini marshmallows in it. The recipe calls for 7 cups, but you will set one cup aside.
  • Pour the melted butter over the marshmallows and microwave for about one minute. Watch it closely.
  • Remove from the microwave and add the Rice Krispie cereal and combine until completely covered.
  • Then add the last one cup of mini marshmallows to the bowl and stir in.
  • Add a few drops of the green food coloring. Keyword, a few as in very little unless you want them very green. Either way, the little baskets are so cute! Stir in the green food coloring until you create the color you want.
  • Now, lightly spray the muffin tins with cooking spray to ease in getting them out of the muffin tins. Scoop about 1/4 cup of the mixture into each muffin cup. Make sure to make as deep a cavity in the mixture as possible so you can fill the baskets with Easter candy.
  • Let them set up for about one hour in the muffin tins. This gives them time to harden up a bit. Use a thin spatula to remove them. Fill with your favorite Easter candy. Optional, place shredded coconut in the baskets before you place the "eggs" of Easter candy in them. Enjoy.

How do I store the leftovers?

We rarely have any leftovers, but if you do, just place them on your kitchen countertop covered with plastic wrap, wax paper, or in an airtight container. They store well at room temperature which helps to keep the treats soft and moist.

Do I need to refrigerate these Easter treats?

No need to refrigerate them, just put them on the kitchen counter, lightly covered with plastic wrap.

Why are my Rice Krispie Treats so sticky?

If you use too many marshmallows and butter, the mixture will be sticky. Plus, if you don’t use enough, it makes the mixture hard and crumbly.

Why won’t my marshmallows melt?

They taste so good when they are fresh, but when they get old and stale, they are much harder to melt, if you can even melt them at all.

How do I keep the mixture from sticking to my hands?

Well, it’s a bit messy but this step works. You can spray vegetable spray on your hands, or even rub some butter on them. Apply more as needed.

How long does it take for these to harden or set up?

Plan on about an hour for the mixture to harden or set up. It’s worth the wait, I promise. These cute little baskets were ready to fill after about one hour.

Can I use a different brand of the same type of cereal?

Yes, you can, I just wanted the picture of the original type for the picture above. Otherwise, I would have purchased the store brand to possibly save some money.

Are these Rice Krispie treats gluten-free?

As with any food allergy, I would highly recommend reviewing the ingredients on any product that you use in this recipe or on any other packaging if you decide to add additional ingredients. With the recipe made as is, the most common ingredient that would contain gluten is in the rice cereal. 

There are many crispy rice kinds of cereal that are sold that don’t contain gluten and are advertised as such on their packaging.

Final Word

Let me know if you make these Easter Rice Krispie Treats, I love to hear how it worked out when you made them. Also, if you make them in different shapes, I’d like to hear about that too. These are the funnest Easter desserts to make! Please teach your kids and grandkids to cook from scratch. May God Bless this world, Linda

The post Easter Rice Krispie Treats appeared first on Food Storage Moms.


from Food Storage Moms