Have you wondered how to make a sourdough starter? It’s funny, but I keep hearing people can’t find yeast. So, my friend Jess called me and said: “I think you need to show people how to make a sourdough starter.”
So here I am, making it with white bread flour. You can make it with all-purpose white flour, but I only stock white bread flour. I’m just giving you a heads-up.
People need to understand that the starter we have you make in this blog post is a substitute for commercial yeast in the bread recipe included. Yes, you can make a yeast substitute that works and tastes excellent when making this delicious sourdough bread.
How To Make Sourdough Starter
Day One
Step One: Combine Water with Flour
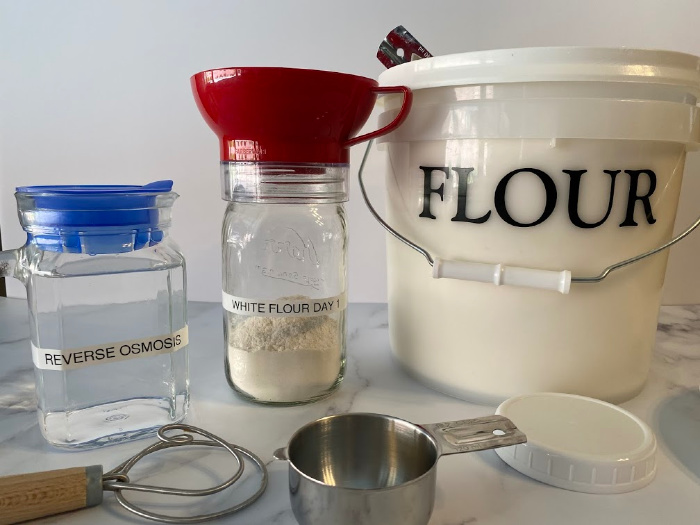
Start with 1 cup of all-purpose white or bread flour and 1/2 cup of cool water (filtered or reverse osmosis). The tap water has too much chlorine to work, or at least at my house, that’s the case.
Please start with a crock or quart glass wide-mouth mason jar. Add the flour to the jar with a Canning funnel, then add the water. I use an 11-inch Danish Whisk to stir my starters. The 13-inch size doesn’t fit inside my wide-mouth quart mason jars.
Stir the two ingredients until smooth; you can’t see any dry flour. Cover the jar with a cloth or a wide-mouth Aozita Wide Mouth White Lid, and barely turn the lid on the jar. It must have air to breathe and grow. Set it on your countertop.
Step Two: Slightly Tighten The Lid
Here’s what it looks like. Please remember that the starter is alive and needs air to breathe. Don’t tighten the lids; only turn slightly to close.
Step Three: Place the Jar on Your Countertop w/Lid Slightly Tight
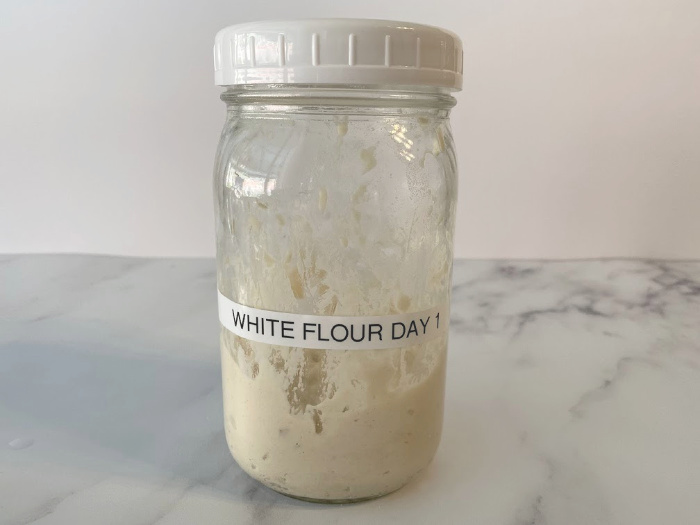
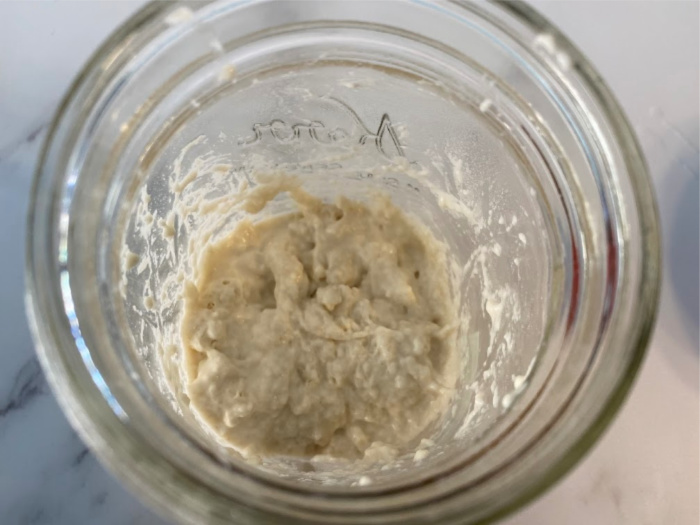
You can see it looks lumpy and quite a bit like oatmeal. It’s not runny or dry. It will be a little stretchy and smell like bread dough. Place the jar on the counter in a warm (70 degrees or above) area for 24 hours with the lid slightly screwed on.
Day Two: Discard and Feed
The jar looked the same on the second day, so I skipped taking pictures. If you look at your jar, you may or may not see any activity for the first 24 hours. That’s okay.
Discard (1/2 cup) the starter in the jar and add one scant cup of flour and 1/2 cup of filtered water.
Mix well, put the lid back on, and turn only slightly. Remember, the starter needs to breathe. Now, we wait another 24 hours. This is so fun! I love watching for the bubbles; the bubbles mean it’s alive and well.
Day Three: The Bubbles Show The Starter is Working
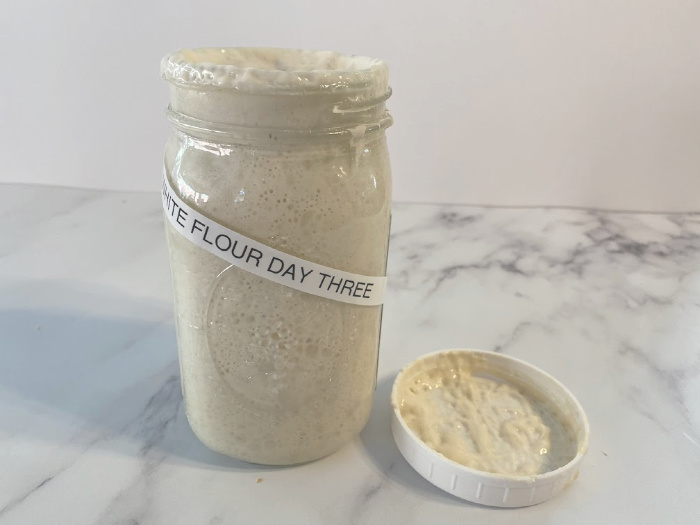
You can see that the sourdough yeast has doubled in volume, if not tripled.
This is a great sign; it’s alive and growing. If you are wondering how I remember the 24 hours, I set the timer on my phone for 2:00 p.m. every day.
Today, day three, you feed the starter every 12 hours, yes, twice during the 24 hours. Now, I have to set my timer twice a day. Remember, we keep the jars at room temperature right now.
Here again (two times today), discard 1/2 cup of the starter, add 1 cup of flour, and add 1/2 cup of filtered water to the jar. Stir until you can’t see any dry flour.
Place the lid on the jar and turn slightly, not tight. They need to breathe.
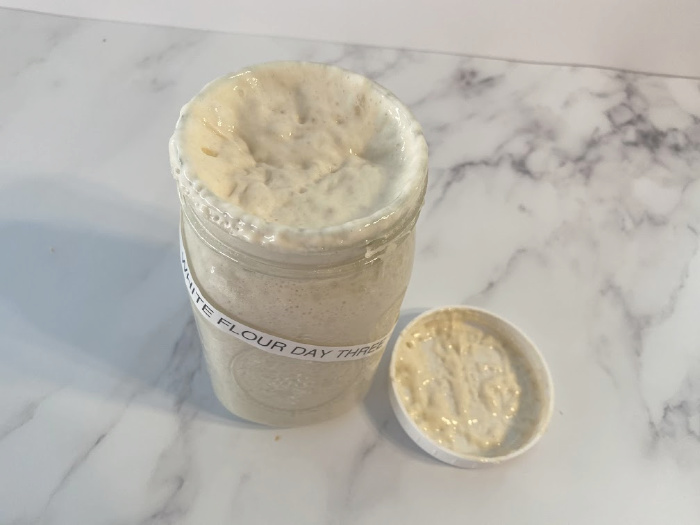
Day Three View From Inside Jar
It’s working; you can see the bubbles, which means it’s alive and well.
Float Test: Do the Float Test
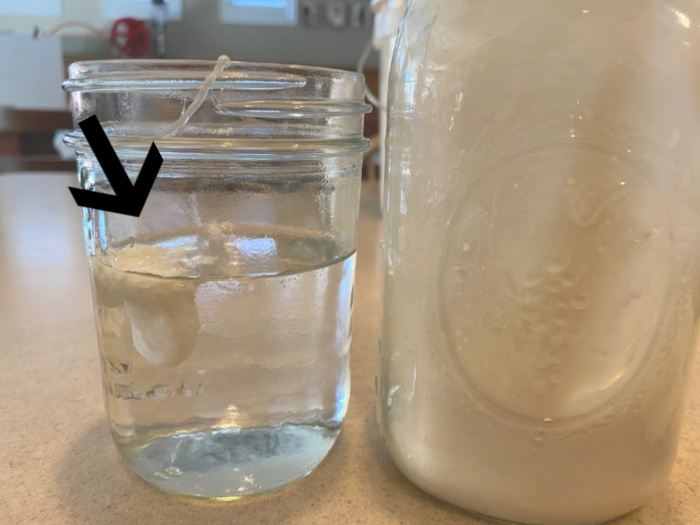
Okay, now, if you’re wondering whether your starter is ready to make bread, pancakes, or whatever, here’s what you do: Grab a glass of filtered water and drop a teaspoon of your starter into it.
If it floats, it’s good and ready to use. No worries, if it sinks, your starter must be fed again and let sit for another 6-12 hours at room temperature.
The black arrow shows my one teaspoon of starter is floating; yay! It’s good to go!
UPDATE: I NO longer do the float test; I have never done it again after taking the picture above.
How often do I need to feed my starter that’s in the fridge?
Some wonder if we must feed the starter daily if it’s stored in the refrigerator. No, it doesn’t. It is suggested that feeding once a week is sufficient. Set a timer on your phone or calendar app to remind you to feed it weekly.
Do I store the starter on the countertop?
The problem with storing the starter on the countertop is that you must continue the “feeding” process daily. Unless you’re ready to use the starter and make some bread, you should consider storing it in your fridge, as outlined in the next topic.
Do I store my starter in the fridge?
As mentioned above, you are better off storing the starter in your fridge if you don’t plan to bake the bread when it is ready for use. You should plan to feed it weekly but don’t worry if you miss a week occasionally.
When you need to feed the stored starter, pull it from the fridge, throw out all but 25% of the starter, and then add one scant cup of flour and 1/2 cup of filtered water and stir as before. UPDATE: I no longer throw out any starter. I take out 3/4 cup needed for my recipe and place it in the mixer. I feed the starter left in the jar with one scant cup of flour and 1/2 cup of water.
Place the lid on loosely. Set this mixture aside for one to three hours before putting it back in the fridge.
This feeding step can be repeated for an extended period as long as you consistently feed the starter.
When you want to use the starter to make bread, pull it from the fridge and add the flour and water as with all your other feedings, but don’t throw any of the starter away.
You’ll want to wait for the starter to get bubbly again. Once it does, it’s ready to use.
The bubbles may take a few hours to appear, so be patient. You might pull it out in the morning or early afternoon, plan to make the dough later that day, and then bake right before bedtime or early the next morning.
What do I do if it goes dark on the top of the starter?
A starter stored in the fridge for an extended period may have a layer of liquid on top in your container. Pour off the liquid and prepare/feed the starter as mentioned above.
You should be able to use it if it is also slightly black. Be sure to scrape the black part off, feed the starter, and use it or place it back in the fridge.
If the starter has dark black, brown, white, or red spots, there is a chance you’ve developed mold in the starter. That seldom happens if stored correctly in the fridge.
If there is any question about whether mold is present, you’ll want to throw all the starters out and start over. This is seldom a problem but can happen from time to time.
What container is the best to store the starter in?
A crock or glass quart mason jar. I use the Aozita Wide Mouth White Lids and barely turn the lid; it’s not too tight or loose.
Let’s Make Sourdough Bread Now
Step One
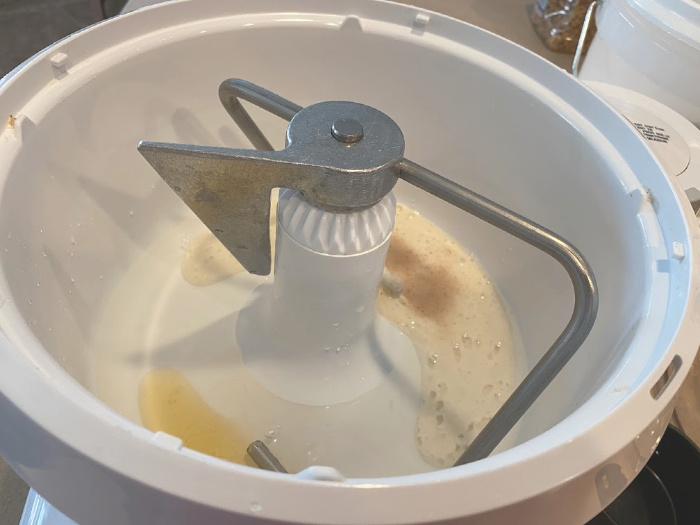
Stir the starter with the water, and add the honey and the flour, one cup at a time. Mix or knead until the bread pulls away from the sides of the mixing bowl.
Step Two
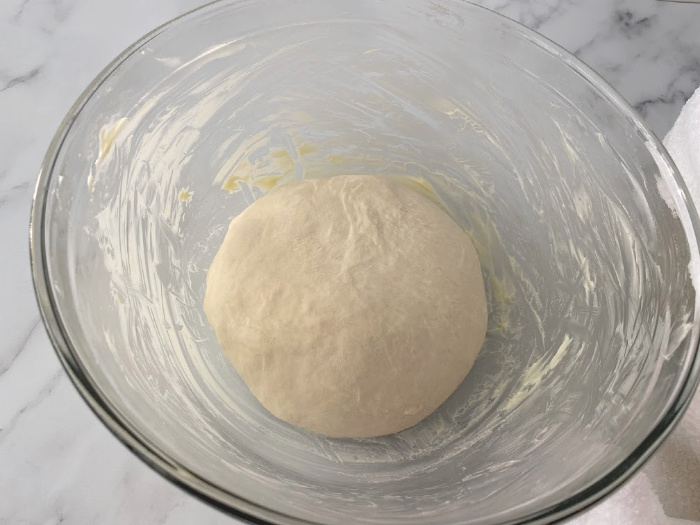
Grease a large mixing bowl (I used butter) and place the ball of dough in it.
Step Three
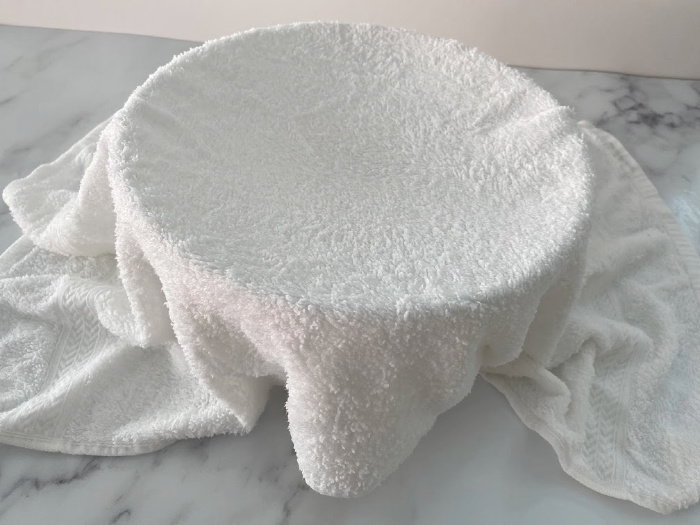
Cover with a wet towel. Let it rise (ferment) for 6-12 hours.
Step Four
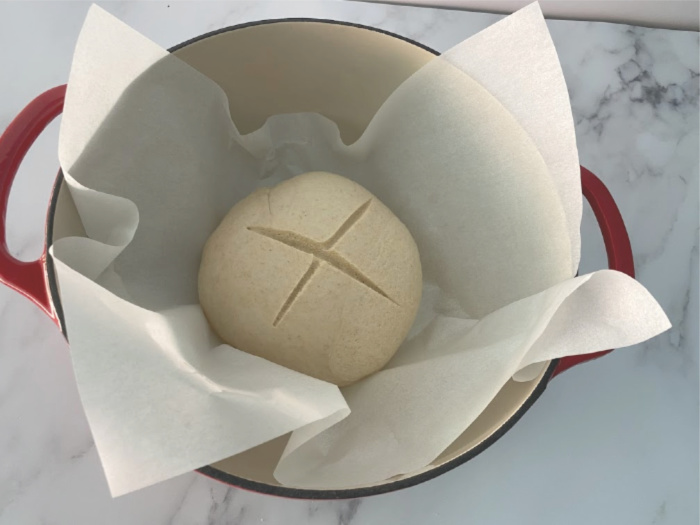
If you want a Dutch oven, you will use a 6-quart one. Place a sheet of parchment paper (greased in the middle) at the bottom of the Dutch oven. This is the Lodge Dutch Oven I used.
Take the dough out of the bowl where it’s been rising and carefully place it on a floured countertop.
You gently remove a few air bubbles and place the rounded dough in the Dutch oven on greased parchment paper. You grease the parchment paper where you will put the dough so the paper doesn’t stick to the dough during baking.
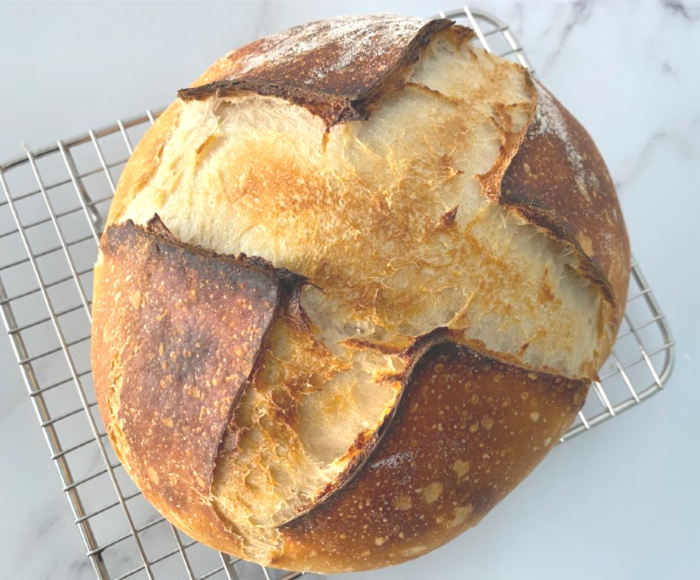
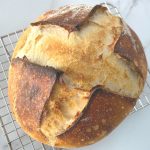
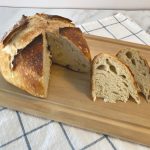
Place the lid on and let the dough rest for 20-30 minutes. Preheat your oven to (450°F) = (232°C) degrees. Use a sharp knife and make a few slices on top of the dough. Bake the bread in the Dutch oven with the lid ON.
Bake for 30 minutes. Remove the lid and bake it for another 20 minutes or until the top is golden brown.
Step Five
Finished product.
How To Make Your Sourdough Starter
How To Make Your Sourdough Starter
Ingredients
- 1 Cup all-purpose white or bread flour
- 1/2 Cup cool water (filtered or reverse osmosis
Instructions
-
Start with 1 cup of all-purpose white or bread flour and 1/2 cup of cool water (filtered or reverse osmosis). The tap water has too much chlorine to work, or at least at my house, that’s the case.
-
Please start with a crock or quart glass wide-mouth mason jar. Add the flour to the jar with a Canning funnel, then add the water. I use an 11-inch Danish Whisk to stir my starters. The 13-inch size doesn’t fit inside my wide-mouth quart mason jars.
-
Stir the two ingredients until smooth; you can’t see any dry flour. Cover the jar with a cloth or a wide-mouth Plastic Wide Mouth White Lid, and barely turn the lid on the jar. It must have air to breathe and grow. Set it on your countertop.
-
Day 1: Please remember that the starter is alive and needs to "breathe." Don’t tighten the lids; only turn slightly to close.
-
Day 1: It looks lumpy and quite a bit like oatmeal. It’s not runny or dry. It will be a little stretchy and smell like bread dough. Place the jar on the counter in a warm (70 degrees or above) area for 24 hours with the lid slightly screwed on.
-
Day 2: If you look at your jar, you may or may not see any activity for the first 24 hours. That’s okay. Discard (1/2 cup) the starter in the jar and add one scant cup of flour and 1/2 cup of filtered water.
-
Day 2: Not much change from day one. Please be patient. Mix well, put the lid back on, and turn only slightly. Remember, the starter needs to breathe.
-
Day 2: Now, we wait another 24 hours. This is so fun! I love watching for the bubbles; the bubbles mean it’s alive and well.
-
Day 3: The bubbles show the starter is working. You can see that the sourdough yeast has doubled in volume, if not tripled.
-
Day 3: This is a great sign; it’s alive and growing. If you are wondering how I remember the 24 hours, I set the timer on my phone for 2:00 p.m. every day.
-
Day 3: Today, you feed the starter every 12 hours, yes, twice during the 24 hours. Now, I have to set my timer twice a day. Remember, we keep the jars at room temperature right now.
-
Day 3: Here again (two times today), discard 1/2 cup of the starter, add 1 cup of flour, and add 1/2 cup of filtered water to the jar. Stir until you can’t see any dry flour. Please place the lid on the jar and turn it slightly, not tight. They need to breathe.
-
Day 3: It’s working; you can see the bubbles, which means it’s alive and well.
-
Day 3: It's ready to make your recipes. When you need to feed the stored starter, pull it from the fridge, throw out all but 25% of the starter, and then add one scant cup of flour and 1/2 cup of filtered water and stir as before. UPDATE: I no longer throw out any starter. I take out 3/4 cup needed for my recipe and place it in the mixer. I feed the starter left in the jar with one scant cup of flour and 1/2 cup of water.
-
Place the lid on loosely. Set this mixture aside on your countertop for one to three hours before putting it back in the fridge.
-
You’ll want to wait for the starter to get bubbly again. Once it does, it’s ready to use.
-
Day 4: Some wonder if we must feed the starter daily if it’s stored in the refrigerator. No, it doesn’t. It is suggested that feeding once a week is sufficient. Set a timer on your phone or calendar app to remind you to feed it weekly.
-
Please don't store the starter on the countertop. The problem with storing the starter on the countertop is that you must continue the “feeding” process daily. Unless you’re ready to use the starter and make some bread, you should consider storing it in your fridge, as outlined in the next topic.
-
Do I store my starter in the fridge? As mentioned above, you are better off storing the starter in your fridge if you don’t plan to bake the bread when it is ready for use. You should plan to feed it weekly, but don’t worry if you miss a week occasionally.
Sourdough Bread w/White Flour
Sourdough Bread Using A Cookie Sheet
Ingredients
- 3/4 cup sourdough starter (do the float test first-1 tsp. of starter in a glass of water, if it floats it's ready to use)
- 1-1/4 cup filtered water
- 1 tablespoon honey (optional)
- 3-1/2 cups white bread flour
Instructions
Sourdough Bread Using a Cookie Sheet
-
I used my Bosch, but you can make this by hand if you like in a large mixing bowl. Stir the starter with the water, and add the honey and the flour, one cup at a time.
-
Mix or knead until the bread pulls away from the sides of the mixing bowl.
-
Sprinkle the countertop with flour and mound the dough into a round ball. Grease a large mixing bowl (I used butter) and place the ball of dough in it.
-
Cover with a wet towel. Let it rise (ferment) for 6-12 hours.
-
When the dough is ready, form it into a circle, place the mound on a greased cookie sheet, and let it rise for 2 hours.
-
Cut a slit with a sharp knife on top to give it some character. Bake at (425°F) = (218 °C) for 30-40 minutes.
-
After baking, lather butter on the top if you like a soft crust. If not, please leave it as it is.
Feeding The Starter After Using It
-
***Feed your sourdough starter in a quart mason jar with l scant cup flour and 1/2 cup of filtered water. Stir until thoroughly mixed and place the jar on your countertop for 4-5 hours before placing the jar in the refrigerator.
Sourdough Bread
Ingredients
- 3/4 cup sourdough starter
- 1-1/4 cup filtered water (it works great if you warm it up)
- 1 tablespoon honey
- 1 teaspoon salt
- 3-1/2 cups white bread flour
Instructions
-
You will need a 6-quart Enameled Cast Iron Covered Dutch Oven. Take your starter out of the fridge. Stir, and let the jar sit on the countertop until it reaches room temperature. (Normally 1-2 hours).
-
Pour approximately 3/4 cup of starter into your mixing bowl. Add warm water, flour, honey, and salt. Mix well by hand or with a mixer. The dough may be sticky.
-
Butter your bowl and your hands and mound the dough into a ball. Cover with plastic wrap or a wet towel. Let it rise for 6-12 hours.
-
Place the dough (you may have to remove the ball of dough) into your 6-quart enameled cast iron Dutch Oven while your oven preheats to (450°F) = (232°C) Degrees. Let the dough rest for 30 minutes uncovered.
-
Use your scissors or sharp knife to make an X or other design on the ball of dough.
-
Lather with butter, oil, or beaten egg whites.
-
Put the lid on your baking pan and place it in the center of your preheated oven. Bake for 30 minutes.
-
After 30 minutes, remove the lid and continue baking for another 15 minutes. Remove bread from the pan and cool on a rack.
Feed Your Starter
-
***Feed your sourdough starter in a quart mason jar with a scant cup of flour and 1/2 cup of filtered water. Stir until thoroughly mixed and place the jar on your countertop for 4-5 hours before putting the jar in the refrigerator.

Sourdough Pizza
Ingredients
- 6 tablespoons sourdough starter
- 1/2 cup plus 2 tablespoons filtered water
- 1/2 tablespoon honey
- 1/2 teaspoon salt
- 1-3/4 cups white flour
- 1 14-ounce jar Pizza Sauce or homemade pizza sauce
- 2 cups Mozzarella Cheese (more or less, it depends on how much cheese you like)
Instructions
-
Take your starter out of the fridge. Stir, and let the jar sit on the countertop until it reaches room temperature. (Normally 1-2 hours).
-
Pour approximately six tablespoons of starter into your mixing bowl. Add warm water, flour, honey, and salt. Mix well by hand or with a mixer. The dough may be sticky.
-
Butter your bowl and your hands and mound the dough into a ball. Cover with plastic wrap or a wet towel. Let it rise for 6-12 hours.
-
Grease the countertop and roll out the dough in the shape of your pizza pan. Preheat your oven to (450°F) = (232°C) degrees. Let the dough rest for 30 minutes uncovered.
-
Bake the dough on your pizza pan for 10 minutes. After 10 minutes, remove the pizza pan from the oven, spread the pizza sauce on the partially cooked pizza dough, and continue baking for another 10 minutes.
-
NOW, add the cheese, return the pizza to the oven, and bake until the cheese melts. Add pepperoni, pepper, onions, etc., when you add the cheese. Enjoy!
Feed Your Starter
-
***Feed your sourdough starter in a quart mason jar with l scant cup flour and 1/2 cup of filtered water. Stir until thoroughly mixed and place the jar on your countertop for 4-5 hours before placing the jar in the refrigerator.
How do I store the sourdough bread after it’s baked?
I use bread bags and set the bread on the countertop.
How long will the bread keep on the counter?
Because there are no preservatives in the bread, it’s best for 2-3 days only.
Can I freeze the loaves after baking?
After baking, you can freeze this bread in a tightly wrapped bread bag or container. It will keep up to three months in your freezer.
Can I use Gluten-Free Flour?
Just a note about cup-for-cup King Arthur Gluten-Free flour: it isn’t recommended for making bread. It’s perfect for cakes, cookies, and brownies.
You can make sourdough flatbread, but not the typical loaves of bread you may want. Sorry, It’s not going to work. As you and I know, it’s not designed for bread, or at least bread. Here is their sourdough flatbread recipe: King Arthur Sourdough Flatbread.
Final Word
A few years ago, I had the pleasure of helping Melissa Richardson (The Bread Geek), author of “The Art Of Baking With Natural Yeast,” teach a few classes in St. George, Utah.
She put herself through college making freshly ground whole wheat bread made with natural yeast (no commercial yeast). She has been a great friend for many years.
I learned how to make natural yeast from her. I learned how to make sourdough bread using a sourdough starter from Chef Brad. Life has been good to me, and I know God wants me to teach the world how to make sourdough and natural yeast bread. We can do it, I promise. May God bless this world, Linda
The post How To Make A Sourdough Starter + Bread appeared first on Food Storage Moms.
from Food Storage Moms
No comments:
Post a Comment