Estimated reading time: 4 minutes
The drawing salve is one of the oldest natural remedies for skin troubles. Traditionally used to “draw out” splinters, toxins, infections, and even stingers from bug bites, a good drawing salve is a must-have for every home apothecary.
Drawing salves are usually thick, dark ointments made with clay, beeswax, healing oils, and activated charcoal. These ingredients work together to detoxify and soothe irritated skin. Many people rely on drawing salves for boils, abscesses, splinters, insect bites, minor infections, and more.
There are many ways to make a drawing salve, and it's likely that the original method for making a drawing salve has been lost. However, Teresa from Old Ways Gardening And Prepping has been refining her formula for years, and in this video, she explains how to make the perfect drawing salve.
She doesn't edit her videos, so it's pretty long, but I typed up the instructions for people who don't want to start and stop the video over and over.
Want to save this post for later? Click Here to Pin It On Pinterest!
Single Batch Drawing Salve Recipe

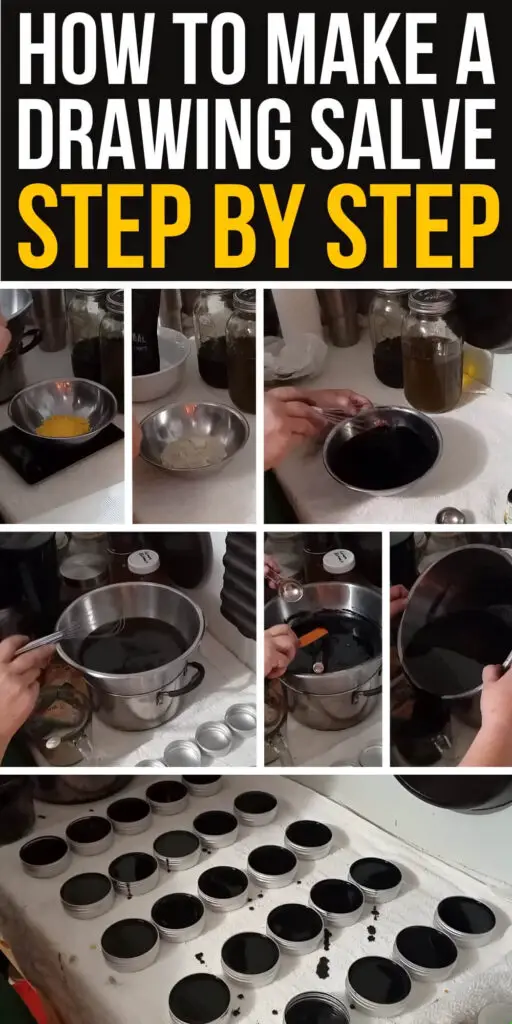
Ingredients:
- ½ cup plantain-infused oil
- ½ cup comfrey-infused oil
- 1¼ oz natural beeswax (adjust slightly if needed for firmness)
- 2 tablespoons activated hardwood charcoal (not from BBQ coals!)
- 2 tablespoons all-natural bentonite clay
- 20 drops tea tree essential oil
- 20 drops frankincense essential oil
- (Optional) 1 tablespoon raw Manuka honey (for added healing benefits)
Instructions:
- Prepare Your Oils: Use a double boiler or a heat-safe bowl over a pot of simmering water. Gently warm the plantain and comfrey oils together.
- Add Beeswax: Weigh 1¼ oz of beeswax and add it to the warm oils. Stir gently until fully melted. If using block beeswax, grate it first to speed melting.
- Mix the Powders: In a separate bowl, mix together the activated charcoal and bentonite clay. Be careful—charcoal powder is messy and easily airborne!
- Incorporate Essential Oils: Add the tea tree and frankincense essential oils to the clay and charcoal mixture. This helps disperse them evenly when added to the oils.
- Combine Everything: Slowly stir the dry mixture into the melted oils and wax. Mix gently and thoroughly to avoid lumps and minimize dust.
- Optional Honey Boost: Once everything is fully mixed, stir in 1 tablespoon of raw Manuka honey (optional but highly beneficial).
- Pour Into Tins: Carefully pour the salve into clean, dry tins. Let them cool completely before sealing with lids. Don’t rush this—adding lids too soon can cause condensation.
- Label Your Tins: Use a sticker or marker to label each tin. Include the date and ingredients if you plan to store or gift them.
Tips:
- Infused Oils Matter: The quality of your plantain and comfrey oils makes a difference. Use organically grown herbs and infuse them yourself if possible.
- Messy but Worth It: Making this salve can be messy—use old towels and work on a surface that’s easy to clean.
- Optional Adjustments: You can omit the honey or use different oils (like olive oil) if needed, though the healing properties will vary.
- Storage: Store in a cool, dark place. The salve should last several months to a year.
- Use: Apply a small amount to the affected area and cover with a bandage if needed. Reapply as necessary.
Watch the video below to see how it's done, and be sure to check out her channel.
Like this post? Don't Forget to Pin It On Pinterest!
You May Also Like:
The post How to Make a Drawing Salve Step by Step appeared first on Homestead Survival Site.
from Homestead Survival Site https://ift.tt/r0th1bP
No comments:
Post a Comment