Submissions     Contact     Advertise     Donate     BlogRoll     Subscribe                         

Thursday, September 17, 2026

Diesel Prices: Why Are They So High?

Diesel Gas With Trucks

Diesel Prices: Why Are They So High? If you’ve filled up a diesel truck or car lately, you already know the pain. Diesel prices have hit a new record in 2026, with the national average climbing above $5.60 a gallon in early September and reaching $6.60 a gallon on September 11, compared to around $ 4 a gallon for regular gasoline. That is a gap of $1.50 or more, well above the normal spread of 20 to 50 cents you’d expect. But here’s the thing many people don’t think about. Diesel doesn’t just affect truck owners. It affects every single person who buys groceries and other products because almost everything you eat, wear, view on a TV, and put in your house traveled on a diesel-powered truck to your store.

Let me break down why diesel costs so much, why it matters more than most folks realize, what it means for the truckers hauling our food and other products, and what you can actually do about it at home.

Diesel Prices: Why Are They So High?

Why Diesel Costs More Than Regular Gas

A lot of people assume diesel should be cheaper than gasoline since it is a heavier, less refined fuel. That used to be true. Diesel actually traded below gasoline through most of the 1990s and into the early 2000s. That changed around 2004 and 2005, and diesel has cost more than gasoline almost every year since. A few things explain why.

First, diesel fuel sold in the United States must meet ultra-low-sulfur standards. Refiners have to strip almost all the sulfur out through an expensive process that requires costly catalysts and hydrogen, which raises the cost of every gallon produced.

Second, diesel is taxed more heavily than gasoline. The federal excise tax on highway diesel is 24.4 cents per gallon, compared to 18.4 cents for gasoline. That’s a built-in 6-cent gap before any state taxes or local fees are added.

Third, diesel demand is broader and steadier than gasoline demand. Gasoline demand mostly follows how much people drive. Diesel demand comes from trucking, farming, construction, shipping, and heating oil, all pulling on the same part of the refining process at the same time, alongside jet fuel.

Seasonal Weather

There’s also a seasonal piece to this. Diesel and heating oil are chemically related, so when cold weather arrives, refiners shift some of their capacity toward heating oil, which tightens the diesel supply. That squeeze happens right around fall harvest season, which is exactly when farmers need diesel the most to run tractors and combines and to move crops to market.

Right now there’s also a geopolitical factor pushing prices even higher. Disruptions tied to conflict near the Strait of Hormuz and attacks on Russian refineries have cut into the global supply of diesel and other distillate fuels, which is part of why diesel jumped to a new record high in September, and why 2026 is on track to potentially set a new annual average cost record.

How Diesel Prices Ripple Through the Whole Economy

This is the part that really matters for families. Nearly everything in your grocery store, your pharmacy, and your local shops and big box stores arrived by truck. Farmers use diesel to run their tractors, combines, and irrigation pumps. Trucking companies use diesel to haul produce, meat, dairy, and packaged goods across the country. Even the delivery trucks bringing packages to your door usually run on diesel, although some have transitioned to electric trucks. Trains and cargo ships also rely heavily on diesel, so imported goods and cross-country shipments are affected too.

When diesel prices go up, it costs more to grow, harvest, package, and ship food. Those costs get passed down the line until they land right in your grocery cart. That’s why you might notice higher food prices even when nothing else about the product has changed. The diesel cost baked into that loaf of bread or that gallon of milk is part of what you’re paying for, even though you never see a receipt that spells it out that way.

It’s not just groceries either. Diesel prices affect the cost of building supplies, since construction equipment and delivery trucks run on diesel. They affect the cost of having propane or heating oil delivered to rural homes. They even affect the price of everyday items at the store that have nothing to do with food, since almost every product on a shelf got there by truck at some point.

What This Means for the Truckers Themselves

It’s worth pausing here, because this story isn’t just about diesel prices. It’s about the people driving those trucks, many of whom are small business owners themselves.

For a trucking operation, fuel typically makes up 30 to 40 percent of total costs, second only to driver pay, and for owner-operators, it’s often the single biggest expense. With diesel over $ 6 a gallon in some places, industry analysts warn that if prices stay this high, between 6,000 and 10,000 carriers, mostly small independent operators, could be forced out of the industry in 2026. Even at $ 5 a gallon, owner-operators without a fuel surcharge built into their contracts are facing serious cash-flow pressure.

Thin Margins

One industry cost breakdown shows just how thin the margins get. At around $5.26 per gallon, fuel alone runs about $0.81 per mile. Once you add insurance, truck payments, maintenance, and driver pay, total costs can reach $2.66 per mile. Even with decent freight rates, an owner-operator can end up with well under 35 cents per mile in profit, which leaves little cushion for a slow week, a vehicle breakdown, or a rough weather season.

Larger fleets with fuel-efficient trucks, hedging contracts, and better route data are better positioned to weather these issues. Small operators, the family-run trucking businesses many of us depend on more than we realize, are the ones absorbing the hardest hit.

There’s a strange twist to all of this. If enough small carriers are forced to leave the industry, trucking capacity tightens, and tighter capacity historically pushes freight rates higher for the carriers who remain. So the truckers who make it through this stretch may eventually see better-paying loads once the market thins out. That’s a small comfort, but it doesn’t change how hard the road ahead looks for many hardworking families right now.

Why This Hits Rural and Self-Reliant Families Differently

If you live out in the country, or you’re working toward a more self-sufficient lifestyle, diesel prices can hit you from more than one direction. You may already be paying more to have goods delivered to a rural address. You may be running equipment on your own property that uses diesel. And you are still paying the same higher grocery prices as everyone else because of the supply chain costs.

This is one more reason why so many self-reliant families put real effort into growing their own food, raising a few animals, and building a stocked pantry. It’s not about giving up on the modern supply chain. It’s about giving your family a buffer so that a spike in diesel prices or a shortage of truckers to move goods doesn’t immediately show up as a crisis at your dinner table.

What This Means for Your Family

Understanding this connection isn’t about feeling helpless. It’s about being prepared. When you know that fuel prices directly affect your grocery bill, it makes sense to build up your food storage when prices are lower, so you’re less vulnerable when diesel prices spike again. Food storage isn’t just for emergencies like storms or power outages. It’s also a financial tool that protects your family from ripple-effect price increases.

It also helps to think locally. Buying from local farmers and producers can sometimes bypass some of that long diesel-powered supply chain, which may help keep costs a little more stable and support families in your own community. A shorter supply chain usually means fewer diesel-powered miles between the farm and your table, and fewer links that can break if trucking capacity gets tight.

A Few Practical Steps

Build your pantry when prices are good, not just when you think you need to. Watching for sales on shelf-stable staples throughout the year, rather than waiting for an emergency, gives you a buffer when diesel-driven price increases hit the stores.

Consider a garden, even a small one. Anything you can grow yourself is one less thing riding on a diesel truck. Even a few tomato plants or a small raised bed with herbs and other veggies can take a little pressure off your grocery budget.

Get to know local farmers and ranchers. Buying direct, even occasionally, can help you save money and understand where your food actually comes from. Many communities have farm stands or co-ops that make this easier than people expect.

Keep an eye on fuel trends. You don’t need to be an expert, but noticing when diesel prices are climbing can give you a heads-up that grocery prices may follow in the coming weeks. Diesel price changes often show up at the grocery store a few weeks later, so a little awareness goes a long way.

Stock up on shelf-stable basics gradually. Rice, beans, flour, oats, canned goods, and other pantry staples all hold their value well and give you flexibility no matter what happens with fuel costs.

Plan meals around what you already have. When you shop your own pantry first, you reduce how often you need to buy groceries, which reduces how much those diesel-driven price increases affect your monthly budget.

The Bottom Line

Diesel prices might seem like someone else’s problem if you don’t drive a diesel vehicle yourself. But the truth is, diesel touches almost every part of how our food and most other goods get to us, and right now it’s also putting real strain on the truckers who keep that whole system moving. From the farmer’s tractor to the truck driver hauling groceries across the state, to the delivery truck outside your local store, diesel is quietly woven into the price of nearly everything we buy. Being aware of that connection, and preparing accordingly, is just one more way we can take care of our families and remember the people working hard to feed them, no matter what happens at the pump.

Please Stock Up On Canned Goods ASAP

Why It’s Important To Know How To Cook From Scratch

Final Word

None of us can control what happens at the pump or in the oil markets halfway around the world. But we can control how ready we are for it. Every bag of rice on your shelf, every jar you put up from your own garden, every relationship you build with a local farmer, is one more piece of steady ground under your family’s feet when the world outside feels less predictable. Diesel prices will rise and fall, and someday they may come back down. Until then, let’s keep doing what families like ours have always done. Plan ahead, take care of our own, and lend a hand to our neighbors along the way. May God bless this world, Linda

Copyright Images: Diesel Gas With Trucks AdobeStock_1567755759 by Katerina Bond, Diesel Gas Handle AdobeStock_2011231739 by Zarana

The post Diesel Prices: Why Are They So High? appeared first on Food Storage Moms.


from Food Storage Moms

Survival Mirror: The Complete Guide to Signal Mirrors

A survival mirror costs less than a candy bar, weighs almost nothing, and never runs out of batteries. It’s also one of the most misunderstood pieces of gear in any bug-out bag, since most people who own one have never actually learned to aim it correctly.

This guide covers what a survival mirror actually is, the real history behind its design, the aiming technique that separates a useless flash from a rescue-worthy signal, and the honest limits of what this tool can and can’t do for you. If you’re carrying one without knowing how to use it properly, you’re carrying dead weight.

What a Survival Mirror Actually Is

A survival mirror, also called a signal mirror or emergency signaling mirror, isn’t just a flat piece of reflective glass. What separates it from the compact mirror in your bathroom is a small sighting hole in the center paired with an aiming aid, usually a patch of retroreflective material, that lets you actually direct the flash of reflected sunlight at a specific target instead of just hoping it lands somewhere useful.

According to the technical history documented on Wikipedia’s entry on signalling mirrors, these tools are officially called “daylight signalling mirrors” under international maritime treaties and “emergency signaling mirrors” by the US military, though most preppers just call them survival mirrors.

Reflective signaling itself predates any of this formal terminology by centuries. Historical accounts describe Crow Indians signaling with looking glasses as early as 1830, and explorer Francis Galton recommended handheld mirrors for shipwrecked sailors in his 1855 travel guide, decades before anyone built a mirror with a proper aiming system into it.

The Untold History Behind This Ounce of Gear

This tool has a genuine combat rescue record. According to the documented history of signalling mirror development, World War II created an urgent problem: downed pilots and torpedoed sailors were dying in open water because rescue ships and planes simply couldn’t spot them. Ordinary reflective objects, even a tobacco tin in one documented Australian rescue, occasionally saved lives, which pushed multiple countries to develop dedicated aiming systems.

The US Coast Guard and the Royal Air Force independently tested competing aiming designs in 1944 and both concluded that a “reflex sight,” using retroreflective material to create a visible aiming dot, dramatically outperformed simpler foresight and rearsight methods. That testing led directly to the Mark 3 signal mirror adopted by the US military in 1949, a design still issued to every branch of the US armed forces today, more than 75 years later.

How Signal Mirrors Actually Work

The physics is simple: the angle of incidence equals the angle of reflection, so a flat mirror bounces sunlight off at a predictable angle you can control by tilting it. A small mirror can still produce a beam bright enough to be spotted from many miles away, since you’re essentially reflecting the light output of the sun itself, one of the most powerful light sources available to you.

The catch is precision. The reflected beam from a handheld mirror has roughly the same angular width as the sun itself, which is under 0.6 degrees, meaning the difference between hitting your target and missing it entirely by a wide margin is a fraction of a degree. That’s exactly why aiming without a proper sighting method is close to useless at real rescue distances.

The Aiming Method That Actually Works

If your mirror has a sighting hole, hold it close to your eye and look through the hole directly at your target, whether that’s a search aircraft, a distant ridge, or a boat on the horizon. Tilt the mirror until you see a bright spot of light, sometimes called the fireball, appear on the retroreflective material around the hole.

Slowly adjust the mirror’s angle until that bright spot lines up directly over your target as seen through the hole. Once it’s aligned, don’t hold it perfectly still, since a steady, unwavering light can be mistaken for a natural reflection off water or quartz. Gently rock the mirror so the flash pulses on and off, which is what actually catches a searcher’s attention.

If you don’t have a sighting hole, the improvised method still works reasonably well at shorter range. Hold the mirror in one hand and extend your other arm toward the target, forming a V with your index and middle fingers around it. Reflect the sunlight onto your extended hand, then tilt the mirror until the beam passes through the V and lands on the target itself.

Glass vs. Polycarbonate vs. Improvised Mirrors

Glass signal mirrors generally produce the brightest, truest reflection and hold their optical quality longest, but they’re also the most fragile option to carry in a pack that gets thrown around. Polycarbonate or Lexan mirrors sacrifice a small amount of brightness for genuine near-unbreakable durability, which is why most modern compact survival mirrors use this material.

In a genuine pinch, almost any smooth reflective surface works as an improvised signal: a phone screen, a polished piece of metal, the back of a CD, or a car’s side mirror removed from its housing. None of these will match a purpose-built mirror’s brightness or have a proper aiming hole, but the same basic aiming principle, tilting until the reflection lands on your target, still applies.

Is a Signal Mirror Legally Required on Your Boat?

Here’s a detail that surprises a lot of preppers: a signal mirror doesn’t actually satisfy the US Coast Guard’s visual distress signal requirement for recreational boats. According to the Code of Federal Regulations governing visual distress signals, the only devices that legally count are an approved electric distress light, an orange distress flag, or approved pyrotechnic flares, meaning a mirror is a smart supplemental tool but won’t get you out of a compliance check by itself.

That doesn’t diminish its value in an actual emergency. A mirror has an unlimited shelf life, unlike flares that expire, and it works as long as the sun is out, which makes it worth carrying in addition to whatever your legal requirement is, not instead of it.

Beyond Signaling: Other Survival Uses

A signal mirror’s polished surface can concentrate sunlight enough to help ignite tinder on a clear day, essentially functioning as a crude magnifying tool if you angle it correctly against fine, dry material. It won’t outperform a dedicated fire-starting tool, but it’s a real backup option you’re already carrying.

The mirror surface is also genuinely useful for the boring, practical stuff: checking a wound or bite location you can’t see directly, inspecting your own face for ticks or debris, or signaling a member of your own group across open terrain without shouting and giving away your position.

If you’re navigating without a compass, a mirror can also help you read a shadow-stick or watch-based direction estimate more precisely by letting you check your own positioning without turning your whole body and losing your reference point. It’s a small, easy-to-overlook use, but it adds up when every tool in your kit needs to earn its weight.

Range and Realistic Expectations

A well-aimed signal mirror flash has been credibly spotted from over 10 miles away under good conditions, and aircraft at altitude have reported seeing flashes from considerably farther than that. Those numbers assume clear sun, a properly aimed reflection, and a spotter who’s actually looking in roughly the right direction, not a guarantee for every situation.

Overcast conditions cut your effective range dramatically, though a mirror still works to some degree even under thin cloud cover, since it’s reflecting ambient light rather than a direct beam. No sun at all means no signal, which is the one hard limitation nothing about technique or mirror quality can overcome.

Time of day matters more than most people account for. A low sun near sunrise or sunset actually works in your favor for horizontal targets like a distant boat or vehicle, since the beam travels roughly parallel to the ground, while a high midday sun is better suited for aircraft passing more directly overhead.

Building Your Own Signal Mirror

A basic DIY version starts with any small, flat reflective surface, ideally polished metal or glass, with a small hole drilled or cut in the center. Cover the back of that hole with a piece of retroreflective tape, the same reflective material used on bicycle reflectors or safety vests, cut slightly larger than the hole itself.

Drill a second small hole in one corner and thread a length of paracord through it, both to keep the mirror from getting lost and to let you hang it from a branch where wind movement creates an automatic, passive flashing signal even when you’re not holding it. A homemade mirror won’t match a mil-spec version’s precision, but the same core aiming principle applies once the retroreflective aimer is in place.

Frequently Asked Questions

Does a signal mirror work on a cloudy day?

It works less effectively but isn’t completely useless, since a mirror can still reflect ambient light through thin overcast. On a fully overcast day with no visible sun, though, you won’t get a usable signal and should rely on other methods.

Can I use my phone screen as a backup signal mirror?

Yes, even a dead phone screen reflects sunlight well enough to signal with, using the same aiming principle as a dedicated mirror. It won’t have a sighting hole, so use the improvised hand-and-fingers aiming method instead.

How much does a real signal mirror cost?

A quality polycarbonate mil-spec style signal mirror typically runs under ten dollars, making it one of the cheapest pieces of genuinely useful gear you can add to a bug-out bag or vehicle kit. There’s very little reason not to carry one given that cost.

Should I practice using it before I actually need it?

Absolutely, and this matters more than the mirror itself. Practice on a stationary target like a distant fence post or tree from fifty or more yards away until finding and holding the aim becomes automatic, since fumbling with the technique for the first time during an actual emergency wastes precious time.

What’s the difference between a signal mirror and a heliograph?

A heliograph traditionally refers to a larger, tripod-mounted mirror system historically used for military Morse code communication over long distances, while a signal mirror is the small handheld version meant for emergency rescue signaling. Some countries and older manuals still use the terms interchangeably, especially for mirrors aimed with a foresight paddle.

Your Most Important Survival Tool Isn’t Something You Can Buy

A signal mirror costs very little, weighs almost nothing, and can potentially help rescuers spot you from miles away. But there’s a catch:

Owning the tool isn’t the same as knowing how to use it.

That principle applies to almost everything in preparedness.

You can fill a garage with emergency supplies, tools, and expensive equipment—but when something goes wrong, what matters most is the knowledge you carry with you.

The Lost Skills of Independence was created around exactly that idea.

It brings back practical, old-fashioned skills that previous generations used as part of everyday life—the kind of knowledge that helped people grow and preserve food, make things themselves, solve problems with what they had available, and depend less on modern conveniences.

Instead of simply adding another piece of gear to your stockpile, you’ll discover practical skills that can help you become more capable, resourceful, and self-reliant around your home and homestead.

Because batteries eventually die. Equipment breaks. Supplies run out.

But a skill you’ve truly learned stays with you.

Whether you’re preparing for emergencies, building a more independent homestead, or simply trying to rely less on systems outside your control, rediscovering these forgotten skills is one of the most valuable investments you can make.

👉 Discover The Lost Skills of Independence and start rebuilding the practical knowledge our grandparents once considered ordinary!

Final Thoughts

A survival mirror is genuinely one of the best value-per-ounce items you can carry, backed by a real combat rescue record going back to World War II and a design that’s barely changed because it already works. What separates a useful mirror from a paperweight is entirely down to whether you’ve actually learned to aim it.

Spend five minutes practicing the sighting-hole technique on a stationary target before you ever need it for real, and this cheap, weightless tool becomes one of the most reliable ways to get found in your entire kit. It doesn’t need batteries, it doesn’t expire, and it works exactly as well on day one as it does ten years from now.


You may also like:

why the pentagon is secretly stockpiling this deviceDon’t Forget To Join Our Facebook Community For More Prepping Tips And Tricks

How to Filter Water Using a Sandwich Bag (VIDEO)

DIY Clint Eastwood Survival Cape

DIY Rambo Survival Jacket

Driving Skills for Life – The Complete Guide Every Driver Needs

What Is Situational Awareness? The Prepper’s Complete Guide to Staying One Step Ahead


The post Survival Mirror: The Complete Guide to Signal Mirrors appeared first on Ask a Prepper.


from Ask a Prepper https://ift.tt/DOe9JUM

Wednesday, September 16, 2026

13 Plants That Mosquitoes Hate

Estimated reading time: 9 minutes

13 Plants That Mosquitoes Hate

Is there anything more annoying than mosquitoes when you’re outdoors? If there is, there’s still no denying that mosquitoes are very annoying. You can have a perfectly relaxing evening on your back porch or at the campground, only to have mosquitoes ruin your day.

And that’s not to mention that in a major disaster scenario, mosquitoes can even be dangerous. For example, in a grid-down disaster scenario where sanitation standards drop dramatically, mosquitoes can carry diseases if they get into human waste and other contaminants.

Needless to say, mosquitoes are not something you want to have around, and while you may think that the simple solution is just to wear bug spray, another option is to invest in plants that literally repel mosquitoes for you.

Bug spray may work, but it’s also sticky, smelly, and in a disaster scenario, it may be in short supply. That’s why investing in plants that can repel mosquitoes is a better option.

Here are the top plants that mosquitoes absolutely hate, presented in alphabetical order:

1. Basil

Basil Houseplant

People love incorporating basil it into various meals, but mosquitoes hate it. That’s because basil puts out an aroma that mosquitos naturally despise, and on top of that, basil is also toxic to mosquito larvae. That means that if you place basil near mosquito nesting sites (such as standing or stagnant water) you can literally stop them from laying their eggs.

2. Bee Balm

Bee Balm Flowers

Bee balm (also known as horsemint or monarda) is a gorgeous flowering plant that mosquitoes simply can't stand. When you crush its leaves, it releases a strong, spicy aroma that masks the scents mosquitoes use to hunt you down, which means they have a much harder time finding you in the first place.

There's one thing to keep in mind, though. Just like lavender, bee balm is a magnet for pollinators like bees, butterflies, and hummingbirds. That's fantastic if you're trying to support your garden, but if you'd rather not invite a bunch of bees to the party, you may want to plant it a little further away from where you like to sit.

3. Catnip

Catnip Plant

Mosquitoes hate catnip because of a chemical that it contains called nepetalactone. This is both a mosquito repellant and a feline attractant. In fact, nepetalactone is so strong against mosquitoes that it is often incorporated into insect repellent products.

4. Citronella

Citronella Plant

Another common ingredient in mosquito repellent products is citronella. Citronella is a large plant that can thrive in any garden without frost. It’s also very low maintenance, which further increases its value. And on top of that, mosquitoes absolutely despise it.

5. Garlic

Garlic Plant

Humans aren’t the only creatures on this planet who can be turned off by the rather pungent smell of garlic. Mosquitoes don’t like it either. In fact, if you rub garlic juice all over your body, it will work just as well as normal mosquito repellents (though of course, you’ll probably keep other people away as well). But still, it’s an option for you to consider.

6. Lavender

Lavender Plant

There’s only one kind of insect that likes the smell of lavender, and it's not mosquitoes (fun fact: bees love the smell of lavender).

Even though lavender may be a very pleasant smell to most people, the overwhelming majority of bugs and insects despite it. If you simply hang dry lavender either inside or outside, mosquitoes will stay away.

The one downside? As I just noted above, bees love lavender. This is why lavender really isn’t the best choice for keeping mosquitoes away since you could attract bees more bees than you'd like, but it is an option to consider.

7. Lemon Grass

Lemongrass Plant

Lemon grass can regularly grow to be nearly five feet tall, and it’s very decorative. And here’s a fun fact, lemon grass also contains citronella, which as we just discussed above, is something that mosquitoes strongly despise. In fact, lemon grass is probably even more effective than citronella because it emits a more powerful aroma.

Lemon grass is able to tolerate heat very well, but for frost and colder temperatures it’s just the opposite. If you use lemon grass during the winter, be sure to keep it indoors or else it will die.

8. Marigolds

Marigold Plant

Marigolds are some of the most attractive flowers that money can buy, and they also have a very strong smell that most insects hate, including mosquitoes.

In fact, marigolds contain a natural compound that is often utilized as an effective ingredient in mosquito repellants. If you plant marigolds in your garden, not only will you be adding to its overall look, you’ll be keeping the mosquitoes away as well.

9. Mint

Mint Leaves

Mint is one of the easiest herbs you can possibly grow, and as it turns out, mosquitoes absolutely hate the stuff. That strong menthol aroma that makes mint so refreshing to us is the very thing that sends mosquitoes packing. You can plant it around your patio, or in a pinch, crush a few leaves and rub them directly onto your skin for a quick and natural repellent.

The one thing to watch out for with mint is that it spreads aggressively and can quickly take over an entire garden bed if you let it. To keep it under control, it's a good idea to grow mint in a pot or container rather than planting it directly in the ground.

10. Pennyroyal

Pennyroyal Plant

Pennyroyal is equally effective against flies as it is against mosquitoes. Many people like to take pennyroyal leaves and crush them into their pockets to keep mosquitoes away.

That being said, one major warning concerning pennyroyal is that they are highly toxic for both infants and pregnant women, so be careful about using it.

11. Petunias

Petunia Plant

Another beautiful plant that can really add to the look of your garden is the color of petunias. Plus, they contain a scent that keeps many insects away, including mosquitoes.

One downside to petunias? Caterpillars, snails, and slugs love them, meaning that you could end up inviting other kinds of pests into your garden if you plant a lot of them.

12. Rosemary

Rosemary Plant

Rosemary is a very popular herb used as a seasoning in many vegetable dishes. And here’s an additional use for it: crunch some rosemary up and then toss it into a fire. The resulting aroma will keep mosquitoes away.

To make it last a long time, wrap it in aluminum foil, wet it, poke some holes in the foil, and then toss it into a fire. If you do this, it will smoke all night.

13. Sage

Sage Plant

Last but not least, sage is another excellent plant for keeping mosquitoes away. As with rosemary, you can throw sage leaves into a fire to keep mosquitoes away. But while sage may be an awful smell to mosquitoes, to humans it’s quite refreshing.

Also as with rosemary, you can wrap it in aluminum foil, wet it, poke holes in it, and toss it into a fire to make it last all night.

Conclusion

As you can see, there are many plants (both indoor and outdoor) that you can use to repel mosquitoes, along with other annoying insects and pests.

As a final piece of advice, keep in mind that standing water outdoors is a major breeding ground for numerous kinds of insects, including mosquitoes. If at all possible, try to keep stagnant or standing water as far away from your house or campsite as possible.

You May Also Like:

The post 13 Plants That Mosquitoes Hate appeared first on Homestead Survival Site.


from Homestead Survival Site https://ift.tt/rwKFJW2

16 Unexpected Off-Grid Uses for 55-Gallon Drums

The ice storm that took our power out for two days taught me a very hard lesson. I had shelves of gear in that garage, some of it barely used, and yet the first thing I dragged outside was a beat-up steel drum I’d bought years earlier for eleven dollars at a farm auction.

That barrel became our stove by the second evening, sitting in the shop with a length of pipe running out the window while my wife and I played cards in our coats. Meanwhile, a good portion of the equipment I’d spent real money on sat there doing absolutely nothing for us.

What worries me now is how close I came to buying the wrong barrels entirely. A drum that once held a chlorinated solvent keeps leaching that chemical into whatever touches it, so a bargain barrel can poison a garden bed or sicken a herd years after you congratulated yourself on the price.

So keep in mind that not all barrels are created equal. 

Know Your Drums

Barrels fall into two camps, and the stamps tell you almost everything before any money changes hands.

  • Food-grade drums held syrup, vinegar, olive brine, or juice concentrate, and they carry a food-grade mark along with a resin code stamped near the bottom seam. Anything touching water, food, soil, or livestock belongs in one of these and nothing else.
  • Industrial drums held solvents, pesticides, hydraulic fluid, and other things I’d rather not have near my tomatoes, since scrubbing does nothing about what soaked into the liner years ago. They still earn their keep in fire, structure, and dry storage of non-edibles.
  • Steel drums take heat, which makes them the choice for stoves, smokers, fire pits, and anything with flame involved. The tradeoff is rust at any waterline, so they suit dry or dirt-side work better than floating work.
  • Plastic HDPE drums carry a number 2 in the recycling triangle and handle water, feed, and burial without corroding. They won’t tolerate fire at all, which is the one line you can’t cross.
  • Wooden barrels breathe and last generations, though they need to stay wet or the staves shrink and the hoops drop right off. Old-timers used them for salting, brining, and cellar storage long before plastic existed.

When a seller can’t tell me what was in a drum, or when it smells like a mechanic’s shop, I walk away rather than gamble.

16. A Barrel Woodstove

Barrel stove kits have been sold at farm stores since the 1930s, and mine still puts out more heat per dollar than anything else I own. The kit supplies a cast iron door, legs, and a flue collar, all of which bolt onto a horizontal drum once you’ve cut the openings with a jigsaw.

What makes the design work is the surface area, because a drum radiates from far more square footage than a compact cast iron stove burning the same size fire. My neighbor stacked a second drum above his first and joined them with stovepipe, which pulls the leftover heat out of the exhaust before it escapes up the chimney.

An industrial barrel suits this fine, though the old paint wants burning off outdoors during the first hot fire rather than in your shop. Like any woodstove, it needs a proper hearth pad underneath and honest clearance from the walls.

Here’s how my woodstove barrel turned out:

LSI barrel stove

15. A Mini-Root Cellar

My father built a proper root cellar back in the sixties, and it cost him a whole weekend, a crew of neighbors, and a pallet of block hauled in on a trailer. I got most of the same storage out of a buried drum in one afternoon, working alone.

The barrel goes into the ground upright, with the lid sitting just above grade. And that packed soil around the sides does all the insulating for free, which is exactly what my father paid for in block.

Six feet down, the ground holds close to fifty degrees through August. Then in January it still never drops below freezing. So potatoes, carrots, beets, cabbage, and apples all stay firm for months down there.

You do need a few small holes near the top, though, because the air has to exchange. And once a hard freeze sets in, a couple of straw bales over the lid will carry it through until spring.

What I didn’t expect, though, was how important the spot you choose to bury it in is. My first one sat in a low spot where the runoff collected, and it rusted through the bottom seam inside three years. So anything on a slight rise is worth the extra digging, since that alone is the difference between three years and twenty.

Over the years I’ve built barrel cellars that flooded, barrel cellars that froze, and one that rusted out in three seasons. But the plan I keep coming back to is this one right here, because it’s the only version that got the drainage and the venting right the first time.

14. Bulk Grain Storage That Mice Cannot Chew Through

A few winters ago the mice got into a bucket of oats out in my barn, and they ruined every last pound of it. That was the winter I switched over to steel for anything I meant to store long term.

A sealed food-grade drum stops them cold, and it costs a fraction of what a purpose-built grain bin runs. So if you’re still keeping your bulk grain in buckets, my advice is to make the switch before the mice make it for you.

One barrel swallows roughly 400 pounds of wheat, which works out to about a year of bread for a small family. And if you line it with a large mylar bag and drop in a few oxygen absorbers, that takes care of the moisture and the insects at the same time. Then once the lid ring is clamped down tight, your wheat holds for a decade without another thought from you.

There’s one thing I learned the hard way, though. Concrete pulls moisture right through steel over time, so keep your drums up on pallets rather than flat on the basement floor.

My best advice is to keep an ingenious rodent trap in a bucket sitting right on top of that barrel, because a determined rat will chew through plastic given enough time and a reason. Also, make sure you mark every lid with the contents and the packing date as well.

13. A Floating Dock That Holds Real Weight

Each sealed 55-gallon drum floats roughly 400 pounds, which makes the arithmetic on a dock refreshingly simple. Four barrels under a lumber frame carry about 1,600 pounds, or a small group of people and their gear without any nervous flexing underfoot.

Steel banding or heavy pipe straps hold the drums into the frame, with the bungs tightened and turned upward where they stay dry. Plastic barrels beat steel in this one application, since steel rusts through right at the waterline within a couple of seasons.

A dock built this way pulls ashore before the ice sets in, which is why so many northern lake properties use them. The same principle gives you a work raft for pond maintenance or a swimming platform the grandchildren will fight over.

12. Solar Hot Water From Black Paint

A drum painted flat black and left in full sun climbs past 110 degrees on a clear summer day, which is genuinely hot. Mounted on a platform above head height with a shower head plumbed off the bottom bung, that barrel gave us hot water at deer camp for years.

Anybody who spends summers on rural property gets real use out of this, since it solves the washing-up problem without a generator or a propane tank. I fill it in the morning and by mid-afternoon the water is hot enough that you have to mix in cold.

Foam board across the back and sides slows the heat loss considerably, and a simple poly box around the whole thing stretches the season into October. The one unforgiving detail is freezing weather, because ice will split those seams open on a full drum.

11. Two Drum Halves and a Working Wind Turbine

The Savonius rotor is the simplest wind turbine anybody has come up with, and one drum split lengthwise supplies both scoops it needs. Offsetting those halves on a vertical shaft lets the wind push one side while slipping past the other, which is all the asymmetry required.

Because the design ignores wind direction entirely and starts turning in a light breeze, it suits gusty or sheltered ground where a propeller turbine just stalls. Connected to a car alternator or a permanent magnet generator, a drum rotor will trickle charge a battery bank through the day.

Nobody should expect house power from one barrel, so I treat mine as battery maintenance and a supplement for the well pump. Solid bearings and a rigid mast matter more than the rotor itself, since a wobbling shaft tears the whole thing apart within a season.

10. Livestock Shelter

Cutting a drum in half lengthwise produces two arched shelters, each sized about right for calves, goats, sheep, or a farm dog. Set on skids, a half-drum drags easily behind a garden tractor as the animals rotate across pasture through the season.

The curved shape sheds rain and holds body heat better than the plywood shelters I built before, and it cost me a quarter as much. A pair of stakes driven through drilled holes anchors one against wind without committing it to a single spot.

Straw bedding inside and the open end turned away from the prevailing winter wind handle the rest of it. Industrial drums work here, provided the animals can’t reach painted interior surfaces to lick or chew.

9. A Stock Tank Cut From Half a Barrel

Split lengthwise, each half holds around twenty-five gallons, which suits a few goats or a single horse without any plumbing at all. Cutting crosswise instead gives you a deeper tank for cattle, since they’ll tip a shallow one over the first afternoon.

Every cut edge needs filing smooth and then hammering over, or capping with split garden hose, because raw steel will open an animal up on the first careless drink. Level ground matters too, given how hard livestock lean on a tank when they crowd around it.

Only food-grade barrels belong in drinking water, and a weekly rinse in hot weather keeps the algae from taking hold. 

8. Greywater Recovery That Keeps an Orchard Alive

Water from sinks and showers still has value, especially during the dry Augusts when the county starts restricting outdoor watering. Three drums arranged down a slope and filled with gravel, then sand, then charcoal will filter that water by gravity as it moves from one barrel to the next.

By the time it leaves the third drum, most of the soap and food particles are gone, and what comes out works fine on fruit trees and ornamental beds. Through a genuine drought, that recovered flow is what kept my apple trees going while the spigot stayed shut.

7. A Solar Dehydrator

Standing a drum on end creates a natural draft, and that draft is the whole trick behind a working solar dehydrator. Air comes in through low vents, warms against the dark steel, and rises past the trays, carrying the moisture out the top as it goes.

You load slide-in trays with apple slices, pear halves, tomatoes, or herbs, and two or three sunny days will take fruit down to leather without a watt of electricity. That’s exactly how my grandmother handled a heavy apple year, and she never owned a dehydrator in her life.

The details make the difference between a barrel that dries fruit and one that just sits in the sun, so if you want to build one properly, here’s how to build a solar dehydrator the way it ought to be done.

6. Fresh Livestock Feed Through the Dead of Winter

Hay prices climb every winter around here, and a fodder system cuts that bill by sprouting cheap grain into green feed the animals prefer anyway. A drum cut lengthwise and fitted with sloped shelves holds a rotating series of sprouting trays in a small footprint.

Barley soaked overnight and spread thin gives you a thick green mat in about seven days, turning one pound of grain into six or seven pounds of feed. My chickens, rabbits, and goats all took to it immediately, and the nutrition runs well ahead of dry hay in February.

The system needs somewhere above freezing with indirect light, plus a rinse twice a day to keep mold from setting in. Once the rotation is going, one tray comes out every morning and a fresh one goes in behind it.

5. A Root Washer 

If you’ve ever cleaned two hundred pounds of potatoes at the spigot, then you know exactly how long that job runs and how your hands feel the next morning. A barrel root washer handles the same load in a fraction of the time, and it saves you the bending along with the raw knuckles.

For the build, you mount a drum horizontally on rollers and replace sections of the wall with expanded metal, so the mud falls straight through while it turns. Then a hose running inside and a hand crank on the end take care of the rest, though a slow gear motor works fine if you’d rather not turn it yourself.

All that tumbling scrubs the dirt off without bruising your vegetables, as long as you keep the rotation slow and don’t pack the load in tight. Mine paid for itself the first fall I dug a serious potato patch.

4. Homemade Biochar for Soil

Biochar is charcoal made specifically for soil, and it holds water and nutrients in sandy ground for decades rather than a season or two. Making it means heating wood in a sealed chamber so it chars instead of burning to ash, which a nested pair of drums handles nicely.

You pack a small sealed barrel with wood scraps and set it inside a larger one, then build your fire in the outer drum so it cooks the inner one from every side. 

What comes out is lightweight black charcoal. Most of it gets crushed and charged with compost for the beds, and with the rest you can make these DIY charcoal briquettes for SHTF.  Farmers in the South were doing a version of this long before anyone printed the word biochar in a magazine.

3. A Compost Tumbler That Spins With One Hand

Turning a compost pile with a fork got harder for my father, and his pile sat unturned for most of one summer as a result. My solution for him was to build a drum mounted horizontally on a length of steel pipe that it spins with one hand, mixing an entire batch in about ten seconds.

The build needs a hinged hatch cut into the side, drainage and air holes drilled throughout, and a pipe running through the center as an axle. Two wooden A-frames hold that pipe at whatever height suits you, so nothing about loading or emptying involves bending or lifting anymore.

Tumbled compost finishes in roughly a month during warm weather, against six months for a static pile that only gets turned when somebody feels ambitious. That difference lets me feed the garden twice in a season instead of once.

Do you know what else you can do with compost? Biofuel from leaves and manure. Yes, that’s all you need. But you also need to know the method that can change the game. It’s all in this book

2. Patriot’s Drum Smoker

I call it that because the best barbecue I’ve ever eaten came out of one of these, cooked by fellow Americans who understood what a good barbecue actually means. Not a single one of those men owned a fancy rig, and every one of them could put a brisket on the table that you’d remember for years.

Mine will sit at 250 degrees for eight or nine hours on a single basket of charcoal, and I hardly have to touch it. So while the neighbors are out there fussing with vents on a three-hundred-dollar rig, I’m on the porch with a cup of coffee.

The build is about as simple as anything on this list. You need an access door near the bottom, a ring of intake holes drilled around it, a charcoal basket hanging inside, and a couple of grates up near the top. Mine came in under a hundred dollars all told, and it cooks more evenly than the commercial smoker I’d been eyeing for two years.

Be aware of this when you are smoking meat! Hot smoking occurs at 52 to 80°C (126 to 176°F) and can last from one to 24 hours, cooking or dehydrating the food. Cold smoking is done at 20 to 30°C (68 to 86°F), typically after curing the meat, and can last several days to impart flavor. Using dry, seasoned wood like oak, fruit trees, or beech is best, avoiding resinous logs that produce bitter smoke. Click here to find out more about the art of smoking meat … in a barrel. 

1. A Solar Water Heater

For this one you want a food-grade HDPE barrel, the kind with the number 2 stamped in the recycling triangle, because anything that held solvents will leach into your wash water. The one thing I did differently was painting mine flat black, and that alone pushed the water past 110 degrees on a clear summer day.

The heat drops off fast once the sun goes down, though, which is where the bottles come in. You need to lay clear two-liter bottles across the top and down the sides, and the trapped air between the plastic and the barrel works the same way a storm window does on a drafty house.

All you really need is the barrel, two dozen clear bottles, a can of flat black paint, and a shower head plumbed off the bottom bung. The barrel goes up on a platform above head height so gravity does the work, and the bottles get strapped into place once the paint has dried.

My son and I built our solar water heater over a weekend after seeing the plan on this website, and the water was hot enough by mid-afternoon that we had to mix in cold.

Video preview of a DIY project from the book the lost skills of independence.It shows a water heater based on plastic bottles

The DIY Projects You Need for Survival… Today and When SHTF

Every project on this list came out of the same place. I needed something, I didn’t want to pay three hundred dollars for it, and there was a barrel sitting out behind the shed doing nothing.

But here’s what I’ve come to understand after all these years. The barrel isn’t the valuable part, because you can find one of those at any farm auction for eleven dollars. What’s valuable is knowing what a barrel can become, and that kind of knowledge used to pass from a father to a son on a Saturday afternoon.

Most of it didn’t get passed on. My father knew things about building with his hands that I only figured out by ruining a few barrels first, and I imagine your father was the same way.

If you are the kind of prepper who likes to build thing with their own hands and still don’t have the No-Grid Survival Projects on your shelf, then what are you waiting for? It sits at #1 on Amazon in the Outdoor Survival Skills category, and it covers the projects nobody teaches anymore, from water systems and off-grid power to food preservation and shelter.

It’s a book written by preppers for preppers. 

NGP banner offer click button

The barrel cellar my son and I dug in the side yard came out of a plan like that. And that afternoon with him out there in the dirt turned out to be worth more to me than the cellar ever was.


You may also like:

Sore Joints and Arthritis? Try This! (VIDEO)

5 Home Defense Tips for Seniors

Why Physical Fitness Is the Most Overlooked Survival Skill (Even for Seniors!)

How to Avoid Being Scammed Online

Anti-Looter Kit Review

The post 16 Unexpected Off-Grid Uses for 55-Gallon Drums appeared first on Ask a Prepper.


from Ask a Prepper https://ift.tt/fUaoGTj

Grocery Stores: How To Stay Out Of Them

Grocery Store With Someone Holding A Cell Phone

Grocery Stores: How To Stay Out Of Them. Do you ever feel like you’re at the grocery store three or four times a week and wonder why? You run in for milk, then you’re back the next day for bread, then somehow you’re there again because you forgot the one thing you actually needed the first time. I know this feeling well, and I also know how much money slips out of your wallet every single time you walk through those doors. Grocery stores and their marketing approach are designed to get you to buy more than you came for.

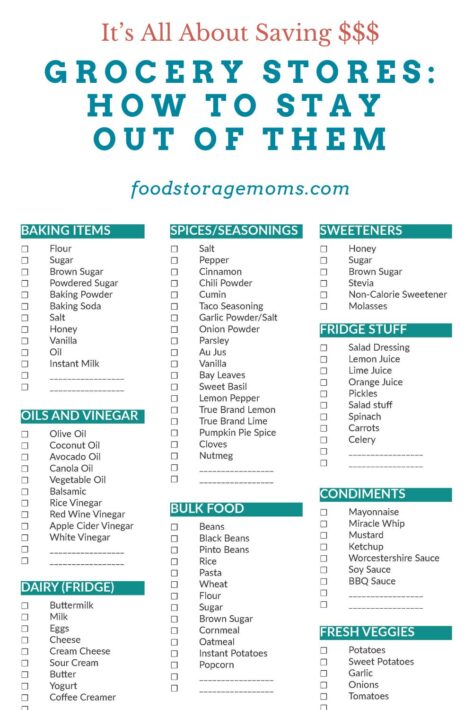
The bright displays, the smell of fresh bakery items, the endcaps loaded with sale signs- all of it is built to loosen your grip on your budget. The good news is that with a little planning, you can cut your grocery store visits down to once every week or two, or even less, and save real money in the process. Today I want to walk you through how to stock your pantry and freezer, learn to cook from scratch, and make your own bread, so you can avoid the grocery store as much as possible and keep more money in your pocket. FREE PRINTABLES: FoodStorageMoms Meal-Planning Chart or Grocery Shopping List.

Grocery Store List

Kitchen Items I recommend:

Why fewer trips save you money

Every trip to the grocery store costs you more than the total on the receipt. It costs you gas. It costs you time. And most importantly, it often costs you impulse purchases. Studies on shopping behavior consistently show that the more often you shop, the more you spend overall, because each trip is another opportunity for something unplanned to land in your cart. When you shop once a week or once every two weeks with a solid list, you naturally spend less. You’re buying with intention instead of buying because something looked good on the shelf. Staying out of the store isn’t about deprivation. It’s about being prepared enough that you don’t need to run out for one more thing.

Stock your pantry

The foundation of staying out of the grocery store is a well-stocked pantry. I always tell people to think of their pantry as their own small grocery store at home. When you have the basics on hand, you can make dozens of meals without ever leaving your house.

Start With These Basics

Start with the essentials. Flour, sugar, salt, baking powder, baking soda, and yeast are the backbone of baking and cooking. Rice, pasta, and dried or canned beans give you filling bases for countless meals. Canned tomatoes, tomato paste, and canned vegetables round out soups, stews, and sauces. Cooking oils, vinegar, and a good rotation of spices make everything taste like a real meal instead of something thrown together.

Buy In Bulk

Buy these items in bulk when they go on sale, and rotate your stock so nothing expires before you use it. This is the old-fashioned idea of first-in, first-out. Write the purchase date on cans and bags with a marker so you always know what to use first. A well-organized pantry with a few months’ worth of staples on hand means that when you’re missing one ingredient for dinner, you almost always have a substitute already on the shelf.

I also recommend keeping a running inventory list on your refrigerator door or in a notebook. Every time you use the last of something, write it down. That way your next shopping trip is planned around what you actually need, not a guessing game while you wander the aisles.

Stock your freezer

Your freezer is just as important as your pantry when it comes to staying out of the store. Meat, bread, butter, cheese, and even milk can all be frozen and used later, which means you can buy in bulk when prices are low and skip the store when they aren’t.

Buy Meat On Sale

When meat goes on sale, buy extra and freeze it in meal-sized portions. Ground beef, chicken breasts, and pork chops all freeze beautifully if you wrap them well and remove as much air as possible. Cooked meals freeze well too. Soups, casseroles, and shredded meat for tacos or sandwiches can be made in a big batch and frozen in smaller containers for quick dinners later.

Buy Frozen Fruits and Vegetables

Vegetables and fruits are another great freezer investment. Buy them fresh when they’re in season and cheap, then wash, chop, and freeze them yourself, or stock up on frozen vegetables when they go on sale. Frozen produce keeps its nutrition and is often more budget-friendly than fresh produce that goes bad before you can use it.

Don’t forget bread and butter. Both freeze wonderfully. If you find bread on a great sale, or if you make your own, freeze extra loaves so you always have some on hand.

A chest freezer or an extra upright freezer in the garage or basement is one of the best investments a family can make for saving money. It lets you take advantage of sales and bulk pricing instead of buying small amounts at full price every week.

Don’t Rely On Convenience Foods

One of the biggest reasons families end up at the grocery store so often is that they rely on convenience foods that run out quickly and need to be replaced constantly. Learning to cook from scratch changes that completely. When you know how to make a meal from basic pantry and freezer ingredients, you’re no longer dependent on a specific packaged product being in stock or on sale.

Start Simple

Start simple. Learn to make a basic white sauce, which becomes the base for countless casseroles and pasta dishes. Learn to make your own taco seasoning instead of buying packets. Learn to make soup from scratch using broth, vegetables, and whatever meat you have on hand. These skills don’t require fancy equipment or culinary school training. They require practice and a willingness to try.

Cooking From Scratch

Cooking from scratch also stretches your food storage further. A pound of dried beans costs a fraction of canned beans and can be cooked in big batches and frozen for later use. A whole chicken can be roasted, then the meat used for dinner, and the bones simmered into broth for soup. Nothing goes to waste, and every ingredient works harder for your family.

I encourage you to pick one new from-scratch recipe each week and add it to your rotation. Before long, you’ll have a whole collection of meals you can make with what’s already in your home, without a special trip to the store.

Learn to make bread

Bread is one of the most expensive items to keep buying at the store, and it’s also one of the most rewarding things to learn to make yourself. A basic loaf of bread requires only flour, water, yeast, salt, and a little fat, such as butter or oil. Once you understand the basic process, you can make sandwich bread, dinner rolls, pizza dough, and more, all from the same handful of pantry staples.

If you’re new to bread baking, start with a simple no-knead recipe. These recipes rely on time rather than intense kneading to develop the dough, and they’re nearly foolproof for beginners. Once you feel comfortable, branch out into shaped loaves, rolls, and even sweet breads. Linda’s No-Knead Bread.

Baking your own bread means you always have fresh bread on hand without a special trip to the store, and it means you control exactly what goes into it. You can freeze extra loaves, so even bread baking becomes part of your stock-the-pantry-and-stock-the-freezer strategy. No-Fail Bread Recipe: all you need are fresh ingredients.

Bread Sliced
Print

No-Fail White Bread: 2 Loaves (Must Use Fresh Ingredients)

Course Side Dish
Cuisine American
Prep Time 15 minutes
Cook Time 27 minutes
Rising Time 1 hour
Total Time 1 hour 42 minutes
Servings 2 one-pound loaves
Author Linda Loosli

Ingredients

  • 1 cup warm milk
  • 2 tsp.  SAF instant yeast
  • 2 tsp. dough enhancer (optional)
  • 1 egg
  • 1/8 cup oil-I use olive oil
  • 3/4 tsp. sea salt
  • 1/4 cup sugar
  • 1/4 cup warm water
  • 3 to 3-1/2 cups white bread flour

Instructions

  • I start with a Bosch bread mixer, although you could make this in a bowl. I put the yeast, warm water, salt, oil, and sugar in the bowl.
  • I then add the eggs and lightly mix them in the Bosch so the egg does not “cook”.
  • Then I slowly add the warm milk and flour. I continue to add flour until the bread dough pulls away from the sides of the Bosch bowl.
  • Then knead the dough for about 7-8 minutes. I place the dough in a greased bowl and cover it with plastic wrap.
  • Let the dough rise until it's doubled in size. Then punch down the dough, make it into loaves, and place these in greased pans (this recipe makes two 1-pound loaves).
  • I let it rise once again (using the same plastic wrap) until doubled in size.
  • Remove the plastic wrap and bake them at 350°F (176°C) for 27-30 minutes. I lightly butter the tops of each loaf after baking and remove them from the pans.

Notes

HOW TO MAKE SCONES aka Fry Bread
  1. I start with a very large skillet and heat the oil one to two inches deep until I can spritz a few drops of water into the oil ever so carefully; then I know it’s hot enough.
  2. You will start with one ball of dough about the size of a tennis ball, maybe a little smaller, but bigger than a golf ball.
  3. Then mash the dough with the palm of your hand on a greased countertop and use a rolling pin to roll the dough from the center out. You keep rolling from the center out until they are very thin.
   4. Then place them in the hot oil really carefully because the oil will splatter. Here’s the deal: yes, it’s a big mess, but I’m talking about memories right now.
   5. Adults and kids always love hot scones. Fry them until golden brown, then turn them over and cook the other side until golden brown too.

Bringing it all together

Staying out of the grocery store is really about shifting your mindset from reactive shopping to proactive stocking. When your pantry is full of staples, your freezer is full of meat, bread, and vegetables, and you know how to turn those ingredients into real meals from scratch, you simply don’t need to run to the store as often. You save money on gas, on impulse purchases, and gain the peace of mind that comes from knowing your family is fed, no matter what happens outside your front door.

Start small if this feels overwhelming. Pick one area, maybe your pantry inventory or your first loaf of homemade bread, and build from there. Before you know it, weeks will go by between grocery store trips, and your budget will thank you for it.

Final Word

Staying out of the grocery store isn’t about cutting corners or eating less well. It’s about being ready. A stocked pantry, a full freezer, a few scratch-cooking skills, and a loaf of homemade bread cooling on the counter give your family security and your budget room to breathe. Start with one small step this week and let the habit grow from there. May God bless this world, Linda

Copyright Images: Grocery Store With Someone Holding A Cell Phone AdobeStock_2019613503, Shopping Cart With Woman Holding Receipt AdobeStock_1976838814

The post Grocery Stores: How To Stay Out Of Them appeared first on Food Storage Moms.


from Food Storage Moms