written by Derrick James
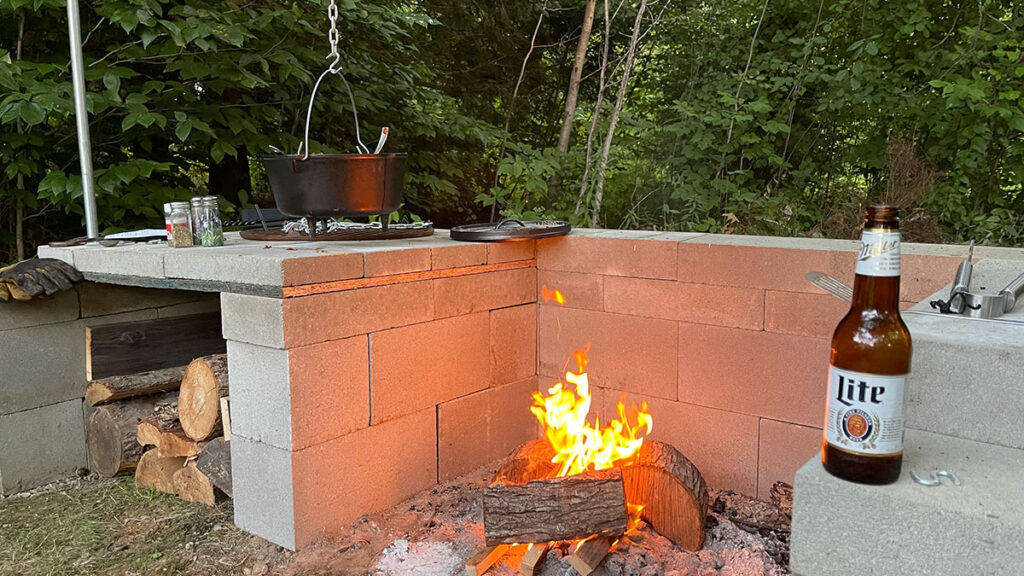
My concrete block fire pit is a serious pit. I designed it for performance. I can do everything with this pit from enjoying a simple evening fire to using it as a big outdoor cook station. I wanted a fire pit that could do whatever I needed it to do. Those needs vary.
Concrete blocks are great. They’re cheap and versatile. I’ve made a concrete block raised bed garden before, and plenty of people have also used them for fire pits.
There are plenty of fire pit options available. You can buy the Solo Stove fire pit that many people like or you can just assemble some rocks in a circle. That has worked for centuries. I wanted something more.
I have cooked over a Solo Stove and over a fire in a ring of rocks. Both can be done, but I wanted a better blend between a fire pit and an outdoor cook station. I wanted options.
Not finding any fire pit close to what I wanted on the commercial market, I decided to design my own fire pit. One big, modular concrete block fire pit.
Concrete blocks are like Legos for men. They come in different shapes and sizes and can be stacked in various ways for many different projects beyond basic building construction. Given that they are rugged and fire proof, they are an obvious choice to build a custom fire pit.
Do they have their downsides? Of course. Everything does.
Pros and Cons of Concrete Block Fire Pits
Pros
- Concrete blocks are versatile. They come in different sizes. You can stack them in countless different ways.
- You can add or remove bocks to change the layout of your fire pit at any time.
- Construction is fast and cheap.
- Blocks and bricks can often be salvaged. Your fire pit could be entirely free.
Cons
- Concrete blocks are heavy. This may not be an issue for some, but for people with physical limitations or anyone with a small car who needs to transport the blocks, it could be a challenge (lumberyards often deliver for free).
- This fire pit is modular, but it’s not portable. Unlike a portable pit, you’re not going to pack your concrete blocks up and reassemble them at a campsite.
- Concrete blocks are known to crack around a fire.
My Design
The last con, concrete cracking around fire, was my biggest concern in building a concrete block fire pit. I believe my design gets around this, however. My pit is big enough that the fire doesn’t have to rest up against the blocks, reducing the chances the blocks will overheat. If a block does crack, it’s not a big deal or expense to simply swap it out for a new one.
I designed this fire pit for work. My design is for dry stacking concrete blocks. That means stacking them without mortar. This makes it easier, faster, and cheaper to construct. It’s also what makes it modular. If the blocks were cemented together with mortar, I wouldn’t be able to change the layout as needed.
Big, Tall, and Rectangular
Most concrete blocks are rectangular in shape, so they lend themselves well to rectangular or square construction. I wanted a wide fire pit, allowing me plenty of options and workspace. A rectangular shape fits this need.
The one downside to this rectangular shape is that it’s less conducive for entertaining guests. You can’t sit 4 or 5 people around my fire pit to talk. If your primary goal in building a fire pit is to entertain guests, this probably isn’t the design for you. I use my Solo Stove for that because it’s smokeless. However, I will say that once this fire pit gets rolling, everyone that has seen it comments on how nice it looks. Four people can sit in front of it comfortably, but everyone faces the fire versus each other.
The design is big enough to allow for more than one fire at once. This way I can use one fire to create coals that I then move to the second fire. Alternatively, I can cook on two fires at once. I can also change things up to create a concrete block table for setting hot cast iron on, cooking gear, etc.
The big, wide design also allows me to burn brush in it. If I’m cleaning up debris in the yard I don’t have to cut it into small pieces to burn it. The tall walls also create a level of fire safety that I wouldn’t get with an open burn. When burning brush, it saves me from having to wait until a dusting of snow falls to make brush burning safer.
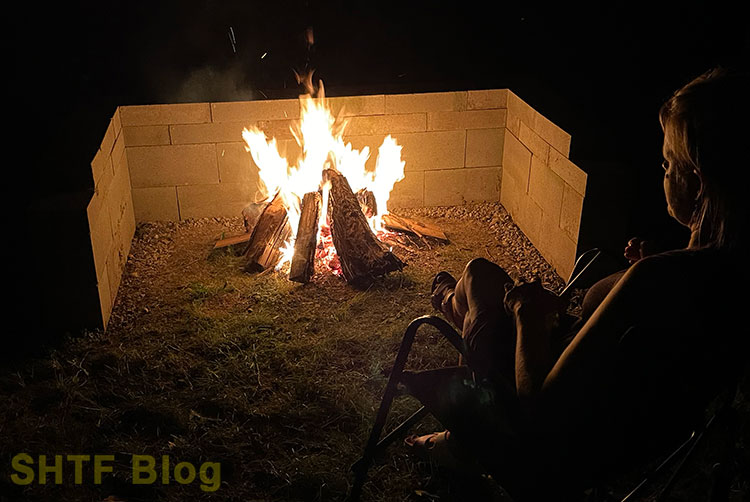
Beyond safety, the tall rear wall is also great at reflecting the fire’s heat and light. This adds comfort and ambience to the fire.
Supplies Needed
You will need enough concrete blocks, some crushed stones or sand, shovel, level, and (maybe) a cold chisel and sledge. You do not need to follow my design exactly. As I said, this is intended to be a modular fire pit. You can use different concrete blocks to create the layout that fits your situation. Use my design as a guide, or if this design works for you, follow the directions I’ve laid out here.
The first order of business is buying or salvaging enough concrete blocks. The photo below shows the type and quantity of each block I used.
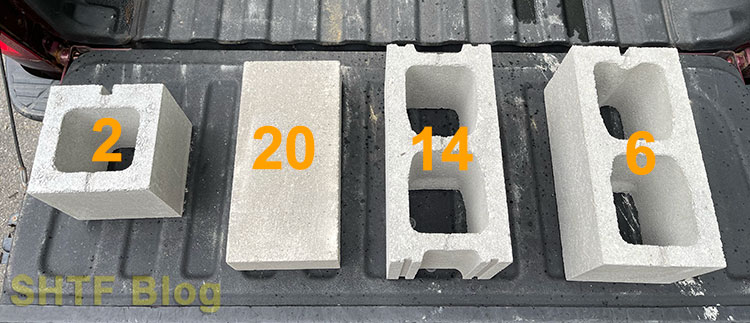
You will see in the completed image below that I double stacked the 4″x8″x16″ blocks on the walls of the pit (second block from left in the pic above). You can cut that quantity almost in half if you just single stack them. Alternatively, you can use more of the 16″x8″x8″ blocks (third from left in pic above) to make the walls even higher and then just use one of the flat blocks to finish the top, even using a thinner 2″x8″x16″ block. The costs won’t change much.
| 16″x8″x8″ | 16″x8″x8″ (one flat end) | 8″x8″x8″ | 4″x8″x16″ (one split in 2) | Grand Total | |
|---|---|---|---|---|---|
| Quantity | 14 | 6 | 2 | 20 | |
| Price per Block | $2.07 | $2.07 | $1.65 | $2.07 | |
| Total | $28.98 | $12.42 | $3.30 | $41.40 | $86.10 |
You will also need some sand or crushed stones. This isn’t a requirement, but it’s highly recommended if you live in an area that experiences frost. You can look for free sand or crushed stone. I happened to have gravel left over from an unrelated project, so I used that.
Gather your shovel, level, and cold chisel and hammer (optional).
How to Build the Concrete Block Fire Pit
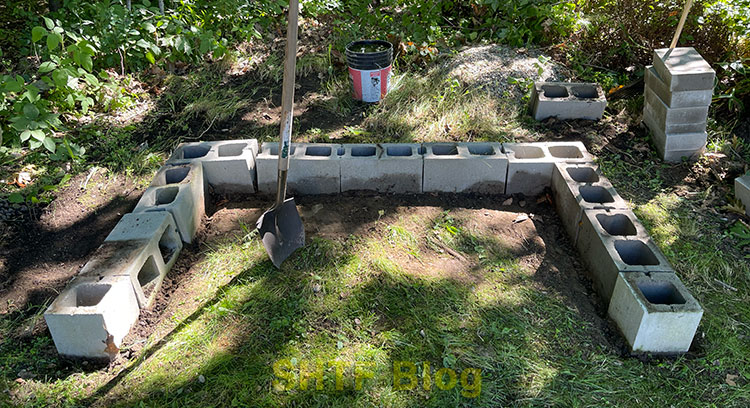
1 – Lay Out Your First Course
The first thing you need to do is just lay out your first course. You’re doing this just to mark the ground space where the blocks will sit. You can use a spray paint to mark the ground, but this doesn’t have to be super fancy or precise. I simply went around all side of the first course and marked the layout with my shovel.
2 – Place Crushed Stone or Sand Under the Blocks
Nothing fancy here. Dig up 6-8″ of ground and backfill it with crushed stone. I would have probably dug deeper, but I encountered a lot of big tree roots that I did not want to damage.
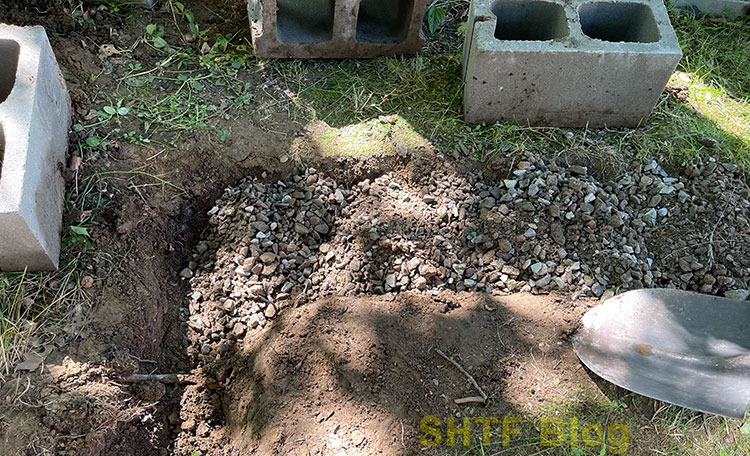
Again, this may not be necessary depending on where you live, but here in Maine the frost wreaks havoc on anything that isn’t properly set in the ground. Will frost still shift the blocks come spring? Probably, but based on my experience with the concrete block raised bed garden that I made, it shouldn’t move much. If it does shift, adjusting the blocks to make them level again is not a Herculean task, particularly with the crushed stone underneath.
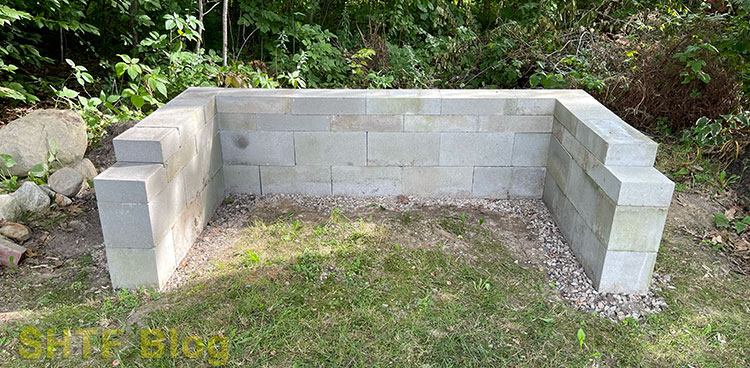
3 – Level the First Row
Now you need to take the time to level your first row. The crushed stones or sand you placed underneath the blocks will make this job easier. If a block is high, just flip it on its side and scrape some stones away. If it’s too low, add some. Easy peasy.
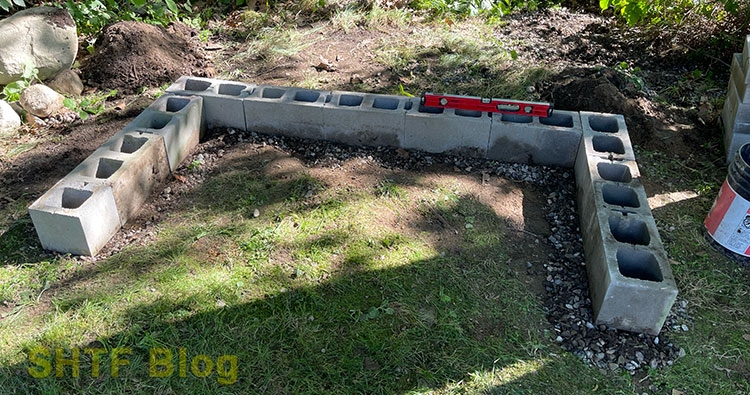
My design calls for 10 8″x8″x16″ blocks, 3 of which have a flat face (front end and back corners), and 1 8″x8″x8″ square block (pictured at the end of the left row above).
4 – Stack Your Blocks
Now that you have a level first row, you just need to stack your blocks. You want to stagger your blocks for stability. You also want to place the blocks with the flat face facing the ends (see pic below). This will give your fire pit a finished look to it. It’s a much more attractive design this way.
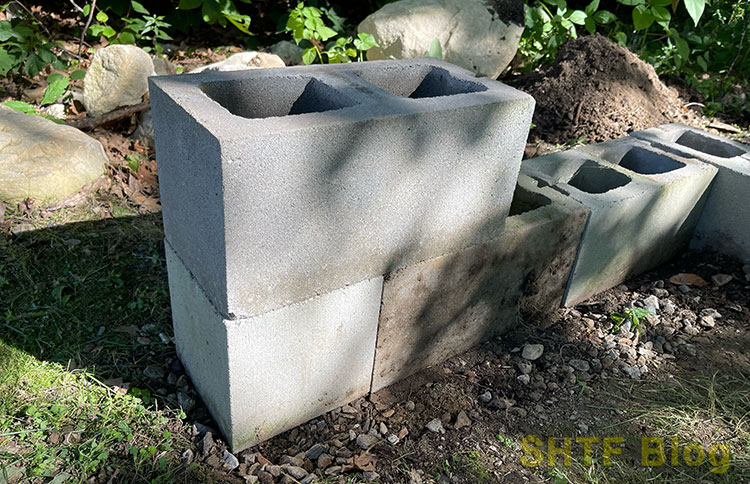
Now stack the second row, again adding flat face blocks to corners and ends for the finished look.
5 – Score and Split a Few Blocks
After you have laid a second course of 8″x8″x16″ blocks (with your two 8″x8″x8″ blocks) it’s time to stack the 4″x8″x16″ blocks. I did not find any 4″x8″x8″ blocks at the big box stores or local hardware store, though I am sure they are available at stone and concrete suppliers. In my case, I just created 4″x8″x8″ blocks by splitting a 16″ block in half.
To do this I marked the block with a pencil at 8″ across and simply tapped along the line with a cold chisel and sledge.

- Available in 3 different shapes and designs.
- Includes 3PC Cold Chisels: 3/8" , 1/2" , 5/8" .
You are unlikely to get a perfect cut this way, but it will get you close enough. Keep tapping along the marked line until the block breaks in two on its own. It won’t take long.
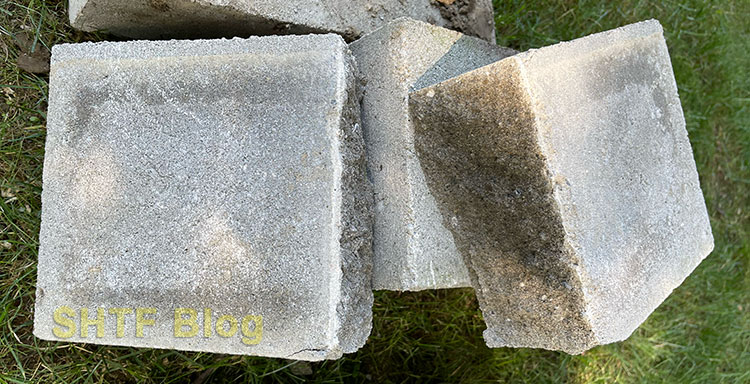
To bring the block a bit closer to a smoother finish I ran the cut side along the edge of another concrete block to smoothen it out a bit. Be careful doing this, however, as it can damage either or both blocks.
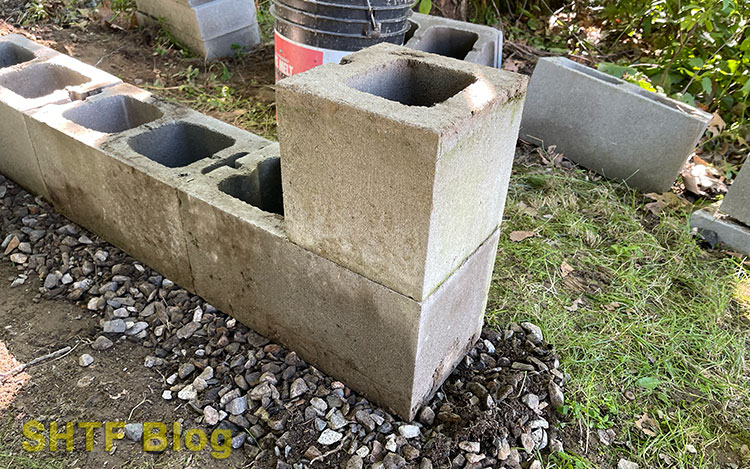
6 – Cap with Flat Blocks
I then added one more layer of 4″x8″x16″ blocks. You may decide to skip this step if you don’t want your walls as high – or maybe you want to go higher.
The picture above shows how I used the split 4″x8″x16″ blocks to create a staggered top layer. I liked this look a bit better than just finishing the front end walls flush. Design as you see fit.
If you’re concerned about the blocks cracking under heat, you can leave the wall cap stones off so that the 8″x8″x16″ blocks have their holes exposed. This should help allow heat to escape up through the blocks versus sealing it in with the flat stones.
I don’t like that look, however. I’d rather replace a block periodically than do that. The flat stones on the tops of the walls have another use beyond aesthetics. I set hot cast iron, logs, and other items on the walls as I work with the fire.
7 – Light Your First Fire
Once I had all of my materials on site it took me under 2 hours to construct. Getting the materials to the location took the longest.
8 – Customize as Desired
The design I outlined above was intended to just be the starting point, the “foundation” to work and customize from. That’s what makes this design modular. You have options!
You can build the back wall higher to reflect more heat toward you. That’s great in colder weather, whether you need the heat for personal survival or just hanging around it with friends in the fall.
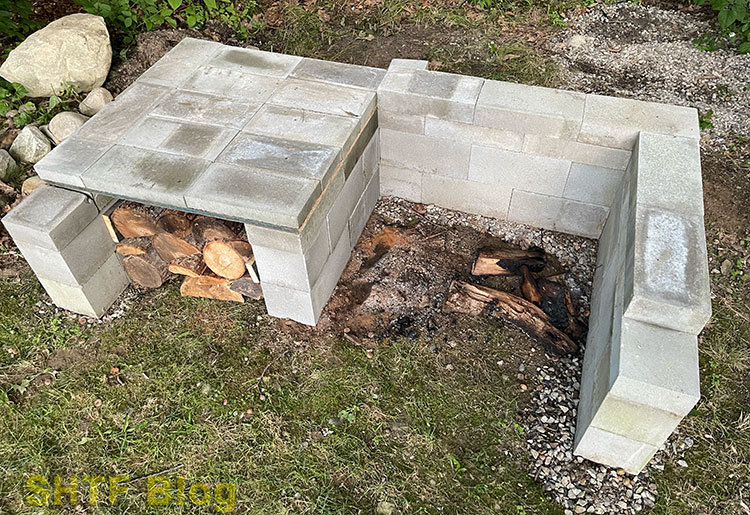
In my case, I added a few more blocks to build an interior wall to create two fire pits. I did this for cooking purposes, then adding an outdoor cooking fire pit (follow the link to learn how) that I also designed and put together myself.
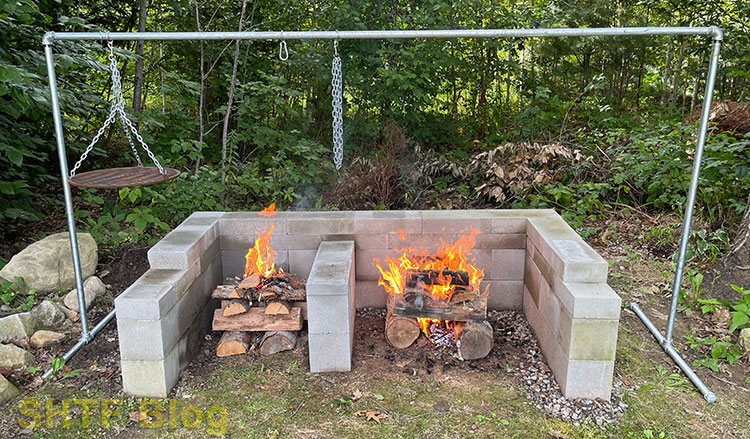
That middle wall also allowed me to turn the shorter side into a concrete block table. I cut a scrap piece of plywood into a 30″x30″ square, removed one course of blocks on the left wall and left rear wall, set the plywood in place, and then covered it with twelve 2″x8″x16″ blocks and one split block (2″x8″x8″). Plywood won’t be ideal here long-term as water and moisture will get trapped between the blocks and the plywood, so I am on the hunt for a steel grate that I can use to both support the blocks and for cooking purposes.
Summary
A concrete block fire pit doesn’t have to be fancy, time consuming, or expensive to look good. Dry stacking the blocks means you can always change your pit’s configuration, replace cracked blocks, or easily remove it altogether. There are countless different design options you can come up with, from the most basic to more advanced. Best of all, you can change it whenever you want something different.
What are your thoughts, experiences, and ideas? Let me know in the comments section.
No comments:
Post a Comment