Submissions     Contact     Advertise     Donate     BlogRoll     Subscribe                         

Wednesday, October 28, 2026

Former FBI Official Urges Americans to Stockpile Emergency Supplies: Here’s What He Says You Need

When a former FBI deputy director tells Americans to start stockpiling, people listen. On his podcast this week, Dan Bongino urged listeners to keep at least three days of food and backup power on hand. “Get your stuff today,” he said. “Please. Do it for your family.”

To be clear, this wasn’t a new federal emergency order. It was advice from a former official, but it lines up closely with what FEMA has recommended for years and with what governments around the world are now telling their own citizens.

What Bongino Said

Bongino, who also served in the Secret Service and the NYPD, made the comments on The Dan Bongino Show on Monday, according to UNILAD. He told listeners to get an emergency radio, batteries, emergency food, a way to collect rainwater, and water filters and purification tablets.

His comments came hours after reports detailed a Pentagon plan called FORTRESS, designed to keep military bases supplied and running for at least 90 days even if civilian infrastructure fails. Bongino’s point was simple: if the military is planning to stand on its own, households should too.

He urged people to make “Fortress my house” a priority, warning that neighbors won’t have extra food to share. He also said panic kills, and that preparing ahead of time is the best way to avoid it.

He’s Not the Only One Sounding the Alarm

Governments across Europe and Asia have been pushing the same message. The UK, Sweden, Germany, Ireland, the Netherlands, and France have all urged households to keep food, water, and medicine on hand for sudden emergencies.

The UK’s updated guidance, released this month, recommends three days of supplies in case severe weather or cyberattacks interrupt essential services. Japan has announced it will formally urge every household to keep at least three days of food, water, and toilet supplies.

Cyberattacks on essential services aren’t hypothetical, either. This summer, hackers broke into control systems at water utilities across the country, as we reported in our coverage of the attacks on America’s water supply.

What You Actually Need

FEMA’s Ready.gov basic disaster supplies kit is the best place to start, and it matches most of what Bongino listed. Here’s how to build it out.

Water

Store at least 1 gallon of water per person per day. The CDC recommends keeping at least a 3-day supply, and a 2-week supply if possible.

Bongino’s advice to add filtration makes sense for longer emergencies. A squeeze-style water filter and a pack of water purification tablets take up almost no space, and using them together gives you better protection than either one alone.

If you have the space, a rain barrel gives you a backup supply for washing and flushing, and for drinking once it’s filtered and treated. Check your state’s rules first, since a few places restrict rainwater collection.

Food

Start with three days of non-perishable food your family will actually eat, like canned meat, peanut butter, crackers, and protein bars. Then keep building toward two weeks.

Freeze-dried emergency food buckets are a quick way to add calories with a long shelf life. Just don’t forget a manual can opener for everything else.

Power and Communications

Bongino specifically called out backup power. A hand-crank emergency radio that receives NOAA Weather Radio All Hazards keeps you informed when the internet and cell service go down, since it broadcasts official warnings around the clock.

Stock extra batteries for flashlights and radios, and keep phones charged with a power bank. For longer outages, a portable power station can run lights and recharge devices for days.

The Rest of the Kit

Round it out with a first aid kit, any prescription medications you rely on, a flashlight, a whistle, garbage bags and moist towelettes for sanitation, and paper maps of your area. Ready.gov also recommends dust masks, plus plastic sheeting and duct tape for sheltering in place.

Don’t Panic, Prepare

Bongino’s message wasn’t that disaster is coming tomorrow. It was that the time to prepare is before you need to.

Three days of supplies won’t carry you through a long crisis, but it covers the most common emergencies: storms, blackouts, and the first chaotic days after something bigger. Once you have that covered, keep building toward two weeks.

Start this weekend with water and a radio. Everything else can follow.


You may also like:
3D Sphere banner17 Depression Era Bartering Skills We Will Use Again Soon

You’ll Wish You Had This Before SHTF (VIDEO)

Quick Trick to See if You Have Gold on Your Property

Survival Skills You’ll Need After the Collapse

The WW2 Secret Recipes that Will Help You in a Crisis


The post Former FBI Official Urges Americans to Stockpile Emergency Supplies: Here’s What He Says You Need appeared first on Ask a Prepper.


from Ask a Prepper https://ift.tt/0mkF85Z

The Fed Faces Another Inflation Decision: What Rising Prices Mean for Your Emergency Budget

The Federal Reserve wraps up a two-day meeting today, and the timing could hardly be more awkward. Inflation is climbing again, energy prices are through the roof, and voters head to the polls for the midterm elections on November 3.

Most economists expect the Fed to leave interest rates where they are this afternoon. The bigger question is what comes next, because a December rate hike is very much on the table.

For preppers, the headline number matters less than what it does to your grocery bill, your debt, and your ability to keep building supplies.

Where Things Stand

Last month, the Fed raised its benchmark rate by a quarter point to a range of 3.75% to 4%, its first increase since 2023. In its September policy statement, the committee said plainly that inflation remains elevated and promised to deliver price stability.

Today’s decision is due at 2 p.m. Eastern. Futures markets have priced in roughly a 90% chance the Fed holds steady, while some economists argue at least one more hike is needed before the year ends.

The decision also lands with political pressure building over borrowing costs. With the midterms less than a week away, every move the Fed makes will be read through a political lens.

Inflation Is Back, and Energy Is Driving It

The latest Consumer Price Index report from the Bureau of Labor Statistics shows prices rose 3.7% over the 12 months ending in September, up from 3.4% in August. The core rate, which strips out food and energy, was a much milder 2.6%.

Energy is the real story. Gasoline prices jumped 34.2% over the past year, and fuel oil, which many rural homes depend on for heat, is up a staggering 74.2%. Gasoline alone accounted for more than half of September’s monthly increase.

Food has held up better so far, rising 2.5% over the year. But some pantry staples are climbing faster than average, with rice up 7.1%, shelf-stable fish and seafood up 8.9%, and coffee up 7.1%.

High fuel costs also tend to work their way into grocery prices with a delay. We covered that risk in our report on diesel prices and the $8 billion emergency farm aid package.

What This Means for Your Emergency Budget

Debt Gets More Expensive

Most credit cards carry variable rates that move with the Fed’s benchmark. If the Fed hikes in December, any balance you carry gets more expensive to hold, and that eats into money you could be putting toward savings or supplies.

Pay down high-interest debt first, especially credit cards. An emergency fund does little good if it sits next to a balance growing at double-digit interest.

Your Cash Cushion Matters More

Inflation quietly shrinks the buying power of savings, but cash is still your first line of defense when a job disappears or the furnace dies. Keep some physical cash at home for outages, and the rest in an account you can reach quickly.

Higher rates do have one upside. Savings accounts and short-term CDs tend to pay more when the Fed raises rates, so shop around instead of leaving your emergency fund in an account that earns next to nothing.

How Preppers Can Stay Ahead of Rising Prices

Buy Staples Before the Next Jump

When prices are climbing, the food you buy today is cheaper than the food you’ll buy next year. Focus on what your family actually eats, like rice, beans, oats, canned meat, and fish, and rotate it so nothing goes to waste.

Bulk buying only pays off if you store it right. Food-grade 5-gallon buckets with gamma lids and Mylar bags with oxygen absorbers protect rice and beans from pests and moisture for years.

Protect Your Fuel Investment

With gasoline up more than a third in a year, every gallon you store is worth more than it used to be. If you keep stored gas for a generator or vehicle, add a fuel stabilizer and rotate it on a schedule so it doesn’t go stale.

If you heat with fuel oil or propane, consider filling up before winter demand pushes prices higher. Even a partial fill now can soften the blow if a December hike and a cold snap arrive at the same time.

Track What You Spend

Keep a simple price book for the 20 items you buy most often. When a staple starts trending up, you’ll know it’s time to stock up, and when it dips, you’ll know to buy deeper.

The Bottom Line

Whatever the Fed announces this afternoon, inflation isn’t going away overnight. Energy prices are high, borrowing is getting more expensive, and another hike may be just weeks away.

You can’t control interest rates, but you can control your debt, your cash cushion, and your pantry. Every can on the shelf now is one you won’t have to buy at next year’s prices.


You may also like:

he predicted 2026 down to the last detail!Jade Helm: Fact or Fiction?

Why THIS Underrated SURVIVAL ITEM Must Be Added to Your Stockpile ASAP

The Incident that Almost Ended America

The Secret U.S. Military Plan for Handling Civil Unrest

The Secret Chinese Farms on US Soil


The post The Fed Faces Another Inflation Decision: What Rising Prices Mean for Your Emergency Budget appeared first on Ask a Prepper.


from Ask a Prepper https://ift.tt/Q6jWw8n

Tuesday, October 27, 2026

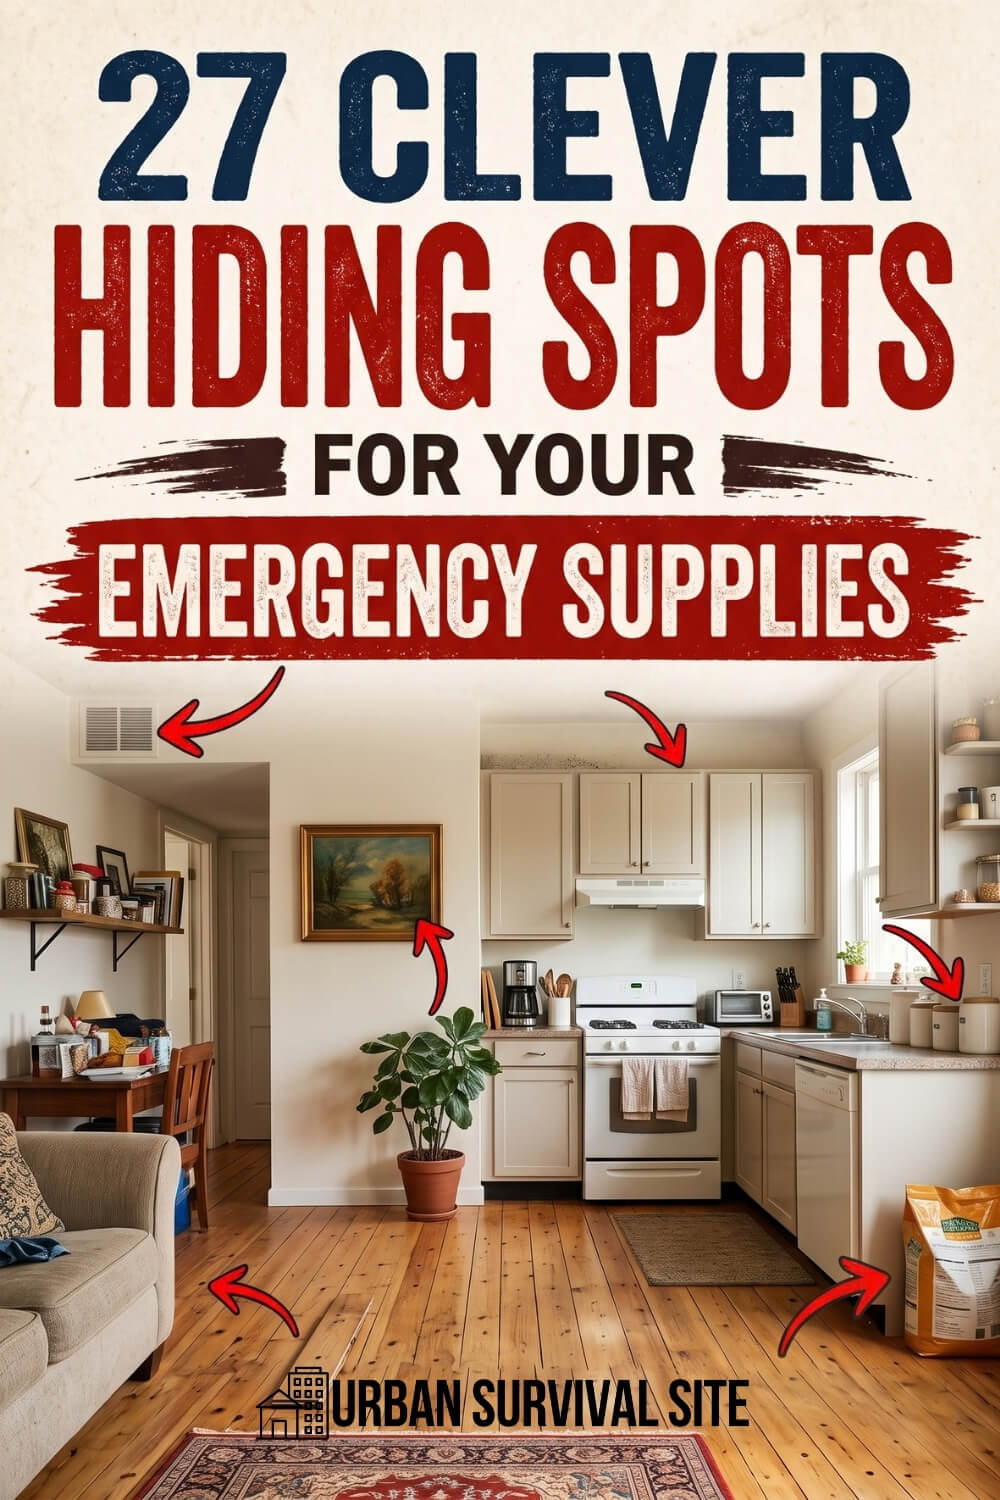
27 Clever Hiding Spots for Your Emergency Supplies

Estimated reading time: 8 minutes

27 Clever Hiding Spots for Your Emergency Supplies

Preppers know that the gear they are storing to live through a major disaster is more valuable than a stack of cash. But thieves and government agents know that, too. If you want to keep your valuables, you need to find the best hiding spots for them.

A few survival items such as a fire starter or a water purifier could mean the difference between life and death after a collapse. Creativity, ingenuity and a little skill can keep these items safe.

Here are some ideas for hiding your valuables. Use the ideas to get your own creative juices flowing. Take a look around your property and think outside the box.

Want to save this post for later? Click Here to Pin It On Pinterest!

1. Air Vents

Air vents are some of the most inconspicuous things in a house. A thief isn’t going to stop and wonder why a vent is on one wall or another. Cutting a hole in a wall or in the floor and putting a dummy vent over it is an easy way to stash valuables.

2. Air Ducts

Air ducts are another option for smaller things that won’t block the airflow. Duct tape the goods near the opening or attach a cord/string to something that is pushed further into the ductwork.

3. PVC Pipes

PVC pipes under a house or a sink are very normal. Again, a thief doesn’t know what does or doesn’t belong. A few fake pipes lined up to look like they belong can provide a hiding spot for small goods.

4. Attic Spaces

Attic spaces with exposed insulation or even sheetrock can provide plenty of hiding spots. Hiding things behind walls or in dark corners is very effective.

5. Under Floorboards

It’s probably one of the oldest tricks in the book, but it works. No one is going to check under twelve hundred square feet of flooring. Make it less obvious. Putting furniture over the area provides more security.

6. Crawlspaces

Crawlspaces are good for larger items, but they can be a little more obvious. It takes a brave, desperate soul to go scurrying into a dark crawlspace.

7. The Kitchen

The kitchen provides plenty of hiding spaces. Avoid the tried-and-true places like inside cereal boxes or coffee cans. Those were great, but unfortunately, they have been used.

Think more along the lines of false walls at the back of a deep cupboard. It only has to be a couple of inches. A piece of plywood that blends in with the cabinetry can work well. Under the kitchen sink there is always a shelf. Don’t be afraid to use the space under that shelf.

8. Drop Ceilings

Drop ceilings can conceal very lightweight items. Pushing up a tile is fairly easy.

9. Picture Frames

Taping small things inside a picture frame is very spy-like, but effective. Larger framed artwork generally has some space behind it that can hold larger items.

10. A Hole in the Wall Hidden by a Picture

A hole in the wall hidden by a picture is another oldie but goodie. You only want to do this if you know anything about construction. You don’t want to cut through electrical wiring or run into plumbing. Also, don’t leave the hole open. Put a square of sheetrock over the hole and a picture over the space to disguise it.

11. Under Stair Boards

There is lots of space under every stair. You can put hinges on the stair board to make it quick and easy to get to your goods.

12. Buried Survival Caches

Burying survival caches around your property is another option. They don’t have to be big. Make sure the goods are sealed up tight to prevent moisture damage. The caches don’t need to be deep. Using a couple Ziploc bags placed inside a PVC pipe is all you need. You can bury backpacks, old mayo jars, or anything that will keep out the water and dirt.

13. Potted Plants

Potted plants are a great way to hide in plain sight. Again, stick your goods inside a plastic bag sealed tight and put it in the bottom of the plant.

14. Under the Couch

In the space between the springs. How many times have you lost the remote in that area? The beauty of that hiding spot is no one will feel it when they sit on the couch, and the sheer fabric that hides the springs on the bottom acts as another layer of protection.

15. Linen Closets

Linen closets are boring. Not a lot of thieves go after the towels and sheets. You could do the fake wall in the back or hide things folded in sheets at the back of the closet.

16. Hollow Interior Doors

Most interior doors are hollow. Drilling a hole on top of the door can get you access. You’ll want to attach a string to the bag or container and secure it at the top in order to retrieve your goods.

17. Storage Totes

Totes in the garage or shoved in the closet labeled with ‘winter clothes’ or ‘taxes’ are an option. Place the goods you’re hiding in the middle or at the bottom of the tote.

18. Laundry Soap Containers

Laundry soap containers are an option for hiding things in plain sight. Use an empty container and fill it with your valuables. Sealing in a bag is an option if you want to fill the container with water to make it heavy. You don’t want a thief picking up the container and giving it a good shake.

19. Paint Cans

Paint cans are in nearly every garage, but they don’t have to be filled with paint. Tossing some things in the can and putting them on the shelf with other paint cans gives you an easy hiding spot.

20. Fish Tanks

If you have a fish tank, hiding small items under the gravel is an option. This is somewhat of a known area, but it isn’t blatantly obvious. Make sure the gravel in the tank is deep enough to keep your stuff hidden in case your fish get wild and move gravel around.

21. Dry Dog Food Bags

Dry dog food bags, whether you have a dog or not, are not going to be a huge target for theft. Seal up your goods, put them in the bottom of the bag, and dump the dog food on top.

22. Hollowed-Out Books

Hollowed-out books are another oldie. This works best if you have a lot of books on the shelf. Because this hiding spot has been around for centuries, a thief with a good eye might be able to spot one of these books if it’s obvious. Not so easy if it’s packed onto a bookshelf with twenty other books with similar covers.

23. Toilet Tanks

Hiding things in a bag in the toilet tank is an option.

24. Clothes Hampers

The bottom of a clothes hamper is much like the dog food option. Just to be safe, taping the item/s to the bottom and then tossing in some ‘dirty’ clothes to hide it works best. If a looter dumps out the clothes, the goods will stick to the bottom.

25. Old Coats and Ugly Sweaters

An old coat or ugly sweater in the back of the closet can disguise things hidden under the shirt. Hide stuff in the pockets as well.

26. Toe-Kick Space Under Kitchen Cabinets

There’s a gap of about four inches between the bottom of your lower cabinets and the floor, hidden behind a thin strip of trim called the toe kick. Pry the strip off carefully, slide flat items like cash, documents, or a sealed bag of fire starters into the space, and hold the trim back in place with a couple of small magnets or clips so you can get back in quickly. Nobody gets down on the floor to inspect the base of a cabinet.

27. Hollow Curtain Rods

Many curtain rods are hollow metal tubes with removable end caps. Roll up some cash or slide in small items like a spare key, a ferro rod, or a strip of water purification tablets, then put the cap back on. Thieves might look behind the curtains, but they won’t think to look inside the rod holding them up.

Thieves will generally not take a lot of time searching for valuables. This is why it’s crucial to hide things in places that require some thought to find. Thieves want quick and easy with little risk.

Be careful hiding things in places that used to be really clever, like a tampon box. Too many people talked about it and now it’s not so discreet. The goal is to stay one step ahead and, most importantly, keep it a secret. Tell no one—not even the friendly next-door neighbor.

Like this post? Don't Forget to Pin It On Pinterest!

You May Also Like:

The post 27 Clever Hiding Spots for Your Emergency Supplies appeared first on Urban Survival Site.


from Urban Survival Site

Vintage Three-Color Jell-O Salad

Vintage Three Color Jello Salad

This vintage three-color Jell-O salad is one of my favorite recipes to make for special occasions, especially for holidays. Did your family make this for you back in the 1960s?

Well, it’s a little bit of nostalgia today, my friends. My mother had one of the first official Jell-O cookbooks. Back in the 1960s, recipes weren’t on the internet, as we all know.

I can still picture the Jell-O cookbook my mother had; it was cream-colored and about 5 inches by 9 inches, give or take. I’m not sure who got the book after she died, but I didn’t see it.

You may recognize this salad as the Jell-O Crown Jewel Salad. Some people would make a graham cracker crust and make it a pie. Either way, this is so fun to make!

I still remember a few years ago when we had family over for dinner. Included were a couple of 10-year-old girls, one of whom I consider my first great-grandchild. I told them they could eat a whole bowl full of this salad, but they needed to pay special attention to the “jewels” they found deep in the Dream Whip. Both of them giggled as colorful Jell-O chunks appeared in each spoonful. What a fun time and delicious treat that all kids and adults will enjoy.

In case you missed this post, Fresh Cranberry Salad Recipe

Vintage Three-Color Jell-O Salad

Items You May Need In The Kitchen

Vintage Three-Color Jell-O Salad

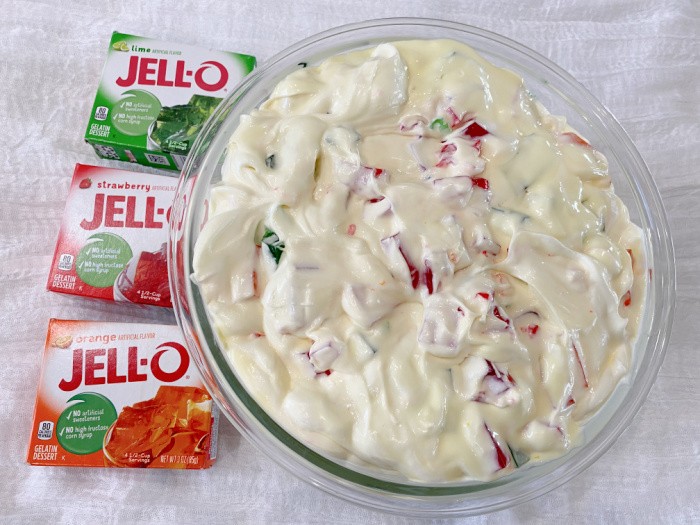
Step One: Gather Ingredients

I love gathering the ingredients before I start making the recipe.

Vintage Three Color Jello Salad

Step Two: Spray Pan with Vegetable Spray

Spray the three eight or 9-inch pans with vegetable spray so the Jell-O squares will come out easily after they firm up in the refrigerator.

Spray the Pans

Step Three: Prepare the Three Gelatins

Prepare the first three flavors of gelatin separately, using 1 cup boiling water and 1/2 cup ice-cold water for each.

Mix the Jello

Step Four: Pour Each Gelatin into Square Pans

Pour each flavor into an eight- or 9-inch square pan. Chill overnight to ensure they’re fully set and firm. (I waited 4 hours.)

Vintage Three Color Jello Salad

Step Five: Combine Lemon Gelatin with Sugar and Boiling Water

Then combine the lemon gelatin, the white sugar, and the last cup of boiling water. Stir the gelatin until fully dissolved. Add the pineapple juice, stir thoroughly, and chill until this mixture thickens.

Lemon Jello

Step Six: Prepare the Dream Whip

Prepare the Dream Whip as instructed on the package. Beat until you see stiff peaks.

Vintage Three Color Jello Salad

Step Seven: Combine Yellow Gelatin and Dream Whip

Add the slightly thickened lemon mixture to the Dream Whip.

Vintage Three Color Jello Salad

Step Eight: Cut the Three Colors of Gelatin into 1/2 Squares

Cut the different flavors/colors of gelatin into 1/2 inch squares.

Cut the Jello into Squares

Step Nine: Fold the Gelatin Cubes Into the Dream Whip Mixture

Fold the gelatin cubes into the Dream Whip mixture and pour into your bowl. Chill for at least 2 hours, then top with more whipped topping. Enjoy.

Vintage Three Color Jello Salad

Final Product

As a child, I loved to dig through the Jell-O (with my spoon) for the “jewels.” It’s time we have fun again, sitting around the kitchen table and enjoying delicious treats together.

Vintage Three Color Jello Salad

Vintage Three-Color Jell-O Salad

Vintage Three Color Jello Salad
Print

Vintage Three-Color Jell-O Salad

Course Salad
Cuisine American
Prep Time 20 minutes
Cook Time 0 minutes
Chill Overnight 12 hours
Total Time 12 hours 20 minutes
Servings 8 people
Author Linda Loosli

Ingredients

  • 1 3-ounce pkg. Orange gelatin
  • 1 3-ounce pkg. Strawberry or Cherry gelatin
  • 1 3-ounce pkg. Lime gelatin
  • 4 cups boiling water
  • 1-1/2 cups ice-cold water
  • 1 3-ounce pkg. Lemon gelatin
  • 1/4 cup of white granulated sugar
  • 1/2 cup pineapple juice
  • 2 ENVELOPES Dream Whip Whipped Topping, or 2 Cups Whipping Cream (whipped)

Instructions

  • Spray the three eight or 9-inch pans with vegetable spray.
  • Prepare the first three gelatin flavors separately, using 1 cup of boiling water and 1/2 cup of ice-cold water for each flavor.
  • Pour each flavor into an 8-inch square pan. Chill overnight to make sure they are really set and firm.
  • Then combine the lemon gelatin, the white sugar, and the last cup of boiling water.
  • Stir the gelatin until fully dissolved.
  • Add the pineapple juice, stir thoroughly, and chill until this mixture is slightly thickened.
  • Prepare the whipped topping (Dream Whip) as directed on the package.
  • Blend with the lemon gelatin mixture.
  • Cut the different flavors/colors of gelatin into 1/2 inch squares.
  • Fold in the gelatin cubes and pour into your bowl or individual cups.
  • Chill for at least 2 hours and top with more whipped topping. Enjoy.

How do I store the Jell-O salad?

I stored mine in an airtight Tupperware-type container with a lid, then placed in my fridge.

What can I serve with it?

  • Roast beef dinner
  • Chicken meal
  • Pulled pork sandwiches
  • Cheese and crackers
  • Grilled cheese sandwiches

Can I use Sugar-Free Jell-O?

Yes, you can. I’ve made it with Sugar-free Jell-O, and it tastes great. The bonus is fewer calories!

Can I use REAL whipping cream instead of Dream Whip?

Absolutely, I just made the recipe as it was made in the 1960s. I love fresh whipping cream. Simply substitute 2 cups of Dream Whip with 2 cups of fresh whipped cream.

Can I substitute Cool Whip for the Dream Whip?

I actually have made it with Cool Whip. It’s one less step since you don’t have to make the Dream Whip.

Is it possible to use different Jell-O flavors?

This is what’s so fun about this recipe. If you want to make it for Valentine’s Day, use raspberry, cherry, or strawberry Jell-O. You can use lemon or orange for Thanksgiving Day. Try lime-flavored Jell-O for St. Patrick’s Day. Use your imagination; kids love this salad. They love to dig for the “jewels.”

Can I make it a dessert?

Actually, this salad can be made into a dessert by making a graham cracker crust. You can make it a loaf dessert or a pie. Truth be told, although it’s called a salad, we’ve more often than not eaten it for dessert!

Where did Jell-O come from?

I was curious to see where Jell-O originated. Some research taught me that a fellow named Peter Cooper developed a less labor-intensive process for making gelatin. He patented it as a gelatin dessert in 1845. Side note: he also invented the locomotive “Tom Thumb.”

It wasn’t commercially successful until 1895, when Pearle B. Wait, who had developed a cough syrup, developed and patented a “packaged food product” he called Jell-O. The company was sold to Genesse Pure Food Company in 1899, and they began an aggressive ad campaign that put Jell-O on the map. It was eventually sold to the company that became Kraft Foods.

There are several reasons Jell-O is so well-known and popular:

  • It’s really easy to make.
  • It’s very inexpensive, particularly when making a dessert.
  • There are so many flavors available.
  • It was aggressively advertised with celebrities such as Jack Benny and Bill Cosby.
  • The product line continued to expand into other dessert options, such as pudding. Jell-O molds made the product more versatile, since you could create shapes like animals, letters, cartoon characters, and toy cars.
  • People discovered that it was great in salads too.
  • It has its own Jell-O Gallery Museum in LaRoy, New York.

There’s something wonderfully nostalgic about a Three-Color Jell-O Salad. This vibrant, wiggly salad/dessert, layered in pastel reds, sunny yellows, and cool greens, has stood the test of time, gracing potluck tables, holiday spreads, and family reunions for generations. But what makes this classic so irresistibly popular even today? Let’s dive into why people still love it!

A Slice of Americana

The Three-Color Jell-O Salad became a symbol of mid-century American dining. In the 1950s and 1960s, gelatin dishes were a sign of creativity and modern homemaking. Layering colorful Jell-O was seen as both fancy and fun—a way to impress guests without breaking the bank.

A Nostalgic Treat That Brings People Together

For many, this salad isn’t just dessert; it’s a memory. It reminds us of grandma’s kitchen, Sunday dinners, and festive family gatherings. Each colorful layer tells a story of comfort and community. It’s a dessert that sparks conversation and smiles.

A Feast for the Eyes

Let’s be honest; half the charm of a Three-Color Jell-O Salad is how beautiful it looks! The contrast of jewel-toned layers, often topped with whipped cream or fruit, makes it a standout centerpiece at any table. It’s simple, but it shines. Refreshing and Light.

Unlike heavy desserts, Jell-O salad offers a light, refreshing finish after a big meal. The fruity flavors, creamy layers, and cool texture make it especially popular during the warmer months or at holiday buffets.

Easy to Customize

Every family has its twist—some add crushed pineapple, cream cheese, or even cottage cheese between layers. It’s endlessly adaptable, making it a fun recipe to customize.

Fresh Cranberry Salad Recipe

Final Word

The Vintage Three-Color Jell-O Salad remains popular because it’s more than just a recipe; it’s heritage served on a plate. With its cheerful colors, nostalgic flavor, and simple joy, it connects generations and makes any occasion a little more special.

Jell-O has particular significance here in Utah, where I live. For several years, it has been the state with the highest per-capita consumption of Jell-O. I’m not sure if that’s due to the large families here, the population’s need for daily sugar, or our love of getting together with friends and family.

Let me know if you make this vintage three-color Jell-O salad. It’s all about teaching our kids and grandkids how to cook from scratch. May God bless this world, Linda

The post Vintage Three-Color Jell-O Salad appeared first on Food Storage Moms.


from Food Storage Moms

How to Get Your Family Into Prepping This Holiday Season (Without Scaring Them Off)

Every prepper knows the feeling. You’ve got water stored, a pantry that could last months, and a plan for when the power goes out, but the people you love most think it’s a strange hobby at best.

The holidays are your best shot at changing that. Families are together, people are already thinking about gifts, and winter weather gives you a natural, non-scary reason to talk about being ready.

The trick is to do it without the doom talk. Here’s how to bring your family on board one small, practical step at a time.

Why the Holidays Are the Perfect Time

Holiday gatherings are one of the few times of year when the extended family is in one room long enough to have a real conversation. That matters when your siblings live in three different states and your parents are getting older.

Winter also does the selling for you. Ice storms, blizzards, and holiday travel delays are things everyone has lived through, so you’re not asking anyone to imagine a collapse. You’re asking them to remember the last time the power went out for two days.

Gift-giving gives you a built-in excuse, too. A well-chosen gift says “I care about you” while quietly filling a gap in someone’s preparedness.

Start the Conversation the Right Way

How you bring it up matters more than what you say. Most people tune out the moment prepping sounds like fear, politics, or a sales pitch.

Lead With Stories, Not Scenarios

Skip the EMP lectures and the economic collapse predictions. Instead, ask about real experiences: the ice storm a few winters back, the night Grandma’s furnace quit, or the cousin who got stuck on the interstate overnight.

Let them tell the story, then ask one simple question. “What would have made that easier?” opens the door better than anything you could say.

Use Language Normal People Use

Words like “SHTF,” “bug out,” and “TEOTWAWKI” make non-preppers picture bunkers and gas masks. Try “emergency kit,” “power outage plan,” and “being ready for winter storms” instead.

The goal is the same either way. You’re just meeting people where they are.

Respect Where Each Person Is

Your brother who hunts may be halfway there already. Your sister-in-law in a downtown apartment may only care about getting home from work if the trains stop running.

Tailor the conversation to their life, not yours. A plan that fits how someone actually lives is a plan they’ll keep.

Give Gifts That Quietly Build Preparedness

The best prepping gifts don’t look like prepping gifts. They’re useful year-round, so they get used, kept handy, and appreciated long before an emergency ever happens.

Stocking Stuffers Under $25

Small gifts are an easy, low-pressure starting point. A quality LED headlamp gets used every week, and a portable power bank keeps a phone alive through an outage. For help choosing one, see our guide on portable phone chargers that still work when the grid goes down.

Other good picks include a compact multitool, a personal water filter, or a pack of emergency mylar blankets for the car. None of these scream “doomsday,” but each one fills a real gap.

Bigger Gifts for the People You Worry About Most

For parents, grandparents, or anyone living alone, a hand-crank emergency weather radio is one of the most useful gifts you can give. Look for one that receives NOAA Weather Radio All Hazards, which broadcasts official warnings around the clock from the nearest National Weather Service office.

A roadside emergency car kit makes a great gift for teens, college students, and anyone who drives in winter. Pair it with a warm blanket, some snacks, and a short note listing what’s inside.

If you want more ideas, Prepper Press’s Christmas gift ideas for preppers covers a wide range of gear for every budget, from small stocking stuffers to bigger-ticket items. It’s a solid list whether you’re shopping for a seasoned prepper or someone just getting started.

Gifts of Skill and Time

Some of the best gifts don’t come in a box. A coupon for a day of canning together, a first aid or CPR class, or an afternoon on the range or the trail builds skills and memories at the same time.

Books work well too, especially for readers who would never pick up a survival manual. A good survival novel often does more to get someone thinking than any lecture.

Build a Starter Kit Together

If someone shows interest, offer to help them build a basic kit. FEMA’s Ready.gov recommends a basic disaster supplies kit with water, several days of non-perishable food, a flashlight, a first aid kit, a battery-powered or hand-crank radio, and a phone charger with a backup battery.

Make it a project, not a lecture. Spend an afternoon shopping together, then pack everything into a plastic bin and decide where it lives.

Water is the piece most people skip. The CDC recommends storing at least 1 gallon of water per person per day for at least 3 days, and a 2-week supply if possible, so a few cases of bottled water make a surprisingly meaningful gift.

Make a Simple Family Plan Over the Holidays

While everyone is together, take 20 minutes to agree on the basics. Who is the out-of-town contact everyone calls or texts, and where does the family meet if a neighborhood has to evacuate?

Decide who checks on Grandma if the power goes out, then write it all down and give everyone a copy. Remind people that a text message often gets through when a phone call won’t.

Older relatives deserve special attention. FEMA’s preparedness guidance for older adults recommends that at least one person in their support network has a spare key, knows where their emergency supplies are, and knows how to help with their medicine or medical equipment.

Keep It Fun and Low-Pressure

Turn preparedness into a family activity instead of a drill. A “blackout night” with board games, flashlights, and a camp-stove dinner will show you more about your gaps than any checklist.

Get the kids involved, too. Let them pack their own flashlight and a favorite snack in a small backpack, and they’ll be the ones reminding the adults to check the kit.

Don’t push if someone isn’t ready. Plant the seed, give a useful gift, and let them come to you, because plenty of people get on board right after their first real outage.

Common Mistakes to Avoid

Don’t gift expensive gear to people who don’t want it, because it usually ends up buried in a closet. Don’t scare kids with worst-case scenarios they’re too young to process. And don’t turn holiday dinner into a debate, since nothing kills interest faster than feeling cornered.

Be careful about oversharing, too. If the whole extended family knows about your stockpile, you may become everyone else’s plan when things go wrong.

If you’re helping someone start from scratch, keep it simple. Our 10 Commandments of Lazy Prepping is a good reminder that small, steady steps beat big, stressful ones.

The Bottom Line

You can’t force anyone to prepare, but you can make it easy, practical, and even fun. The holidays hand you the perfect opening, so use it.

Start with one conversation, one useful gift, and one simple plan. A family that’s a little more prepared this winter is a family that’s a lot safer when the next storm hits.


You may also like:

NASA black outIf You See This Plant, Whatever You Do Don’t Touch It!

A Simple Trick For When You’re Running Out of Water (video)

31 Cool DIY Projects for Preppers

16 Wild Edibles You Didn’t Know You Could Forage For

How to Make Delicious Biltong with 1 Year-Shelf Life


The post How to Get Your Family Into Prepping This Holiday Season (Without Scaring Them Off) appeared first on Ask a Prepper.


from Ask a Prepper https://ift.tt/i38Jr9z