Estimated reading time: 11 minutes
Pre-packaged freeze-dried meals are convenient, but they're also very expensive. Plus, they're usually loaded with sodium and full of artificial ingredients. Fortunately, you don't have to rely on them. With a home freeze dryer, you can preserve your own homemade meals.
I won't lie. A home freeze dryer is a significant investment, but once you have one, you can freeze dry anything you want, exactly the way you like it, with ingredients you trust, at a fraction of the cost. Then your favorite meals can sit in the pantry for years, waiting for the day you need them.
The five recipes below come from Petrina at the YouTube channel Homegrown Florida, where she made a full batch of ready-to-eat freeze-dried meals ahead of an extended RV trip. These are real, everyday recipes you probably already make, adapted with a few key tips to help them freeze-dry beautifully. You can watch her make them and read the recipes below.
Want to save this post for later? Click Here to Pin It On Pinterest!
Before You Start: Tips That Apply to Every Recipe
Before diving into the individual recipes, keep these fundamentals in mind. They apply across the board and will make the difference between a meal that rehydrates well and one that doesn't.
- Minimize fat. Fat does not freeze-dry well and can cause food to spoil inside the bag. Use the leanest cuts of meat you can find (at least 93/7 for ground beef), and after cooking any meat, rinse it with hot water to remove as much residual fat as possible. When boiling chicken thighs, the fat releases into the water and also peels off easily once cooked.
- Cut vegetables small. Dice all vegetables small and uniformly. Smaller pieces freeze-dry faster and more evenly. Larger chunks increase the risk that the center won't fully dry, which can lead to spoilage once sealed.
- Cook pasta and noodles al dente. Any grain or noodle will be rehydrated with hot water later, which effectively cooks it a second time. Cook pasta and egg noodles slightly underdone so they don't turn to mush when reconstituted.
- Weigh your trays. Harvest Right recommends keeping each tray between 2 and 2½ pounds. Overloading trays extends drying time and can result in uneven results. Use a kitchen scale and weigh as you fill.
- Let it run long enough. Check trays every 4–6 hours by weighing them. As long as they're still losing weight, there's still moisture in the food. When the weight stabilizes, the food is done. When in doubt, let it run a few more hours — it's better to over-dry than under-dry.
- Store in mylar bags with oxygen absorbers. Gallon-size mylar bags fit about one full tray of food. Seal with a heat sealer and include a 300–700 CC oxygen absorber per bag. Properly sealed this way, freeze-dried meals can last up to 30 years. Glass jars with vacuum-sealed lids also work, though they won't achieve quite the same shelf life.
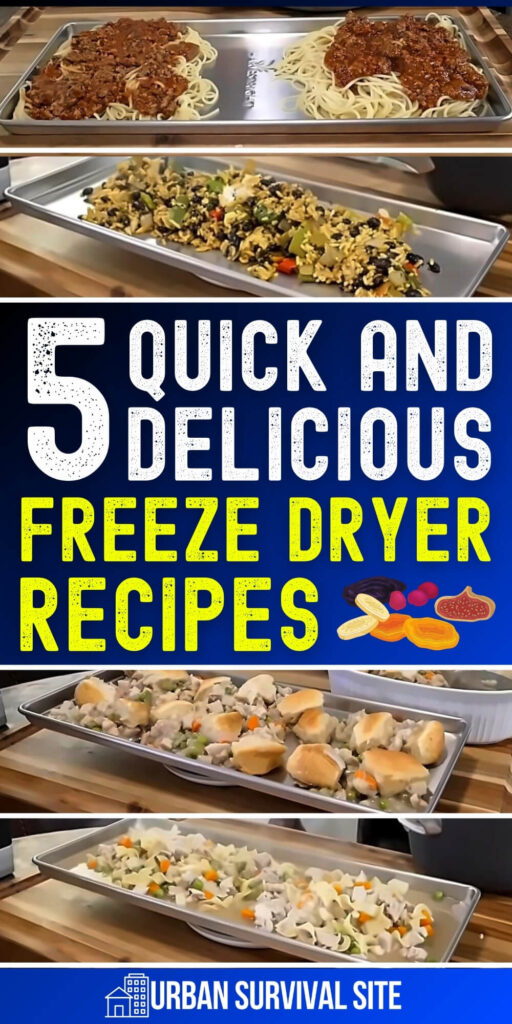
Recipe 1: Spaghetti and Meat Sauce
This is a campsite classic and one of the most satisfying meals to have freeze-dried and ready to go.
Ingredients:
- Lean ground beef (93/7 or leaner)
- Your favorite pasta sauce
- Spaghetti noodles
Instructions:
- Brown the ground beef over medium-high heat, breaking it up as it cooks.
- Once fully cooked, drain the fat completely. Then rinse the meat thoroughly under hot running water to remove as much remaining fat as possible. Set aside.
- Cook the spaghetti noodles separately in boiling salted water. Pull them out when they are noticeably al dente, slightly underdone with a firm bite. They will soften further during rehydration.
- Combine the rinsed ground beef with your pasta sauce and stir to combine.
- On your freeze dryer trays, layer the spaghetti noodles and top with the meat sauce, or mix them together. Aim for 2 to 2½ pounds per tray.
- Freeze dry according to your machine's instructions, checking every 4–6 hours. The spaghetti may need extra time, so let it run until it stops losing weight.
- Once done, portion into quart-size mylar bags (one serving per bag works well here), add an oxygen absorber, and heat seal.
To rehydrate: Add hot water and let sit for several minutes, or heat with water on the stovetop until the noodles are tender and the sauce is warmed through.
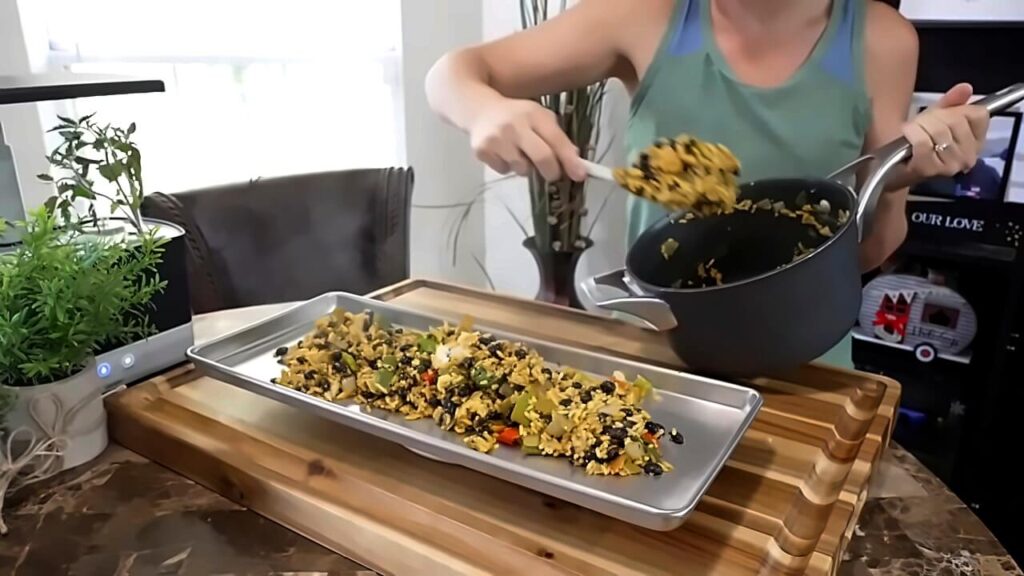
Recipe 2: Chicken Noodle Soup
Comfort food at its finest, and a natural fit for freeze drying thanks to its simple, low-fat profile.
Ingredients:
- Chicken thighs
- Carrots, diced small
- Celery, diced small
- Onion, diced small
- Potatoes, diced small
- Peas (fresh or frozen)
- Homemade or store-bought chicken broth
- Egg noodles
- Salt, pepper, garlic powder, onion powder
Instructions:
- Boil the chicken thighs in a pot of water until fully cooked through. Boiling (rather than roasting or pan-frying) helps release fat into the water and makes it easier to remove remaining fat from the surface of the meat.
- Once cooked, remove the chicken from the water and dice it into small, bite-size pieces. As you cut, peel away and discard any visible fat, it should come off easily at this stage.
- In a large pan or pot, sauté the diced carrots, onion, and potatoes in a small amount of chicken broth rather than butter or oil to keep fat content low.
- Add the celery and peas and continue cooking until the vegetables begin to soften.
- Season with salt, pepper, garlic powder, and onion powder to taste.
- Cook the egg noodles separately in boiling water. Because egg noodles cook very quickly, watch them closely and remove them while still very al dente.
- Add the diced chicken back into the vegetable mixture.
- On your freeze dryer trays, spread the soup base and cooked egg noodles together or in separate sections. Keep in mind that you don't need to use a heavy amount of broth. The meal can be reconstituted with water or additional broth later. Aim for 2 to 2½ pounds per tray.
- Freeze dry until fully dry and trays stop losing weight.
- Seal in gallon-size mylar bags with an oxygen absorber.
To rehydrate: Add boiling water or warm broth to the bag or a bowl, cover, and allow to sit for 5–10 minutes. Adjust liquid to your desired consistency.
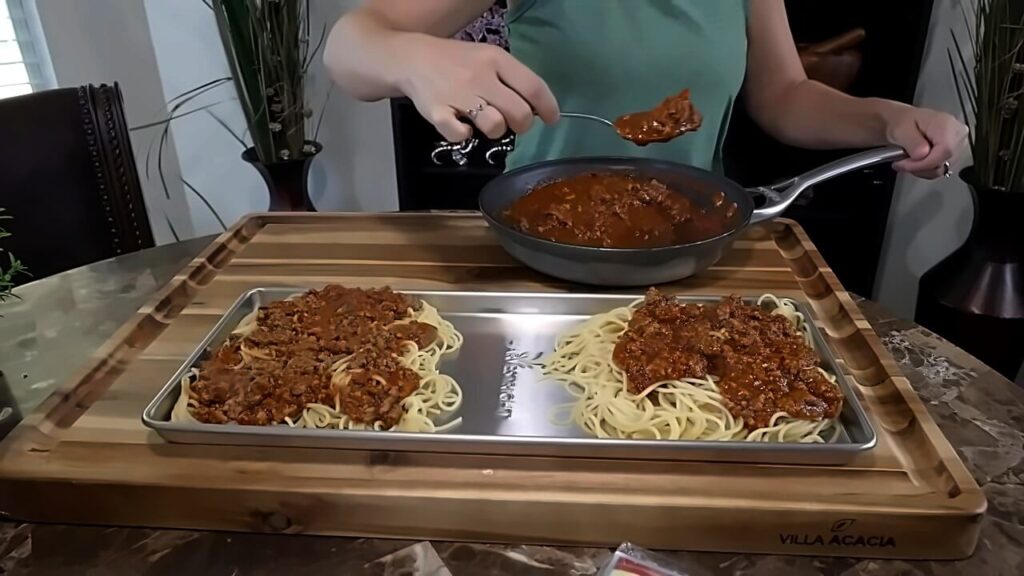
Recipe 3: Rice and Beans
A hearty, meat-free option that's high in protein and freezes beautifully. This is a great base recipe. It's simple and easy to customize.
Ingredients:
- 3 cups cooked white rice
- Cooked black beans (home-canned or store-bought)
- Hot and sweet peppers, diced (fresh or frozen)
- Chicken or vegetable broth (small amount)
- Sazón seasoning
- Salt and pepper
Instructions:
- Cook the rice according to package directions and set aside. (Tip: if you're making multiple recipes, cook all the rice at once and divide it between them.)
- In a skillet, sauté the diced peppers until slightly softened.
- Add the cooked black beans to the pan and stir to combine.
- Add the cooked rice and a small splash of broth to loosen the mixture.
- Season with Sazón, salt, and pepper. Taste and adjust. You can also add cayenne, adobo, or any other spices you prefer.
- Transfer to freeze dryer trays, weighing to stay within 2 to 2½ pounds per tray.
- Freeze dry until done. Rice tends to freeze dry relatively quickly.
- Seal in gallon-size mylar bags with an oxygen absorber.
To rehydrate: Add hot water and stir. Let sit a few minutes until the rice has absorbed the liquid and is warmed through.
Recipe 4: Unstuffed Peppers
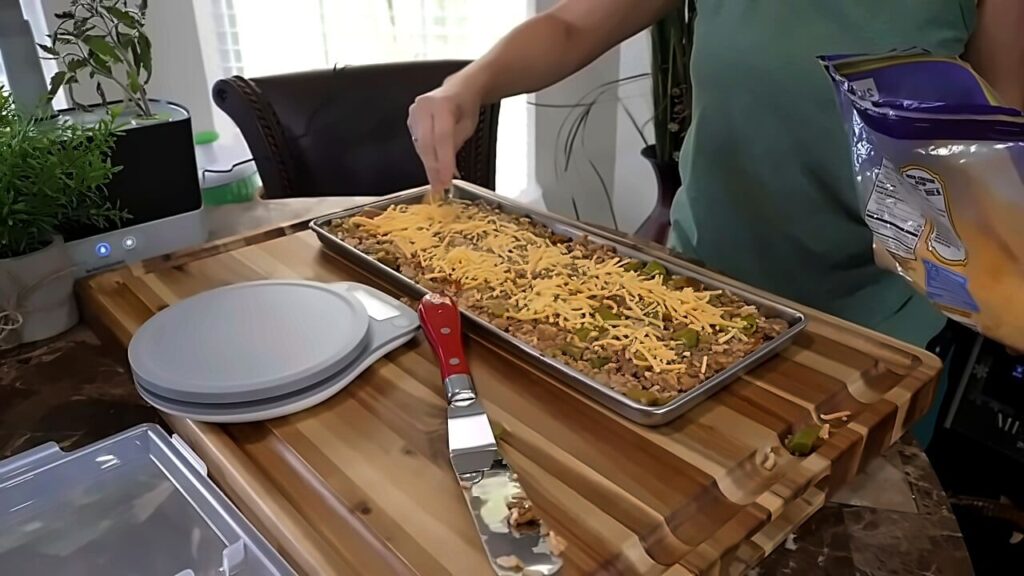
All the flavor of classic stuffed peppers without the fuss of stuffing whole peppers, and it freeze-dries perfectly.
Ingredients:
- Sweet peppers (about 2 cups), diced
- 1 pint stewed tomatoes with juices
- Cooked lean ground beef (rinsed of fat, same as used in the spaghetti recipe)
- Cooked white rice
- Shredded cheese
- Cumin, adobo seasoning, salt and pepper
Instructions:
- In a large skillet, combine the diced sweet peppers and stewed tomatoes (with their juices).
- Add the cooked, fat-rinsed ground beef and cooked rice. Stir everything together.
- Season with cumin, adobo, salt, and pepper to taste.
- Transfer the mixture to freeze dryer trays, weighing to stay within 2 to 2½ pounds per tray.
- Add shredded cheese on top of each tray. You don't need to mix it in; layering it on top works fine.
- Freeze dry until fully dry.
- Seal in gallon-size mylar bags with an oxygen absorber.
To rehydrate: Add hot water and stir gently. Let sit until the rice softens and the mixture is warmed through. The cheese will reincorporate into the dish.
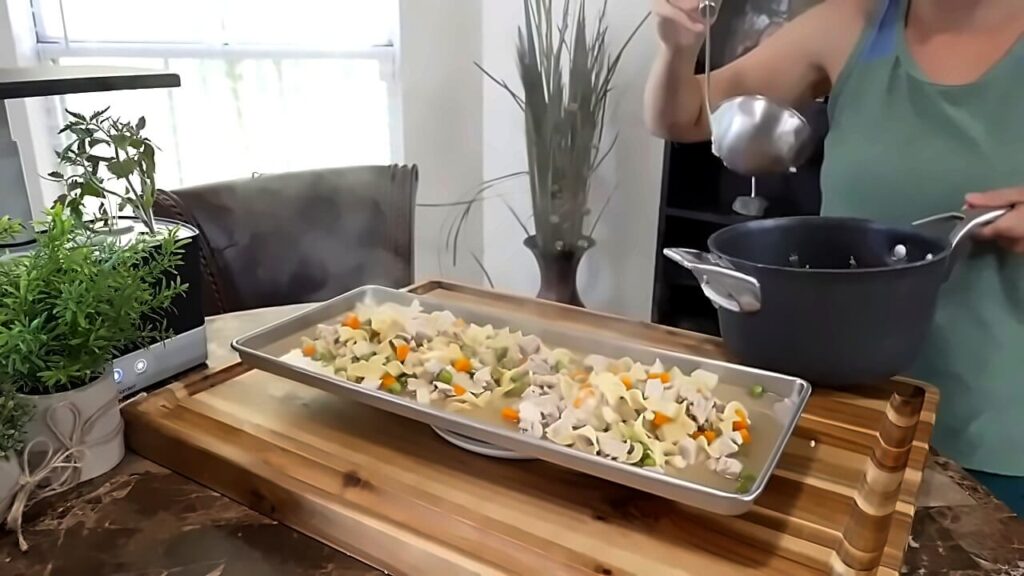
Recipe 5: Chicken and Dumplings
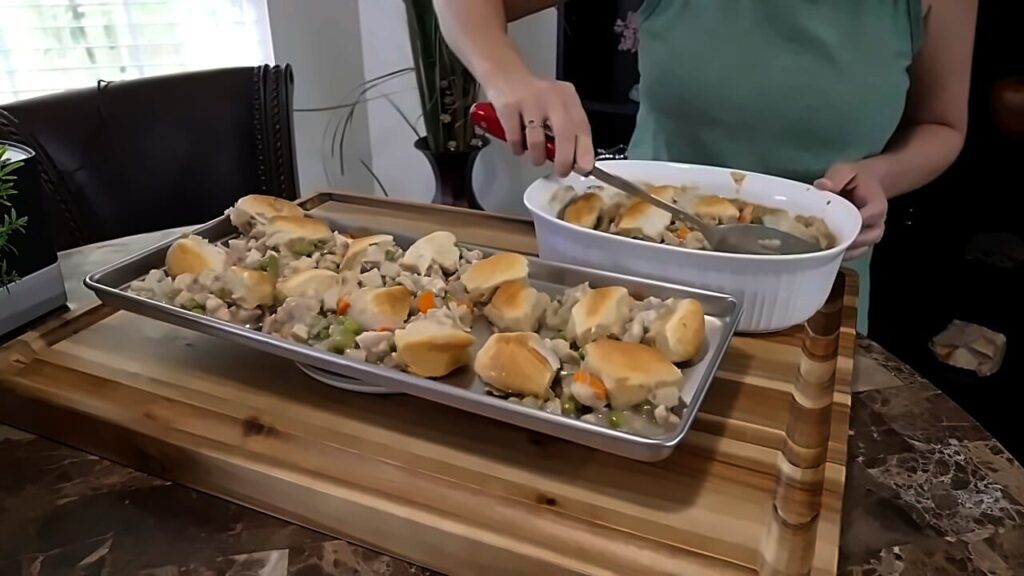
This one is a thick, hearty stew with actual biscuit dumplings that hold their shape through the entire freeze-drying process.
Ingredients:
- Cooked chicken thighs, diced (same batch used for the soup)
- Carrots, diced small
- Celery, diced small
- Onion, diced small
- Peas (frozen, added at the end)
- 1/3 of the usual amount of butter (or substitute a bit of oil)
- About ½ cup flour
- Chicken broth
- Canned or homemade biscuit dough (for dumplings)
Instructions:
- In a large oven-safe skillet or Dutch oven, melt a small amount of butter over medium heat. Add the diced carrots, onion, and celery and cook until beginning to soften.
- Sprinkle about ½ cup of flour over the vegetables and stir to coat. Let the flour cook in the pan for 1–2 minutes.
- Add a splash of chicken broth to deglaze, stirring continuously, then gradually add more broth until the mixture forms a thick stew base.
- Let the mixture cook and thicken over medium-low heat. It may take a bit longer to thicken than you expect, so be patient.
- Once the base is thickening, stir in the frozen peas (add these last so they don't turn to mush).
- Add the pre-cooked, diced chicken. Since it's already cooked, it just needs to be incorporated — no additional cooking is needed.
- Pour the entire mixture into a baking dish.
- Add biscuit dough pieces on top in the dumpling style. Either homemade biscuits or canned biscuit dough works. Place them while still raw.
- Bake at 350°F for 30–35 minutes until the biscuits are golden and cooked through.
- Allow the entire dish to cool completely before freeze drying. Hot food will result in a thin, soupy texture. Once cooled, the filling should be thick and casserole-like.
- Place the stew portion on freeze dryer trays. For the biscuits, separate them from each other before placing them on the tray. This prevents them from fusing together and crumbling apart. Place each biscuit with space between them.
- Freeze dry until done. Biscuits freeze-dry similarly to bread, quickly and thoroughly. The stew base may take a bit longer.
- Once done, carefully remove the whole biscuit pieces and pack them along with the stew base into quart-size mylar bags, being careful not to break up the biscuits. Add an oxygen absorber and seal.
To rehydrate: Add hot water to the stew portion and let sit until the filling is reconstituted and thick. Add the biscuit pieces last so they don't over-saturate.
Loading the Freeze Dryer
When loading multiple trays at once, placement inside the machine matters. The center slots tend to freeze-dry most efficiently, so place the items you expect to take longer (like soups and dishes with a lot of liquid) in the middle positions. Denser or drier items like rice-based dishes can go on the top and bottom shelves.
Petrina ran all five meals in a single 44-hour cycle, though she suspects they were done somewhat earlier. Her advice: check regularly, weigh your trays, and let the machine keep running until the weight completely stabilizes. A little extra time costs nothing; pulling food too soon can cost you the whole batch.
Making your own freeze-dried meals takes a little planning and prep time, but the payoff is huge: real food, real flavor, and shelf life that can outlast any store-bought pouch. Once you have the equipment and get comfortable with the basics, the recipes are limited only by what you love to cook.
Like this post? Don't Forget to Pin It On Pinterest!
You May Also Like:
The post 5 Quick and Delicious Freeze Dryer Recipes appeared first on Urban Survival Site.
from Urban Survival Site
No comments:
Post a Comment